Contents
Introduction to SAP HANA and BACKINT interface
SAP HANA is a complete relational database and suite of accompanying management tools to store, recover, manipulate, and analyze data. Like any good RDBMS it provides advanced tools for analytics and analysis, and also functions to allow data to be backed up into a standardized format and recovered easily and accurately into a new database when necessary.
“Backint”, on the other hand, is the name of the SAP HANA API that allows for a direct connection between SAP HANA database and third-party backup agents. This facility aims to ensure there are no interruptions between a database and a backup agent, making it easy for backups to be transferred via the SAP HANA database to a third-party backup server with the help of that same third party’s backup agent.
This kind of integration results in two different operation categories – in-depth backup agent parameter configuration with the help of the SAP HANA cockpit, and the actual execution of either backup or recovery processes using that same cockpit (via SAP HANA SQL commands).
Since backint offers direct access to a SAP HANA database, it is only natural for SAP HANA to have a list of vendors that are certified to create and recover backups of a SAP HANA database using backint. Bacula Enterprise is a part of this list, along with some well-known names in the field, such as EMC, IBM, HP, Veritas, and more.
This article details the process of SAP HANA backup and recovery with the help of Bacula Enterprise’s multifunctional SAP HANA backup plugin leveraging the ‘backint’ interface. But first we’ll look at how SAP HANA backup and recovery process can be done using nothing but its own, built-in backup and recovery tools.
Native SAP HANA backup and recovery process
In addition to backint, there are other existing backup methods. SAP HANA offers three different approaches to backup jobs – the first one being the aforementioned backint, while the second and the third one are file system backup and snapshot, respectively.
Backint as a backup type has already been explained above – an API-based backup method that is capable of bringing a variety of features to regular backup jobs, including data encryption, data compression, and more.
The snapshot-based backup is a completely different approach to the same tasks, since it uses the ability to create snapshots to back up not only the current data, but also data that is still being worked on. Unfortunately, this is just about as far as a snapshot as a backup type can go – with no consistency checks, no third-party feature integration, etc.
A file system backup is probably the most common backup type, creating extra copies of the existing data using one of several different backup types (full, incremental, differential). File system backups can also be checked for consistency, which is a big advantage on its own. They can also place a rather large strain on the company’s internal network in the process of backup creation, and monitoring the storage level is essential to avoid missing out the entire days of backup due to your storage being full.
Since the backint backup type is the closest one to the file system backup type, we can compare the two to see how different they are in the way they approach backup as a job. With that being said, we would be starting with native SAP HANA file system backup process, explained step-by-step.
First of all, it’s important to mention that a person performing a SAP HANA backup would have to have either a “backup operator” or “backup admin” role assigned to their HANA database user account.
Knowing that your account has sufficient privileges, the first thing you’ll have to do is of course, to open up HANA studio and connect to the system that you want to make a backup of.
To start up the backup process you’ll have to right-click the system in question and choose the “Back Up System…” option.

By default the backup wizard launches with standard parameters for both “Backup destination” and “Backup prefix” fields. You can change the default backup destination path by modifying the “basepath_databackup” line in the global.ini file. The default value of this line is $(DIR_INSTANCE)/backup/data.
Of course, you can modify this specific operation’s backup destination, as well as the backup prefix, in the same first window of backup wizard that we’ve just opened.
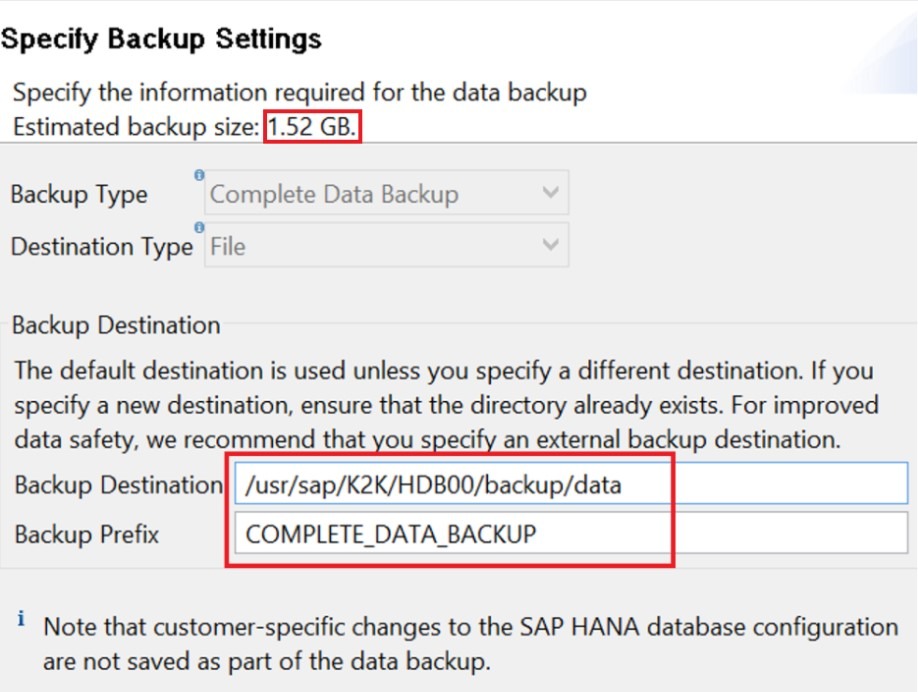
You can also see that the backup estimate can be seen from the first step of the backup process, close to the header of the wizard window. Clicking “Next” within this same window would lead you to the finalization screen that shows all of your future backup settings.
Clicking “Finish” in that window would start up the backup process. The entire process is also displayed in the separate wizard window, as follows:
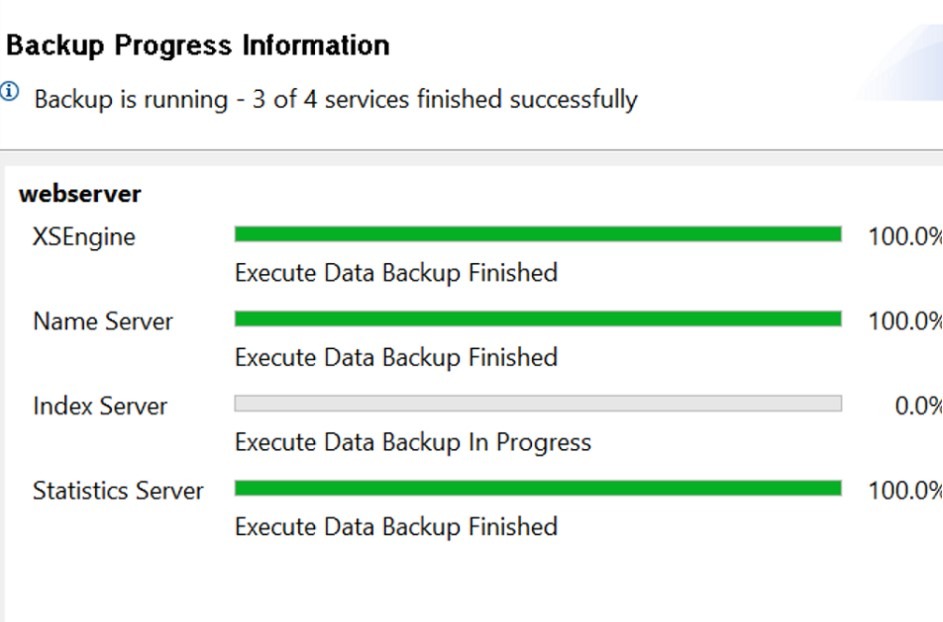
As soon as the backup process shows a complete 100% everywhere, the process is complete and the backup files are created. It’s also possible to double-check the creation of the backup files via the command line.
Another way of performing backups with only the most basic SAP HANA capabilities is via the SQL command and through the SQL console. The command itself is as follows:
BACKUP DATA USING FILE (*****);
The ***** part represents the target backup destination and should be entered with single brackets on both sides, for example – (‘/usr/backup/data’).
Recovery part of your SAP HANA backup and recovery process is relatively simple, as well. You’re starting up in the same way as the backup process, but looking for the “Recover System…” option instead.
The first choice that you’ll have in this process is the recovery type. SAP HANA backup and recovery built-in software supports three main recovery types:
- Most recent state. For this recovery option to work properly you’ll have to have an entire last backup and logs available to be able to restore it.
- Specific point in time. This option attempts to restore the backup that’s closest to the point in time that you’re choosing.
- Specific data backup. Gives you a list of currently stored backups, and you can restore any one of the ones that you have.
Choose whichever you want and click “Next” in this window.

In some cases you’ll have to confirm the location of the backup catalog, as well. As soon as you’re ready, click “Next”. You’ll receive a notification warning you about the need to stop the database in question to perform a restoration process.

Clicking “Ok” on this notification would stop the database in question and take you to the next screen. Next you’ll have to confirm both the last backup that’ll be restored and the location of the log backups. The last two screens that you’ll see before the restoration process begins are the “Other settings” window and the “Review Recovery Settings” window. Choosing “Finish” at the end of the “Review Recovery Settings” window would start up the recovery process.

The recovery process itself is split in three phases: data recovery, log recovery and database restart. After all three of the phases are done, you’ll be given the “Recovery Execution Summary” window about either success or a failure of the recovery process. Clicking “Close” on this window finishes up the recovery process for your SAP HANA database.
Third-party SAP HANA backup solutions
While SAP HANA does have its own backup measures, they are rarely convenient or easy to work with. This is where third-party backup solutions for SAP HANA appear, offering either alternative ways to perform database backups or more convenient ways to use existing methods. We are going to present a number of different SAP HANA backup solution examples in the list below.
Veeam

As a well-known software provider in the industry, Veeam is a versatile and powerful data protection solution with a variety of capabilities. It can cover physical storage, virtual storage, cloud storage, applications, SaaS data, although some would argue it has a strong emphasis on vSphere technology. Veeam’s feature set is extensive, including, but not exclusive to data deduplication, secure cloud storage, instant file-level recovery, and easy backup/recovery task management.
Veeam Data Platform is Veeam’s flagship solution for different use cases – it is split into multiple components, such as Cloud, Virtual & Physical, Backup & Recovery, Monitoring & Analysis, and Recovery Orchestration. There are also multiple plug-ins that provide additional functionality that may not be widespread enough to be a part of the main solution – and Veeam Plug-In for SAP HANA is one of these plug-ins. Veeam can integrate with SAP HANA’s Backint processing in order to forward backups to Veeam storage targets, it can also work with existing SAP workflows, provide multiple ways to restore backups and more.
Customer ratings:
- Capterra – 4.8/5 stars based on 69 customer reviews
- TrustRadius – 8.8/10 stars based on 1,237 customer reviews
- G2 – 4.6/5 stars based on 387 customer reviews
Advantages:
- Veeam’s first-time setup and configuration is relatively simple, very few customers have issues with it
- Veeam’s customer support team is quick and effective, providing helpful answers at a moment’s notice; the solution’s community forums can also be a great source of information about specific issues or features
- Most basic backup and restore tasks can be managed with ease by a person with any level of technical background, thanks to Veeam’s user-friendly interface
Shortcomings:
- Veeam may be a solution full of features and capabilities, but its interface does look a bit outdated, especially when used within a more modern operating system, such as Windows 11
- There is no information about the exact pricing of Veeam’s software, but there are plenty of customers reporting that some specific elements of the solution are priced significantly above most of the competitors for no particular reason
- Veeam is a powerful and feature-rich solution, but it does not have all of the solutions on the market – both Data Management and Cyber Resiliency are still considered weak spots of Veeam’s software
Pricing (at time of writing):
- There’s little to no official information about Veeam’s pricing that is available on the official website. The only way to receive the exact price for everything that your specific company needs is to request a personalized quote.
- Veeam has a pricing calculator page that lets users specify the number of different environments they want covered with Veeam’s solution, as well as the planned subscription period.
- This page can also be used to reveal basic information about Veeam’s pricing, such as:
- Veeam’s subscription can be purchased for at least one year in advance, and up to 5 years, with “multi-year contracts offering additional discounts”
- The workload selection screen offers one field for each of the following workload type: Virtual VM, Cloud VM, Servers, Workstations, M365 Users, NAS/File Shares (TB)
- The “Contact Us” button would not be available if only “NAS/File Shares” part is above zero
- Veeam sells licenses in increment of 5 at once, meaning that at least 5 licenses of one of the aforementioned categories have to be selected
- Protecting five workloads (either Virtual VM, Cloud VM, Server, or Workstation type) for a year costs $642
- “Microsoft 365” category is an exception, it requires at least 10 users to be selected at once, and the starting price for 10 users is $306
My personal opinion on Veeam:
Veeam is considered one of the most well-known backup software providers on the enterprise backup market. There are plenty of reasons for that, too – from many satisfied clients to a wealth of features Veeam’s software can offer to its customers. There is a separate plug-in dedicated to SAP HANA operations – it can integrate with SAP HANA Backint in order to forward backups to Veeam storage, it can restore these backups via Studio, Cockpit, or HDBSQL, and more. It is far from the cheapest solution on the market, but it may be well worth its price for bigger companies looking for a solution with plenty of features in a single solution. However, it may not be a good choice for organizations that require very high levels of security.
Cohesity

Cohesity may be one of the best-performing solutions on a bigger backup market, with its solutions being proclaimed leaders of independent review aggregator websites such as Gartner. There are multiple different backup solutions that Cohesity offers for different use cases, and there are two solutions that are considered its flagships – DataProtect and Data Cloud. DataProtect is a secure unified platform that helps accelerate and secure backups across different environments. Data Cloud is more of a cloud data management platform that helps users extract more value from their data.
Both solutions have the ability to integrate with SAP HANA data, working with existing SAP workflows and generating new ones when necessary. This solution takes full advantage of the Backint API in order to secure backups that are later transferred to secure storage and protected with all of Cohesity’s power. Cohesity’s SAP HANA capabilities are not particularly complex, but still impressive, with data encryption, quick backup times, and more.
Customer ratings:
- Capterra – 4.6/5 stars based on 48 customer reviews
- TrustRadius – 8.9/10 stars based on 59 customer reviews
- G2 – 4.4/5 stars based on 45 customer reviews
Advantages:
- Cohesity has a centralized management console that makes it easier to initiate and manage various backup and recovery-related tasks and processes
- Cohesity’s software is easy to set up and configure as a new user
- Online profiles and various scheduling options are developed quite well in Cohesity’s solutions, offering plenty of customization options to work with
Shortcomings:
- Performing calendar-based backups with Cohesity can be quite difficult, and there is no clear and concise way of doing it
- Cohesity does not have much to offer in terms of customer support, it often relies on standard replies and is not particularly helpful
- Cohesity’s update process is not exactly standardized and some updates can only be applied using a command line and nothing else
- There have been some reports of Cohesity being “buggy”.
Pricing (at time of writing):
- Cohesity’s pricing information is not publicly available on their official website and the only way to obtain such information is by contacting the company directly for a free trial or a guided demo.
- The unofficial information about Cohesity’s pricing states that its hardware appliances alone have a starting price of $110,000 USD
My personal opinion on Cohesity:
Cohesity is a popular backup company in the market. Both DataProtect and Data Cloud are versatile backup and recovery platforms with good scale and performance, aöthopugh there is limited support for legacy platforms. Cohesity’s SAP HANA integration works well with Backint API to provide security and versatility to SAP HANA backups on multiple levels. It has its issues with customer support and some specific features not being particularly accessible, but most of the solution’s capabilities still perform at their best and can satisfy all kinds of enterprise-level clients.
Commvault

Commvault is a comprehensive data protection platform that is fast, feature-rich, and competent. It is a well-known player in the backup and recovery market, offering both well-known and exclusive features for plenty of use cases. It works with VMs, databases, endpoints, and Cloud destinations. It can create backups of unstructured or structured data, move data from one cloud storage to another, offer pinpoint accuracy for all of its backups, etc.
Commvault has quite a lot to offer when it comes to SAP HANA backup and recovery – including array and cloud snapshot management, impact-free recovery copies, easy data migration, data governance, dev/test, long-term retention, etc. It can work with Backint backups and it can also perform its own hardware snapshots of SAP HANA data. Impact-free data protection and plenty of flexibility options are also included in this package.
Customer ratings:
- Capterra – 4.8/5 stars based on 9 customer reviews
- TrustRadius – 7.8/10 stars based on 207 customer reviews
- G2 – 4.2/5 stars based on 78 customer reviews
Advantages:
- Commvault is a scalable solution that serves some of the biggest IT infrastructures in the world
- Commvault can be integrated with a variety of different solution types, storage types, and even different service variations, if necessary
- It is relatively easy to configure backup tasks within Commvault’s solution
Shortcomings:
- Commvault shares a rather popular problem of large backup solutions in the form of its reporting features not being as descriptive as they could be
- There are many integrations that Commvault can offer, but there remain some storage types unsupported, and some Hypervisor types are also not covered
- Commvaults otherwise wide functionality comes at a cost – the solution is not exactly user-friendly and has a steep learning curve for most of its feature set
- The user interface could be improved
Pricing (at time of writing):
- Commvault’s pricing information is not publicly available on their official website and the only way to obtain such information is by contacting the company directly for a demo showcase or a free 30-day trial.
- The unofficial information suggests that Commvault’s hardware appliances’ price ranges from $3,400 to $8,781 per month.
My personal opinion on Commvault:
Commvault is an impressive backup and recovery platform with a good feature range. It integrates with a number of different storage types and data variations. Most of its integrations are quite deep, too – such as its SAP HANA integration, which offers two different backup types, multiple restoration methods, extensive data protection, a lot of customization options, and more. The price can become very expensive, though.
Rubrik

Rubrik is a relatively young company by this market’s standards – and yet, it is already a well-known backup and recovery platform with a rather unique approach to the entire field. Rubrik uses its own technologies to combine hardware and software in a single effective data protection solution that can manage information and protect it at the same time. It can work with physical and cloud environments, as well as everything in-between, as well.
Rubrik is a certified third-party backup tool for SAP HANA, it is fully integrated with the Backint API, it can restore backups with either SAP HANA Studio or Cockpit, and there are plenty of other Rubrik features that can be applied to SAP HANA backups. This includes flexible deployment rules, a zero-trust approach to security, and more.
Customer ratings:
- Capterra – 4.7/5 stars based on 45 customer reviews
- TrustRadius – 9.1/10 stars based on 198 customer reviews
- G2 – 4.6/5 stars based on 59 customer reviews
Advantages:
- Rubrik is often considered one of the more secure solutions – due to a good number of different security-oriented features
- There are also plenty of features related to actual backup functionality, such as the ability to work with different storage types – applications, databases, virtual machines, physical servers, etc.
- It is fast and versatile, offering low RTOs in many cases
Shortcomings:
- Rubrik’s RBAC capabilities are not particularly detailed or customizable, they’re very basic, lacking most features that competition tends to offer
- Rubrik is another solution on a rather long list of enterprise-grade software that only has very basic reporting capabilities with very few details
- Technically speaking, Rubrik should be suitable for all company sizes, but its average price makes it less accessible for most SMBs
- Support quality has sometimes been ciriticized
Pricing (at time of writing):
- Rubrik’s pricing information is not publicly available on their official website and the only way to obtain such information is by contacting the company directly for a personalized demo or one of the guided tours.
- The unofficial information states that there are several different hardware appliances that Rubrik can offer, such as
- Rubrik R334 Node – from $100,000 for a 3-node with 8-Core Intel processes, 36 TB of storage, etc.
- Rubrik R344 Node – from $200,000 for a 4-node with similar parameters to R334, 48 TB of storage, etc.
- Rubrik R500 Series Node – from $115,000 for a 4-node with Intel 8-Core processors, 8×16 DIMM memory, etc.
My personal opinion on Rubrik:
Rubrik is a relatively young solution that packs a lot of different features in it. It can work with different types of deployments, it can offer extensive security features, and there are also plenty of backup-related features, as well. It is also an officially licensed SAP HANA third-party backup solution that supports Backint API, Cockpit, Studio, and plenty of security features that Rubrik can apply to exported SAP HANA backups. Its backup and recovery features for SAP HANA may be somewhat basic, but the wealth of security and backup features compensates for it quite a lot.
Quest NetVault Plus

As a software solution provider, Quest has been around since 1987, offering different kinds of software to improve cybersecurity, streamline IT workflows, and simplify data management. Quest offers numerous solutions that can accommodate the needs of many different companies and storage types, from physical disk storage to databases, applications, and more. One good example of such software is Quest NetVault Plus – a cloud-ready enterprise backup solution that protects data from ransomware, minimizes storage costs, and offers plenty of backup/recovery capabilities.
Quest NetVault Plus is a SAP-certified solution that has plenty to offer for SAP HANA specifically. It supports SAP HANA Cockpit/Studio/HDBSQL to provide direct access to backup and recovery tasks directly from SAP HANA. It can offer full, incremental, and differential backups, as well as log backups with automation features. It is fast, secure, scalable, and reasonably secure – with FIPS 140-2 certification, multiple encryption levels, fast replication and disaster recovery times, and many other features.
Key features:
- FIPS 140-2 certification and support for AES-256, CAST-256, and CAST-128 encryption
- Multiple backup and recovery scenarios, support for full, incremental, differential, and log backups
- Drastically reduced storage requirement for backups, accelerated data ingestion rates
Pricing (at time of writing):
- There is no public information about the pricing of Quest NetVault Plus available on the official website, it seems that the customer would have to contact the company directly and request a quote in order to receive this kind of information
My personal opinion on Quest NetVault Plus:
Although Quest has its share of clients in different fields, there are plenty of competitors that are on a completely different level regarding scope. However, that doesn’t mean that its features or capabilities are not good. Quite the contrary, Quest’s solutions tend to offer plenty of functions for different use cases – such as Quest NetVault Plus, which is a comprehensive enterprise-grade backup solution that works with all kinds of different storage types (including SAP HANA), offering a wealth of features for convenience, security, streamlined management, and more, although cloud backup can be limited.
Druva for SAP HANA

Druva can be considered a well-known software provider in the overall backup and recovery market, with plenty of features and solutions for different storage types and systems. Most of its solutions are connected with the flagship platform Druva Data Resiliency Cloud in one way or another. Data Resiliency Cloud is a data governance solution that also offers data management and protection features to all Druva modules in a single location.
Druva also has a completely separate backup agent for SAP HANA deployments, offering impressive data resiliency to SAP HANA solutions. Druva is an officially certified third-party backup solution for SAP HANA, allowing for a proper Backint API integration, as well as extensive scaling, support for Studio/Cockpit/HDBSQL for both backup and recovery operations, and integration with Data Resiliency Cloud for data protection and secure storage, among other benefits.
Customer ratings:
- Capterra – 4.5/5 stars based on 204 customer reviews
- TrustRadius – 7.8/10 stars based on 133 customer reviews
- G2 – 4.3/5 stars based on 668 customer reviews
Advantages:
- Druva’s customer support is effective and typically responds within a short time period, making it extremely useful in any situation
- Druva’s unified GUI is often praised for being easy to work with and also convenient, with quick access to necessary features
- There are also plenty of security-related features that Druva can offer, with the entire Data Resiliency Cloud solution being focused on data protection first and foremost
Shortcomings:
- Some specific features of Druva can be rather basic and barely customizable
- Data restoration from cloud is often slow and inconvenient
- Initial configuration and setup process can be somewhat complicated
- Customers with large data volume may struggle
Pricing (at time of writing):
- Druva’s pricing is fairly sophisticated and offers different pricing plans depending on the type of device or application that is covered.
- Hybrid workloads:
- “Hybrid business” – $210 per month per Terabyte of data after deduplication, offering an easy business backup with plenty of features such as global deduplication, VM file level recovery, NAS storage support, etc.
- “Hybrid enterprise” – $240 per month per Terabyte of data after deduplication, an extension of the previous offering with LTR (long term retention) features, storage insights/recommendations, cloud cache, etc.
- “Hybrid elite” – $300 per month per Terabyte of data after deduplication, adds cloud disaster recovery to the previous package, creating the ultimate solution for data management and disaster recovery
- There are also features that Druva sells separately, such as accelerated ransomware recovery, cloud disaster recovery (available to Hybrid elite users), security posture & observability, and deployment for U.S. government cloud
- SaaS applications:
- “Business” – $2.5 per month per user, the most basic package of SaaS app coverage (Microsoft 365 and Google Workspace, the price is calculated per single app), can offer 5 storage regions, 10 GB of storage per user, as well as basic data protection
- “Enterprise” – $4 per month per user for either/or Microsoft 365 or Google Workspace coverage with features such as groups, public folders, as well as Salesforce.com coverage for $3.5 per month per user (includes metadata restore, automated backups, compare tools, etc.)
- “Elite” – $7 per month per user for Microsoft 365/Google Workspace, $5.25 for Salesforce, includes GDPR compliance check, eDiscovery enablement, federated search, GCC High support, and many other features
- Some features here can also be purchased separately, such as Sandbox seeding (Salesforce), Sensitive data governance (Google Workspace & Microsoft 365), GovCloud support (Microsoft 365), etc.
- Endpoints:
- “Enterprise” – $8 per month per user, can offer SSO support, CloudCache, DLP support, data protection per data source, and 50 Gb of storage per user with delegated administration
- “Elite” – $10 per month per user, adds features such as federated search, additional data collection, defensible deletion, advanced deployment capabilities, and more
- There are also plenty of features that could be purchased separately here, including advanced deployment capabilities (available in the Elite subscription tier), ransomware recovery/response, sensitive data governance, and GovCloud support.
- AWS workloads:
- “Freemium” is a free offering from Druva for AWS workload coverage, it can cover up to 20 AWS resources at once (no more than 2 accounts), while offering features such as VPC cloning, cross-region and cross-account DR, file-level recovery, AWS Organizations integration, API access, etc.
- “Enterprise” – $7 per month per resource, starting from 20 resources, has an upper limit of 25 accounts and extends upon the previous version’s capabilities with features such as data lock, file-level search, the ability to import existing backups, the ability to prevent manual deletion, 24/7 support with 4 hours of response time at most, etc.
- “Elite” – $9 per month per resource, has no limitations on managed resources or accounts, adds auto-protection by VPC, AWS account, as well as GovCloud support and less than 1 hour of support response time guaranteed by SLA.
- Users of Enterprise and Elite pricing plans can also purchase Druva’s capability to save air-gapped EC2 backups to Druva Cloud for an additional price.
- It is easy to see how one can get confused with Druva’s pricing scheme as a whole. Luckily, Druva themselves have a dedicated webpage with the sole purpose of creating a personalized estimate of a company’s TCO with Druva in just a few minutes (a pricing calculator).
My personal opinion on Druva:
Druva the company is a data protection software distributor that offers plenty of different solutions to companies with varying storage types. A lot of these solutions are connected to Druva Data Resiliency Cloud – a flagship solution of the company that offers centralized data management and data protection in a single extensive platform. Druva’s SAP HANA module is officially licensed by SAP HANA as a third-party backup solution, but most of its unique capabilities come from the integration with Data Resiliency Cloud – it can only do a basic set of features by itself, such as data backup via Backint API, support for Studio/Cockpit/HDBSQL, etc. Druva can have limitations in working with legacy technologies.
Arcserve Backup

Arcserve Backup as a solution is titled as “Arcserve Tape Backup Software” at its official product page – but it is far more than just a tape backup solution. Arcserve Backup is a comprehensive data management solution for multi-platform environments that often use tape storage as its main backup medium. It can perform all kinds of backup and recovery operations while also being a great centralized source of information about different backup operations within the system.
Arcserve Backup does support SAP HANA backup and recovery operations, but its capabilities in this regard are relatively basic. It can work with the Backint API and also supports recovery via either SAP HANA Studio or HDBSQL, but there are little to no other features included.
Customer ratings:
- TrustRadius – 5.4/10 stars based on 49 customer reviews
Key features:
- Generally speaking, Arcserve Backup has plenty of features to offer to its users, from virtual tape libraries and multistreaming to hardware snapshots, multiplexing, and more
- Arcserve meets many kinds of requirements for specific applications, be it disk-to-disk-to-tape, backup to disk, disk-to-disk-to-cloud, and so on
- Different backup types and storage versions can also be managed with ease using Arcserve’s centralized management interface that also helps with general data management tasks across the board
Pricing (at time of writing):
- Arcserve does not usually reveal any kind of pricing information about its solutions publicly. As such, the only way to receive such information from a company is for that company to request a personalized quote.
My personal opinion on Arcserve:
Arcserve Backup is a powerful backup solution, even if its methods are mostly on the old-school side of the spectrum. It focuses more on physical storage types, while also supporting other storage types, offering centralization features, and plenty of unusual backup features. It does support SAP HANA as a backup target, but its features are relatively basic – Backint API for backups, SAP HANA Studio/HDBSQL for restores, and most of the features that Arcserve can apply to backups pulled from the Backint API. Nevertheless, it is still quite an interesting solution that may be worth it in some specific use cases.
IBM Storage Protect

IBM as a company has produced plenty of software and hardware solutions over the years, earning its popularity all over the world. The fact that the company also provides enterprise-grade backup solutions is relatively unknown – but the solution itself is quite handy. IBM Storage Protect, for example, is a backup and recovery platform with plenty of centralization capabilities for different backup types. It can work with different storage types, can perform network backups, and even save plenty of storage space by reducing the amount of space backups take.
IBM Storage Protect also offers SAP HANA backup and recovery tasks, but its overall functionality in this area is rather limited. It can perform basic full backups that are subject to the solution’s overall RTOs and RPOs. It is also possible to perform incremental and differential backups, as well as log file backups – all of which can be automated if necessary with IBM’s basic scheduling capabilities.
Customer ratings:
- TrustRadius – 8.0/10 stars based on 22 customer reviews
- G2 – 4.0/5 stars based on 68 customer reviews
Advantages:
- IBM Storage Protect may not have the biggest feature set on the market, but it is still rather competitive and covers plenty of different potential use cases
- A combination of deduplication, compression, and IBM’s own “progressive incremental forever” backup method saves quite a lot of storage space while using IBM Storage Protect
- IBM’s solution interface is surprisingly user-friendly and offers a convenient way to access most of the necessary features
Shortcomings:
- First-time configuration of IBM Storage Protect is not an easy process to go through, and it can be rather confusing for customers that are less experienced with this software type
- The same could be said for the overall data restoration process, it can be quite challenging to set up and launch properly in many cases
- IBM Storage Protect may save a lot of storage space with its own technologies, but its own pricing is based on data amounts and can be quite expensive for larger enterprises with big data turnover on a regular basis
Pricing (at time of writing):
- No official pricing information is available on the IBM Storage Protect Plus website, the only way to obtain this kind of information is to book a meeting with the company’s representative in order to discuss your company’s needs and the features that IBM can provide you with
My personal opinion on IBM Storage Protect:
IBM Storage Protect is not a particularly unique solution by this market’s standards – it provides a lot of features that already exist in plenty of other solutions, such as different backup types, support for different storage types, data encryption, etc. It does have its own approach to conserving the amount of storage that backups take, but there are also plenty of issues in the solution – difficult first-time setup, lackluster SAP HANA capabilities, expensive pricing models based on data amounts, and more.
Bacula Enterprise as an SAP HANA backup solution
Of course, this list is far from conclusive, and there are plenty of other backup solutions capable of creating SAP HANA backups. There are also some examples of SAP HANA backups being supported in something that is not considered a backup solution in the first place – such as the Amazon EC2 instances. These instances can be used to install the AWS Backint agent, which offers all of the features a basic Backint API integration can offer – such as the backup and recovery tasks via SAP HANA Cockpit/Studio or even with basic SQL statements.
However, we would like to go over one more example of a backup and recovery solution with SAP HANA support in this particular article – Bacula Enterprise. Bacula Enterprise is an especially highly secure, fast and feature-rich backup platform with a lot of different systems and storage types it can work with. Bacula’s SAP HANA module offers a number of advantages when it comes to creating a SAP HANA database backup – including both significant speed improvements and smaller QoL changes. Let’s look at these clear advantages:
The first general advantage is all about small but useful additions to the classic backup process, such as backup scheduling, backup automatization, and so on. Bacula Enterprise’s SAP HANA module can also perform quick recovery, quick job creation, and many other operations.
The second advantage revolves around centralization – the ability to backup multiple different parts of your company’s infrastructure in one place with one unified control panel. That way, Bacula can create backups of your apps, your virtual machines, as well as many other parts of your system.
The third advantage might be the biggest one of the three, but it is not as obvious as the other ones – the existence of Bacula’s experienced support team that can help its users with a variety of backup-related questions. As such, clients can use Bacula’s support team to figure out what kind of backup would be the best one for their specific situation, as well as backup target location, backup storage type, and many other parts of their own backup policy.
The fourth advantage is the “elephant in the room”: Cost. Bacula’s overall price for SAP HANA functionality is almost negligible, making it fairly unique in the industry. That fact, coupled with Bacula’s policy of no capacity-based licensing, means the value gains are more than significant.
Manually creating SAP HANA backup jobs in Bacula Enterprise
Although normally the process of both backing up and recovering your SAP HANA database is automated using Bacula Enterprise or your specific SAP HANA infrastructure, we’ll go through the process of doing so manually using Bacula Enterprise’s SAP HANA plugin and the Bacula bconsole command line. The manual backup and restore procedure is chosen here to show all of the steps of this specific process.
SAP HANA backup configuration in Bacula Enterprise
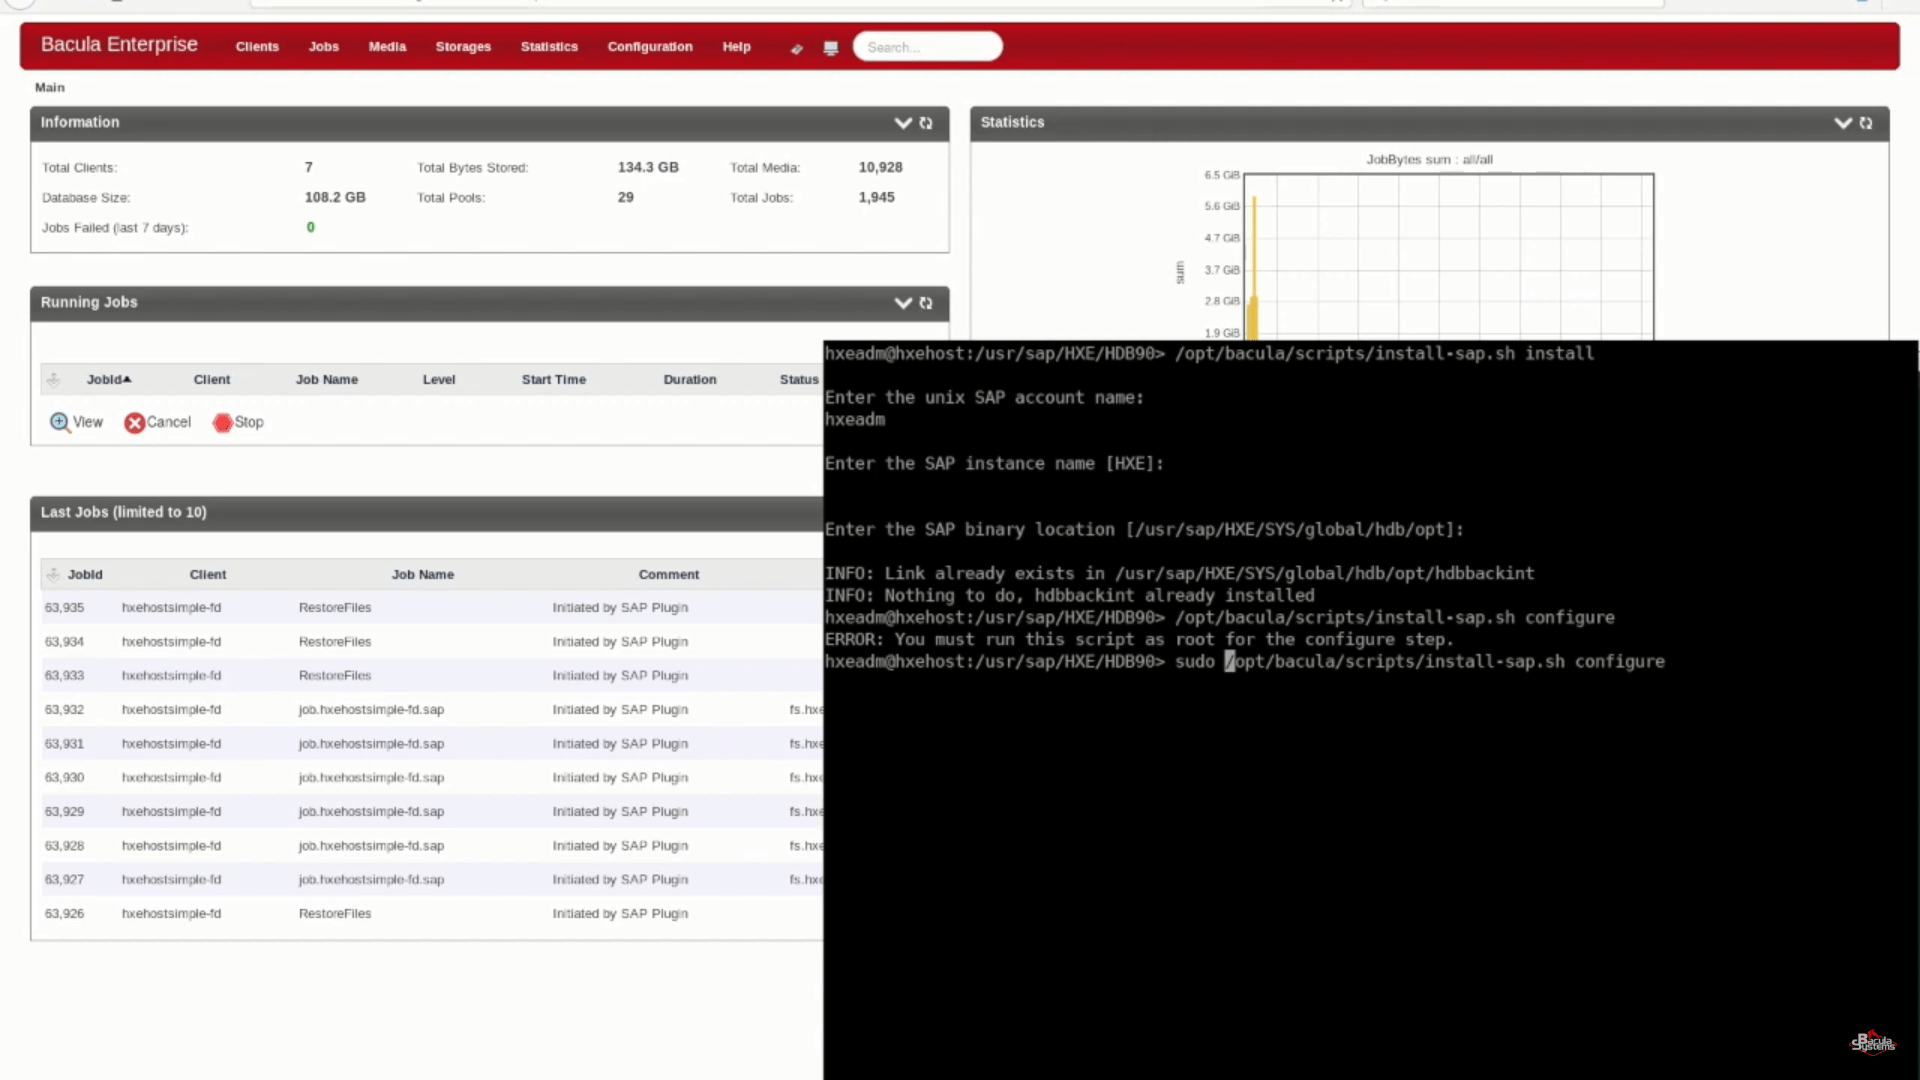
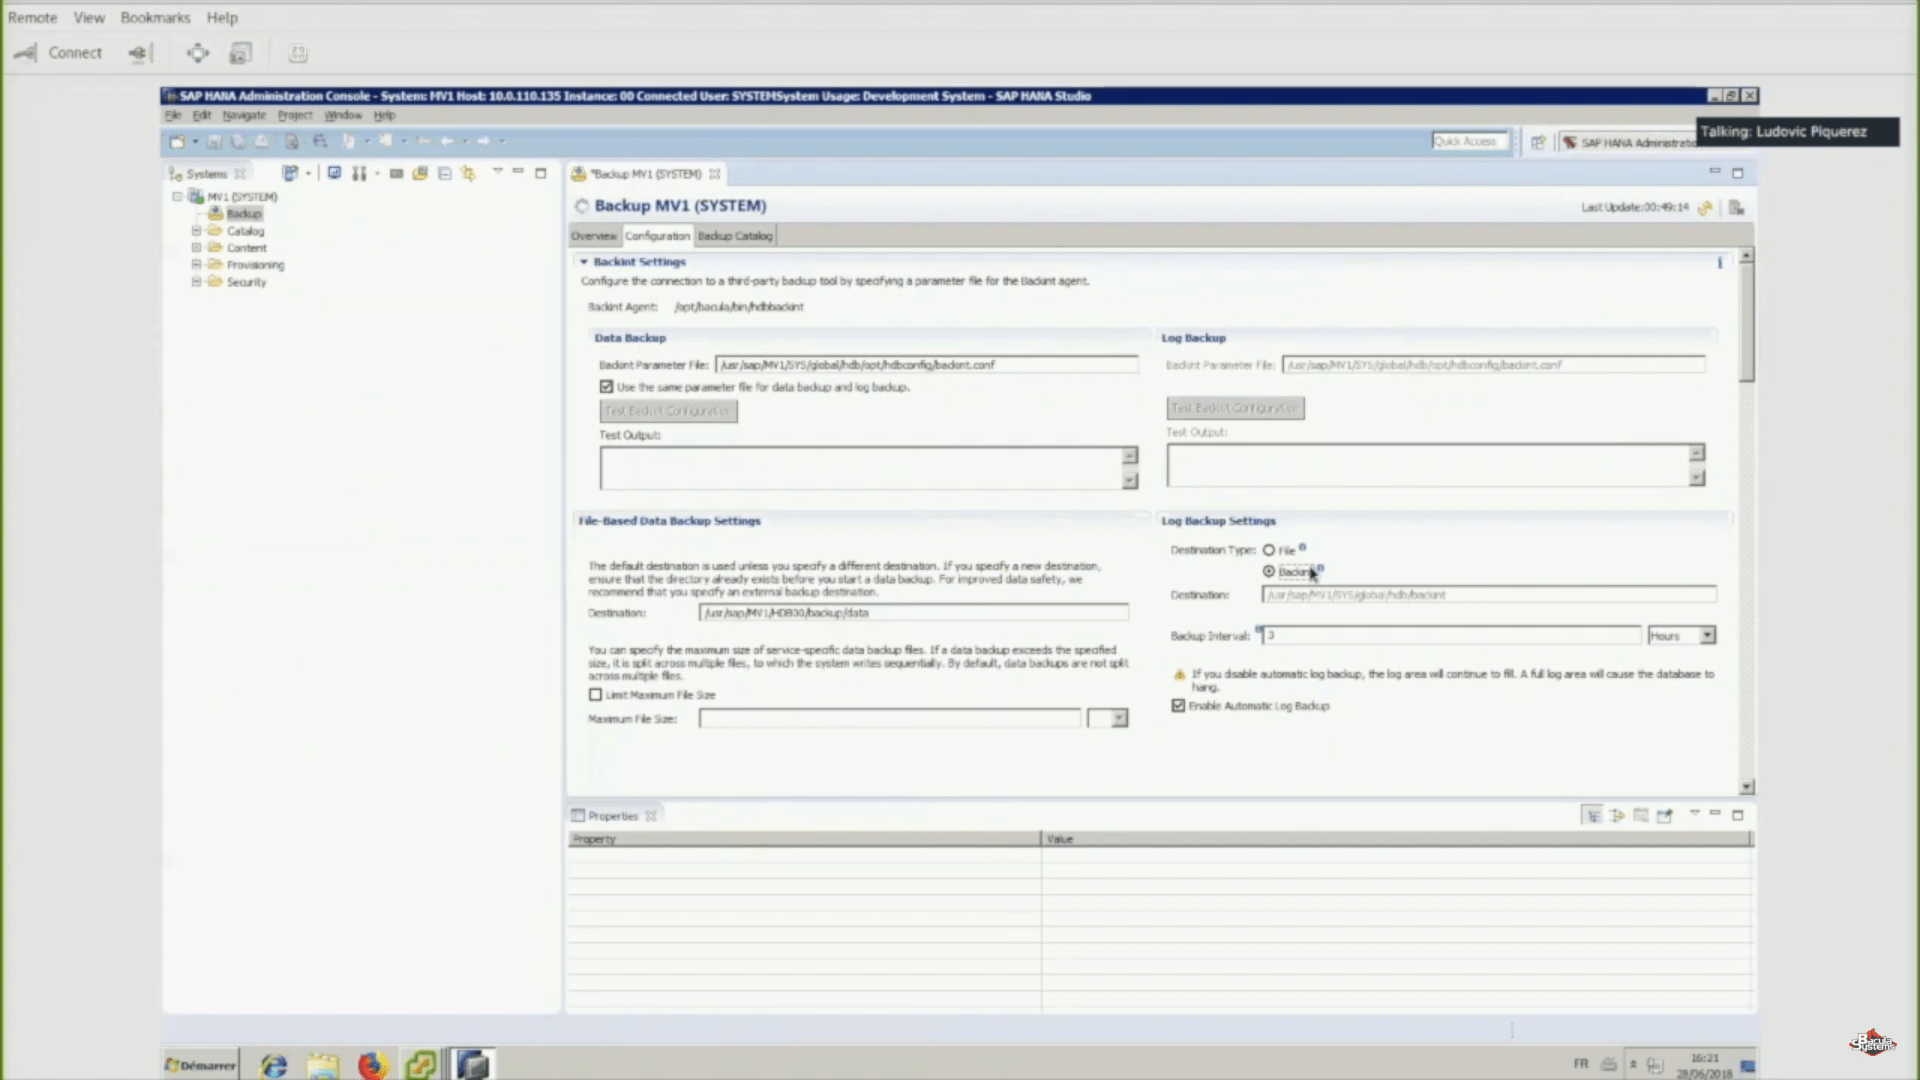
To begin, SAP HANA backup plugin must be configured so that the Bacula Enterprise server and the SAP HANA backint process can authenticate and share data. This potentially complex process can be automated by running the included configuration script, which will prompt the user for the necessary SAP HANA information and store it for future backup jobs. Once this configuration script has successfully executed, backup jobs can be scheduled for regular operation or can be run manually.
Manual SAP HANA backup initiation
Next, let’s go through the process of initiating a backup job manually. The first step is to log in to a SAP HANA interactive console. The backint command is configured to send data directly to the Bacula Enterprise server. When running manually, you can also specify a job name and timestamp.


After running that command you should be able to see your brand new backup jobs, created by the backint command.
Backup administration using SAP HANA studio
There’s also a graphical way of managing backups that you’ve created, and it’s done with the help of a SAP HANA admin console, also called “SAP HANA studio”. This graphical interface allows you to initiate backups and also makes it easy to schedule runs of backint to initiate Bacula SAP HANA plugin backups. This leaves control of backup scheduling with the DBA, which is often preferable.
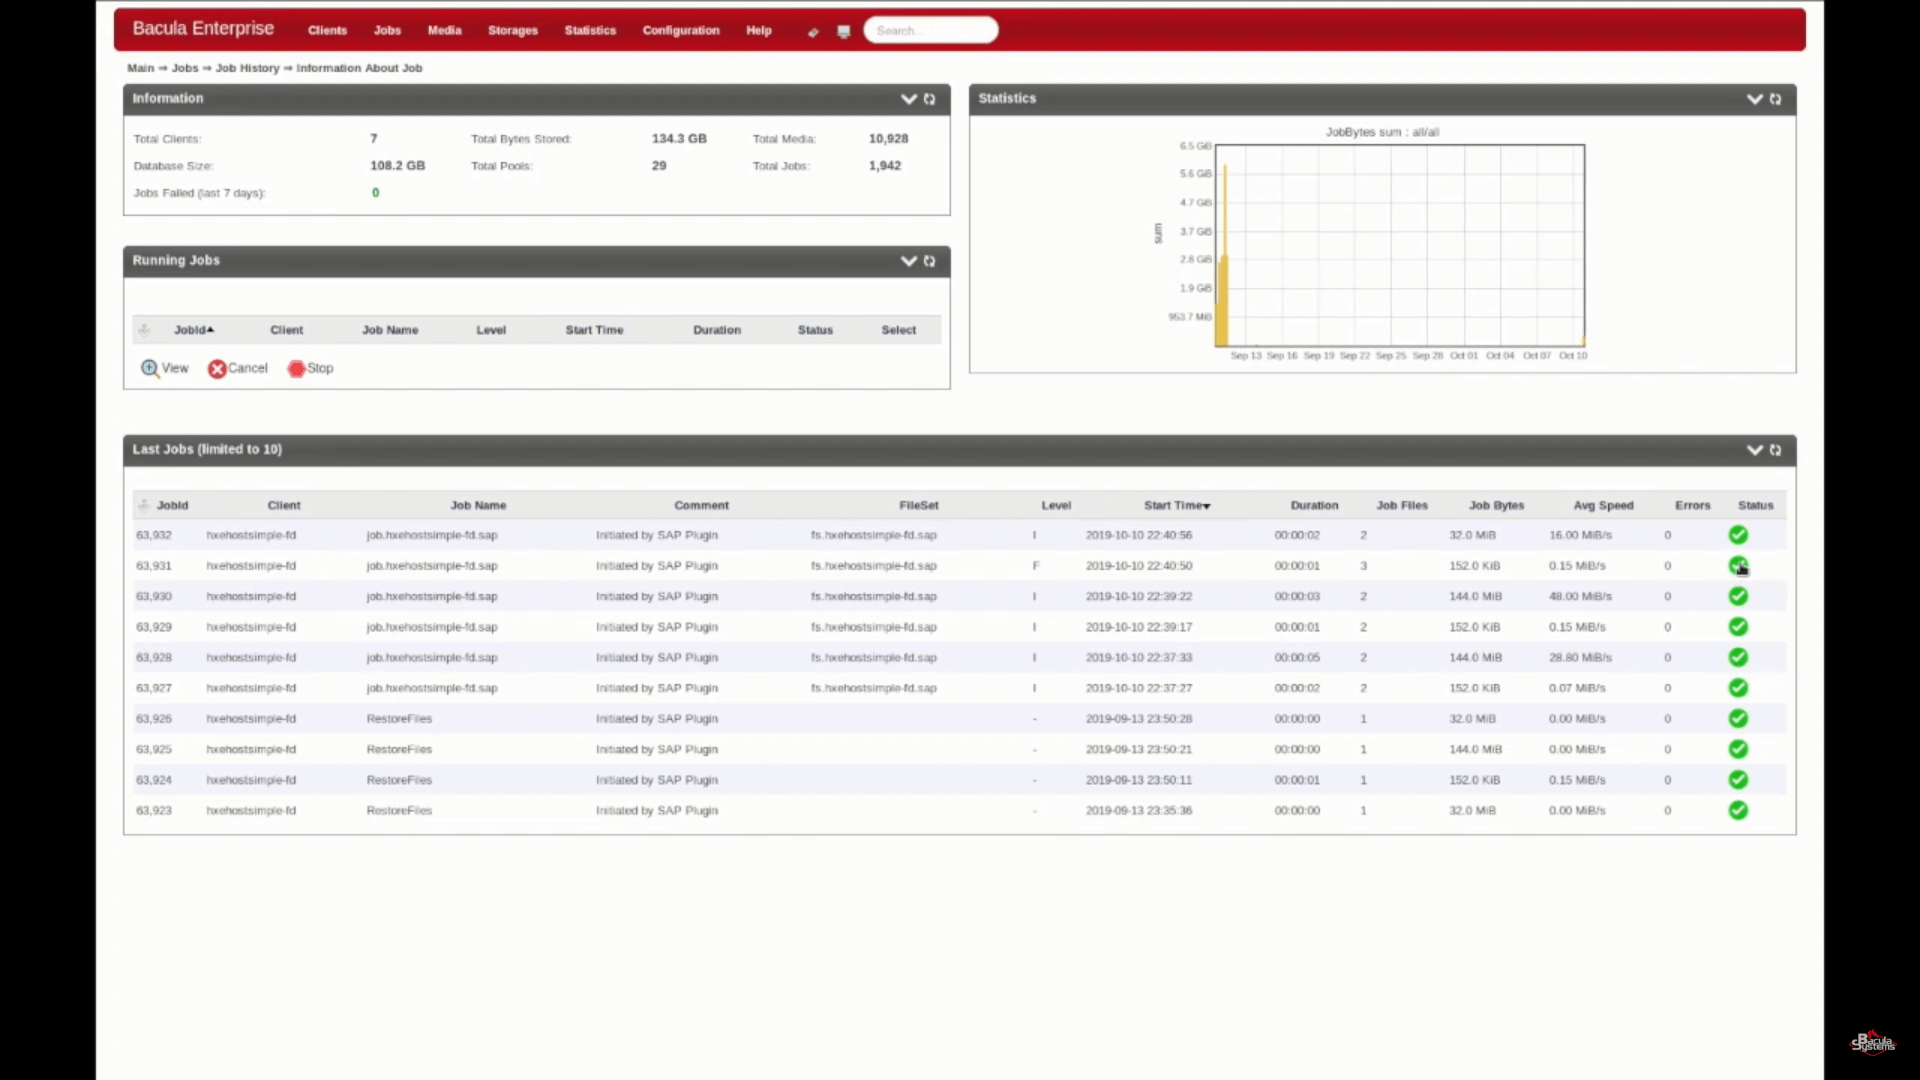
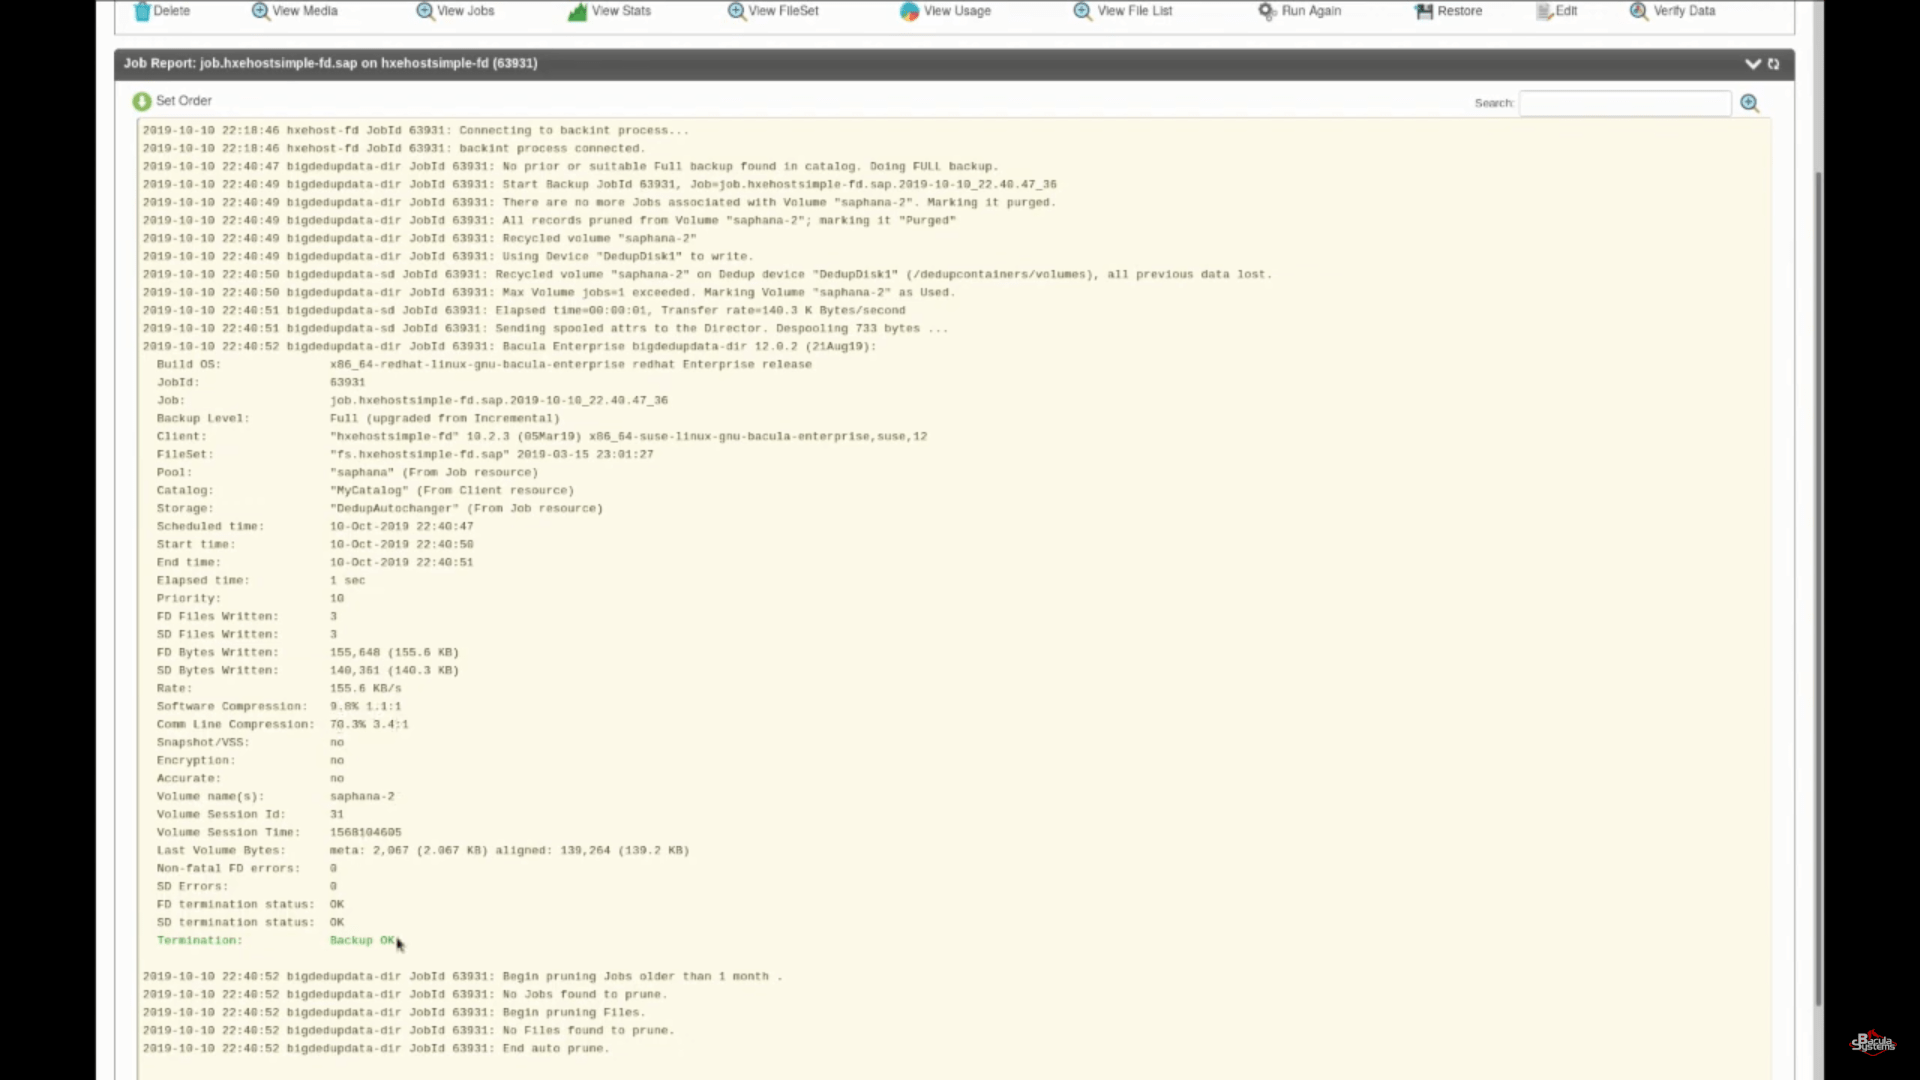
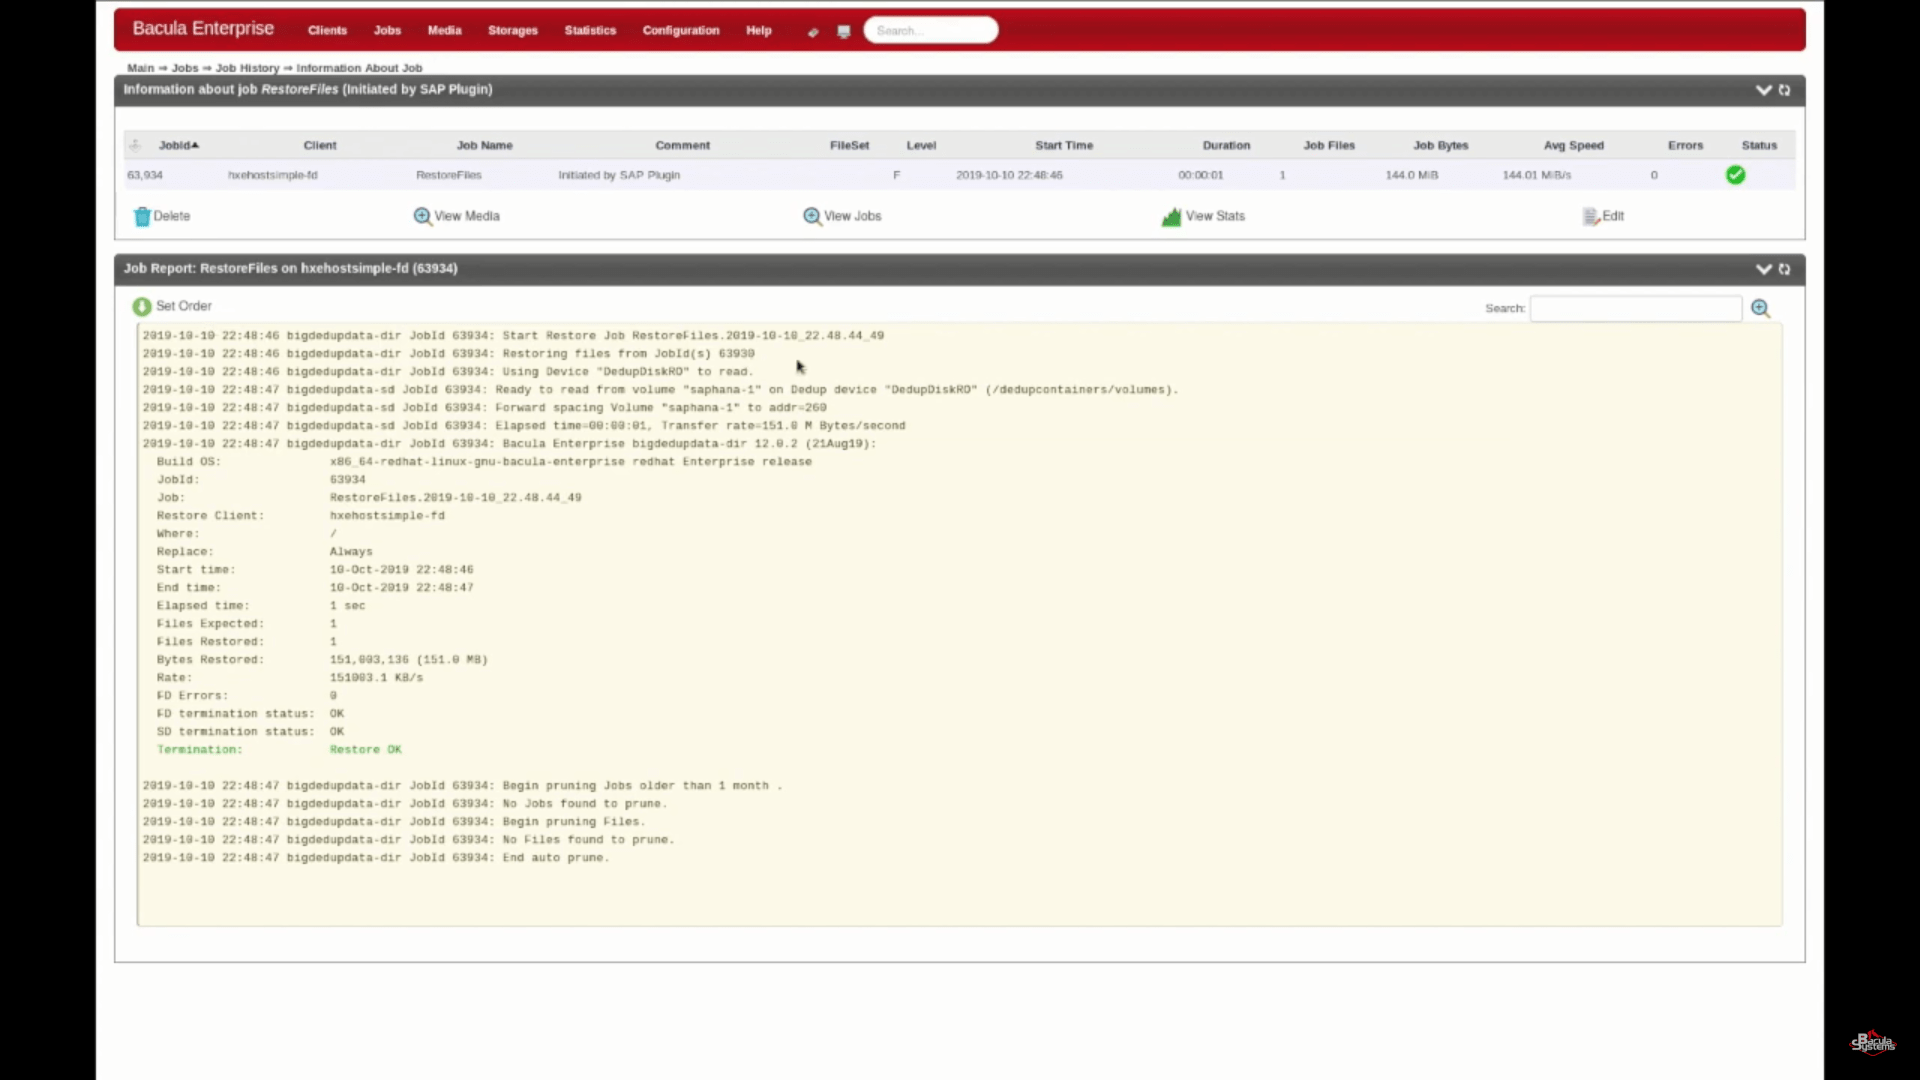
Regardless of how the job is initiated, you have a very detailed log of every job available via BWeb by clicking on the status icon in the same line as your backup job is (if the job is done correctly, it should be a white checkmark with a green background). For example, here is the backup job that was created in the previous steps, the first line is showing that there is a connection between the SAP HANA database and the server, and the rest of it is a detailed steps of the whole process, including the total size of your backup, how many files are in it, what’s the compression rate and so on. And the very last line should, of course, be the confirmation that everything went right – an OK status.
Manually creating SAP HANA recovery jobs
Now let’s move on to the SAP HANA recovery process. There are many ways to recover a database, including restoring a backup from previously mentioned SAP HANA studio or directly restoring a backup through the same backint command, but for the sake of simplicity in this example we’ve used the Bacula Enterprise user-friendly recovery script. All you need to do is specify a restoration point-in-time and the recovery script handles the rest.
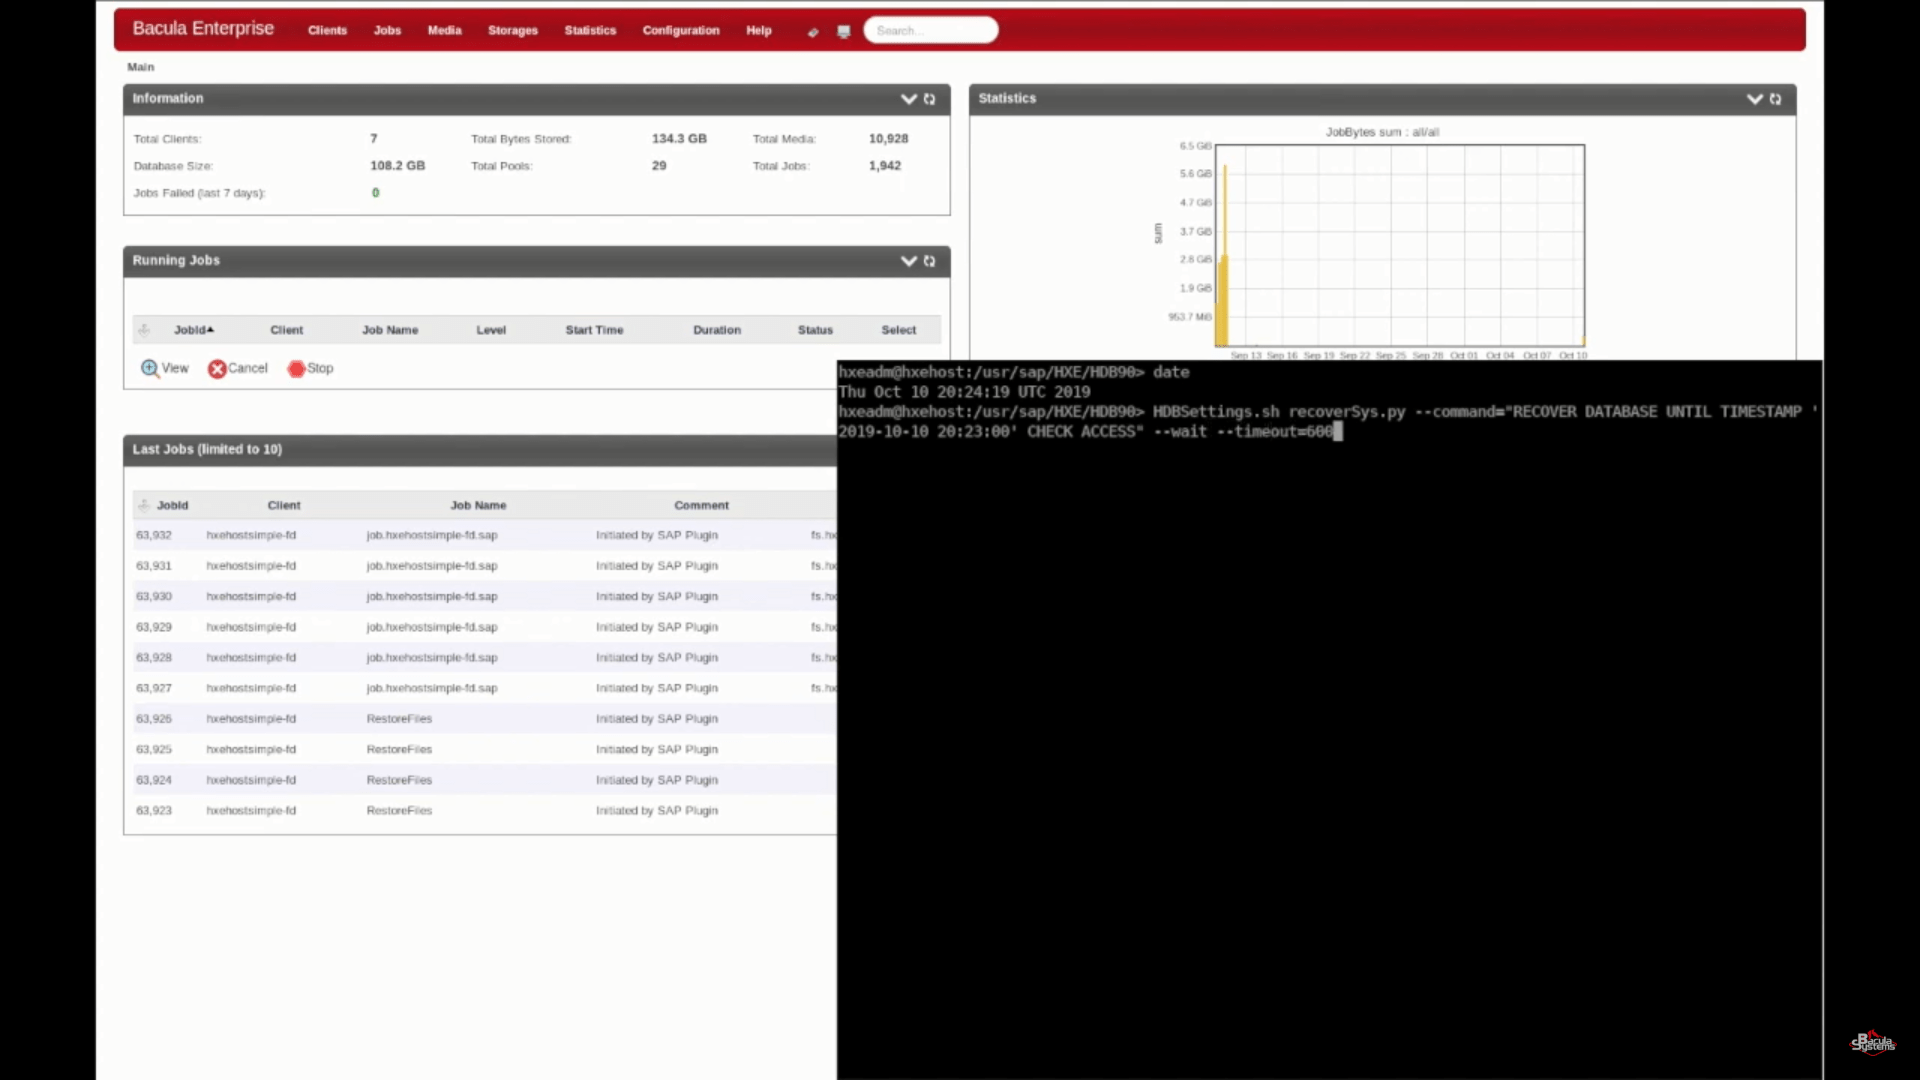
After executing the script , recoverSys leads the process to check the database in question, to stop it if it’s running, connect to the Bacula Enterprise servers and to restore the data you need. Once the restore finishes you’ll see the console outputs showing that the process was a success.
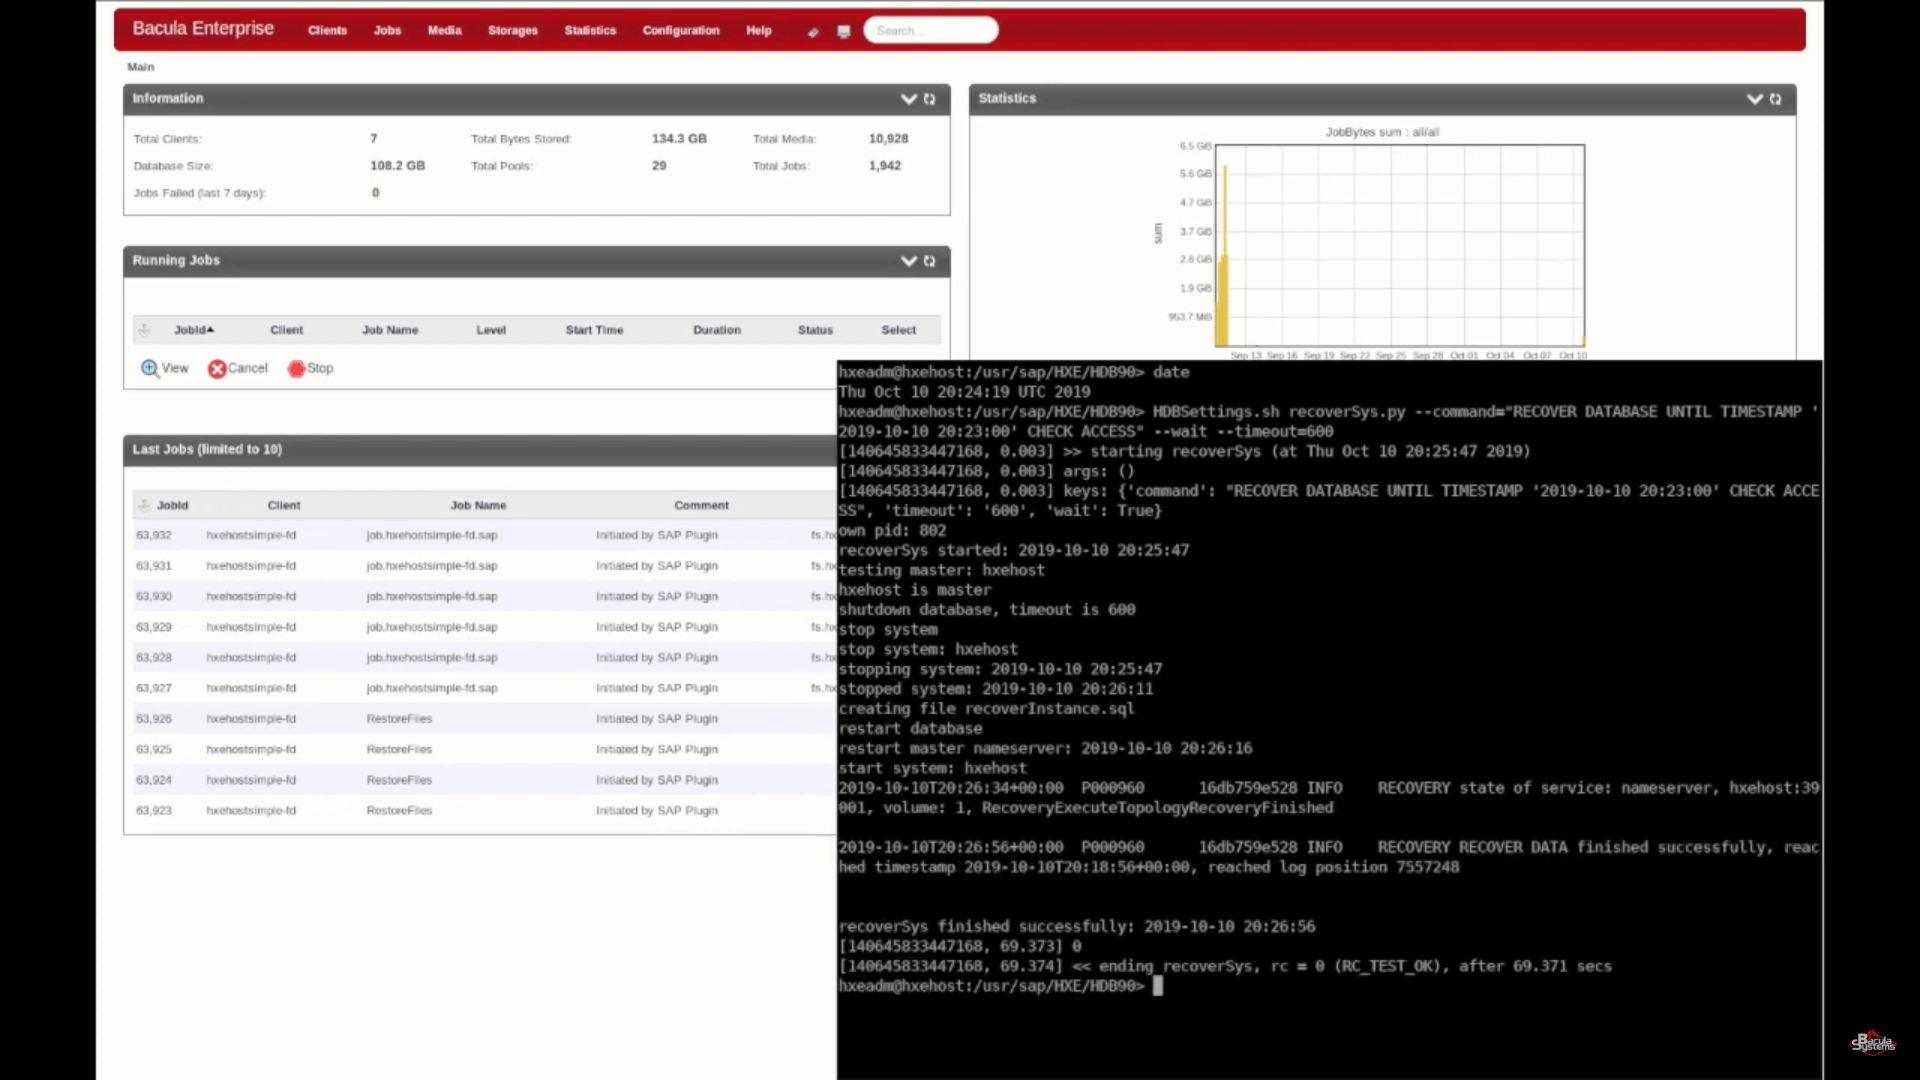
You can also check BWeb to see your restore job logs and see in detail how the process went and that it was a success (confirming what was shown via the command line restore script).
Conclusion
As you can see, Bacula Enterprise’s SAP HANA backup and recovery plugin is capable of both backing up and recovering your critical data within SAP HANA databases and provides a number of options to script and automate the process or to leave it in the hands of the SAP HANA DBA. The Bacula Enterprise SAP HANA plugin is SAP certified to protect your data. However, the ultimate advantage of using Bacula by SAP HANA users may well be its up-to-date, expansive security features, resilient architecture and impressive scalability.
Why you can trust us
Bacula Systems is all about transparency, accuracy, and consistency in its products, our materials always try to provide the most objective point of view on different technologies, products, and companies. In our reviews, we use many different methods such as product info and expert insights to generate the most informative content possible.
Our materials offer all kinds of factors about every single solution presented, be it feature sets, pricing, customer reviews, etc. Bacula’s product strategy is overlooked and controlled by Jorge Gea – the CTO at Bacula Systems of Bacula Systems, and Rob Morrison – a co-founder of Bacula Systems.
Before joining Bacula Systems, Jorge was for many years the CTO of Whitebearsolutions SL, where he led the Backup and Storage area and the WBSAirback solution. Jorge now provides leadership and guidance in current technological trends, technical skills, processes, methodologies and tools for the rapid and exciting development of Bacula products. Responsible for the product roadmap, Jorge is actively involved in the architecture, engineering and development process of Bacula components. Jorge holds a Bachelor degree in computer science engineering from the University of Alicante, a Doctorate in computation technologies and a Master Degree in network administration.
Rob started his IT marketing career with Silicon Graphics in Switzerland, performing strongly in various core technology management roles for almost 10 years. In the next 10 years, Rob also held various marketing management positions in JBoss, Red Hat, and Pentaho ensuring market share growth for these well-known companies. He is a graduate of Plymouth University and holds an Honours Digital Media and Communications degree.


Creating SAP HANA backups turned out to be easier than I thought it was. Thank you for this article, it was an interesting reading material.
The versatility of Bacula’s BWeb interface never ceases to amaze me. And the fact that it also works with SAP HANA backup and recovery jobs is even more surprising.
Automatization for some of the steps of creating a SAP HANA backup seems like a good way to save both time and money. This was highly interesting.
How does Bacula support the procedure for database and log backup cleanup?
Can I define a retention period for database full backup, database incremental/differential backup and log backup individually?
Hello Thomas,
The retention of catalog backup, Full and Incremental/Differential backup are all set and handle through the SAP HANA mechanism, which then impact the Bacula retention accordingly. Bacula Enterprise SAP HANA plugin is fully integrated with backint. It means the end user should follow carefully SAP HANA documentation on this topic and our best practice written in the Bacula plugin SAP HANA documentation.