Contents
- Using AWS Backup to create backups
- AWS Backup and its interaction with other AWS-based services
- AWS backup and EC2
- 2022 Update
- Basic operations with Amazon S3 console
- Other methods of backing up your Amazon S3 bucket
- Versioning and bucket replication
- Third-party AWS S3 backup solutions
- Veeam
- Cohesity
- Commvault
- Unitrends
- Handy Backup
- Bacula’s AWS S3 backup solution
- Introduction to AWS S3 Backup with Bacula Enterprise
- Adding a new S3 storage in Bacula Enterprise
- Configuring your AWS S3 storage backup using Bacula Enterprise
- Finishing the S3 storage setup process
- Saving your new S3 backup settings
- Testing the AWS backup settings
- Conclusion
Using AWS Backup to create backups
Backing up your information – data – is perhaps the most important part of protecting it from any harm as well as ensuring compliance. Even the most durable servers and storages are susceptible to bugs, human errors and other possible reasons for a disaster. But creating and managing all of your backup workflows might be a daunting task overall. Therefore, there are a variety of methods that you can use to simplify the entire process of creating a backup while using AWS S3.
A popular choice is Amazon’s own backup solution – AWS Backup. AWS backup can provide a way to manage your backups both in the AWS Cloud and on premise, as well as supporting a variety of other Amazon applications.
The backup process itself is fairly easy. A user would have to create a backup policy – their backup plan – specifying a number of parameters such as backup frequency, the amount of time that these backups should be kept, etc. As soon as the policy is set up – AWS Backup should start backing up your data automatically. After that you’ll be able to use AWS Backup’s console to view your backed up resources, have the option to restore a specific backup or just monitor your backup and restore activity.
AWS Backup and its interaction with other AWS-based services
There are plenty of different AWS services that can offer various useful features and work in tandem with AWS Backup service. For example, these services include, but not exclusive to:
- Amazon EBS (Elastic block store);
- Amazon RDS (Relational database service);
- Amazon DynamoDB backups;
- AWS storage gateway snapshots, etc.
Of course, you have to enable the specific service that you want to use in your backup process before using it in the first place. Trying to initiate or create the backup using specific resources from a service that you have yet to enable means you will likely receive an error message instead and won’t be able to perform the creation process.
To find the list of services that you can switch on or off, you have to follow a number of steps:
- Open the AWS backup console.
- Go into the “Settings” menu.
- Move to the “Service opt-in” page and click “Configure resources”.
This should get you to the page with a number of service names and toggles, and you can easily toggle each of the specific services on or off. Clicking “Confirm” after making the changes would save your operations.
AWS backup and EC2
AWS backup is capable of implementing a lot of existing AWS service capabilities in the process of creating a backup. One good example of that is the EBS snapshot capability that is used to create backups according to the backup plan you’ve created. Creating EBS snapshots, on the other hand, can be done using the EC2 API (Elastic compute cloud). This way you’ll be able to manage your backups from a centralized AWS backup console, monitor them, schedule different operations, and so on.
AWS backup can perform backup jobs on entire EC2 instances, allowing you to have less need to interact with the storage layer itself. The way it works is also quite simple – AWS backup takes a snapshot of the root EBS storage volume, as well as associated volumes and launch configurations. All of the data is stored in the specific image format called volume-backed AMI (Amazon machine image).
EC2 AMI backup files can also be encrypted in the backup process the same way AWS backup does this to EBS snapshots. You can either use the default KMS key if you don’t have one, or you can use your own one to apply it to the backup.
This process is far superior and easier to customize than the built-in way of AWS EC2 to backup and restore data. For example, the backup process for EC2 originally creates a snapshot of the volume, requiring little or no configuration, and that’s it. It can be done within the Amazon EC2 console at “Snapshots > Create Snapshot > *choose the volume in question* > Create”.
The restoration process for EC2 resources can be done in several different ways: AWS backup console, command line or just the API. Compared to the other two, the backup console has a lot of functionality limits for the restoration process and cannot restore several parameters like ipv6 addresses, some specific IDs, and so on. The other two methods, on the other hand, are capable of doing a full restore one way or another.
It is also possible to restore EBS volumes from a snapshot. However, this process is a little more complicated and includes two parts – restoring a volume from a snapshot and attaching a new volume to an instance.
Volume restoration is rather simple and can be done within the EC2 page by going to ELASTIC BLOCK STORE, Snapshots > *select the snapshot in question* > Create Volume. Attaching a newly restored volume to an instance, on the other hand, is a slightly different process that you can do by going to Volumes > Actions > Attach Volume > *choose the volume by name or by ID* > Attach. It is also recommended to keep the suggested device name throughout this process.
2022 Update
As of the beginning of 2022, AWS Backup has added another one of its services that it can work with – Amazon Simple Storage Service (S3). The modern world has a lot of requirements and possibilities when it comes to storage options, and it is quite normal to rely on multiple different storage locations or services at once.
This kind of integration allows AWS Backup to protect and govern S3 data, just as it does with other Amazon services. There are three main advantages when it comes to using the integration between AWS Backup and Amazon S3:
- Better compliance, with the built-in dashboards;
- Easier restoration process with point-in-time restoration processes;
- More convenient centralized backup management, making backup lifecycle control that much easier to work with.
At the time of writing, AWS Backup for S3 is a preview, but it can already offer basic backup functionality – point-in-time backups, periodic backups, restorations, and so on. It can also be completely automated using AWS Organizations.
Basic operations with Amazon S3 console
Amazon’s own S3 toolkit allows for some basic operations when it comes to retrieving or storing a specific file from the bucket. It’s possible to point out four different operations that can be done using only Amazon S3 backup software – but we have to get to the Amazon S3 console, first.
It can be done by going to the AWS services page using this link, entering your login information should allow you to access the first screen of the AWS services toolkit. After that it’s possible to find the S3 console by either going to the “Services” menu and finding S3 there, or by typing in “S3” in the search bar located at the higher part of the page.
- Creating S3 Bucket.
- A bucket is a type of container that Amazon S3 uses to store your files. A bucket can be created in the AWS S3 interface by clicking the “Create Bucket” button in the title screen.
- It is worth noting that the web page would look differently depending on whether you’ve already created a bucket before within this account or not. If there are other buckets already in place, you’ll be met with a screen that allows you to manage said buckets, including renaming or outright deleting them.
- On the other hand, if it is your first time creating a bucket within this AWS S3 backup account, you’ll see a corresponding screen describing a way to create a bucket in the first place. If that happens, you can use either the “Create bucket” button or the “Get started” button, both of these should lead to the same place – the bucket creation screen.
- The first prompt of the screen should be about creating a name for your new bucket, and the field would also notify you if the name of the bucket does not meet some of Amazon’s own bucket name-related regulations. You’ll also have to choose an appropriate region for your future bucket. Once you’ve done that, click “Next” to continue.
- The second bucket creation screen allows you to enable one of the properties for your Amazon S3 backup bucket, such as Tags, Versioning, Encryption, Server-access logging and Object level logging. For the purpose of keeping this explanation simple, we are not enabling any of these properties. Click “Next” to proceed.
- The next screen allows for permission customization, including both system permissions and user permissions. You can also change your own permission levels and add specific people to have access to this bucket. Our example keeps all of the default permission levels – with the creator having access to anything inside of this bucket. Click “Next” when you’re done.
- The last part of the process is the confirmation screen, allowing you to review all of the settings you’ve previously configured. This includes permissions, properties and names. Clicking the “Create bucket” button after finishing the review process does exactly what it says – creates a bucket with your specific settings.
- Uploading a file.
- Uploading a file to your new AWS S3 bucket is also relatively easy, if you’re starting from the Amazon S3 console. Clicking on the name of your new AWS bucket would allow you to access said bucket and its contents.
- As soon as you’re in your bucket’s landing page, you can start the upload process by clicking the “Upload” button in the left part of the page.
- There are two ways of uploading a file in the following window – by either drag-and-dropping a file on the page, or by clicking the “Add files” button and selecting the file in question afterwards. After you’ve chosen the file to upload, you’re free to click “Next” to proceed.
- As with the backup S3 bucket creation process, you can change the file’s permissions before uploading it, including both your own permissions, accounts who have access to this file, and public permissions. Use the “Next” button to continue.
- The next page is more about specific properties for your file, such as storage class (Standard, Standard-IA and Reduced redundancy), encryption (None, S3 master key and KMS master key), and metadata. After you’re done choosing one of the options, you can continue through the “Next” button.
- The last screen of this sequence is all about confirming all of your changes before uploading. Your properties, permissions and the amount of files chosen are all displaced here. Clicking the “Upload” button after double-checking the details should begin the upload process.
- Retrieving a file.
- Downloading a file from your AWS S3 bucket can be done in two easy steps. First, you have to be on your bucket’s landing page, in which you’ll see all of the files that are being stored within said bucket. The first step you’ll have to do is click the checkmark field to the left of the file that you want to download
- Selecting at least one file on the list brings up a description pop-up window, which has two buttons: “Download” and “Copy path”. Use the “Download” button to receive the file in question.
- Deleting a file or a bucket.
- Deleting unneeded files or even buckets is not just easy, it’s also highly recommended by Amazon themselves to prevent excessive cluttering of your files. First of all, the file deletion process.
- As soon as you arrive at a bucket’s landing page, the first thing you have to do is click the checkbox field to the left of the file that you want to delete.
- After choosing the file or files for deletion, you can press the “More” button near the “Upload” and “Create Folder” buttons and choose the “Delete” option from the drop-down list.
- You’ll receive a confirmation screen that shows you which files would be deleted, and you have to click “Delete” once more to initiate the deletion process.
- The process of deleting an entire bucket is slightly different. First, you’ll need to back out of your bucket landing page and get back to the main Amazon S3 backup console that lists all of your buckets.
- Clicking on the blank space to the right of the bucket that you want to delete would select the bucket, and clicking the “Delete bucket” button would initiate the deletion process.
It is worth noting that all of these basic operations could be done with just Amazon’s own system and without the addition of any AWS backup solutions.
Other methods of backing up your Amazon S3 bucket
Using AWS Backup isn’t the only option when it comes to S3 backups, as well. There’s a variety of different options that can be both performed by an application within Amazon’s ecosystem as well as third-party solutions.
For example, here’s several more ways of creating an S3 backup without using AWS Backup application:
- Create backups using Amazon Glacier;
- Use AWS SDK to copy one S3 bucket to another;
- Copy information to the production server that is itself backed up;
- Use versioning as a backup service.
It is worth mentioning that most of these methods aren’t exactly fast or convenient. Amazon Glacier, for example, would be a good backup solution if it wasn’t a lot slower than your regular backup process, since Glacier is more about data archiving and less about ongoing data backups.
Versioning and bucket replication
Versioning is a subject that merits going into more detail. Object versioning is a feature of Amazon S3 that allows for data protection against a variety of unwanted changes, including deletion, corruption, and so on – it operates by creating a new copy of a file each time this particular file is changed in some way (when it is stored in S3).
The S3 bucket stores all these different versions of the same file, which gives you the ability to both access and restore any of these previous versions. This can sometimes even counteract even deletion, since deleting a current version of the file usually does not affect its previous versions.
It is worth bearing in mind that using versioning as a backup solution might raise your storage costs significantly due to the amounts of data that need to be stored. In this case, you may want to configure your lifecycle policy for previous versions of files, so that newer copies can replace older ones, making versioning an overall more cost-effective solution.
S3 versioning can be enabled using AWS Management Console by going to Services > S3 (In the “Storage” category) > Buckets > bucket_name. Each bucket has a lot of different customizable options that are separated in multiple tabs. We’re looking for a tab called “Properties”.
Bucket versioning is one of the first options that show up in the “Properties” tab. While it is disabled by default, all you have to do to enable it is to select “Edit” under the “Bucket Versioning” option, and switch “Bucket Versioning” in the next window from “Suspend” to “Enable”.
You may notice that enabling bucket versioning displays a helpful tip that tells you to update your lifecycle rules to set up versioning as a process in the correct way. Lifecycle rules can be changed in the “Management” tab within the same bucket details menu.
First, you need to create a lifecycle rule in the first place (“Create lifecycle rule” button) – you will have to enter a name and choose the scope of the role (can be applied to the entire bucket or to specific files chosen with filters).
You can also customize the way this rule behaves in the first place using the “Lifecycle rule actions” part of this menu. In here, you can set up a number of rules that concern current and previous versions of files, as well as the prerequisites for version expiration (with its subsequent deletion). After setting everything up, all you have to do is to click “Create Rule” for the lifecycle rule to be generated and applied.
While versioning can be great for working with specific files, it might not be a viable choice when there are too many files that you are keeping previous versions of. Luckily enough, versioning is not the only alternative here – since bucket replication also exists.
This option can be found within the same menu as before; another category under the “Lifecycle rules” called “Replication rules”. Clicking “Create replication rule” should open a new page for you, with a number of settings for future bucket replication rule.
You can change a rule’s name here, define the status of the rule at the moment of creation (if it would be enabled or disabled from the start), select a target bucket to be replicated and a destination bucket to store the copy of the original. Additional options on this page include replication time control, replica modification sync, various replication metrics, and more.
This option is not perfect either, since it involves copying an entirety of a bucket, which is a massive increase in the amount of consumed storage space. Since most of these options have their own problems and shortcomings, you might want to consider a third-party solution for your S3 backup and restore needs.
Third-party AWS S3 backup solutions
There are a good number of third-party solutions that perform AWS S3 backup jobs, some of them with broad and different features. Here are a few different examples of those solutions.
Veeam

Veeam is a well-known comprehensive backup platform that supports a multitude of storage locations and storage types, including AWS S3. There is quite a lot that Veeam can do with AWS S3 data, specifically, as a dedicated AWS backup solution – with an abundance of different features and complete integration with other Veeam instances. Veeam can offer extensive backup automation based on policies, as well as data encryption, fast recovery time, backup cost calculation, data migration to different storage locations, and more.
Cohesity

In its efforts to work as an AWS S3 backup solution, Cohesity puts a lot of emphasis on cloud data management above some other needs. This kind of approach makes operations such as data migration and data archival easier. The whole concept of Data Management as a Service provided by Cohesity involves most of its features being provided with the same idea in mind – which is why this AWS backup solution has both Backup as a Service and Disaster Recovery as a Service, as well as one unified UI for all of its features and services and many other advantages.
Commvault

Commvault’s capabilities as an AWS S3 backup software may be somewhat standard, but that does not mean they’re not effective. When it comes to AWS backup jobs, Commvault can integrate with multiple AWS parts at the API level, while providing both data management and cloud data protection capabilities at the same time. Commvault is capable of protecting and interacting with a many different AWS workloads aside from S3, such as EKS, EC2, EFS, EBS, Redshift, DynamoDB, and so on.
Unitrends

Unitrends is another fairly popular solution that has a variety of backup-centered products, including the one focused on working with AWS. Unitrends Backup is a versatile solution that offers both regular backup services as well as other capabilities, such as moving data to and from AWS for the sake of remote data storage in other locations or as a means of compliance. Unitrends is also capable of protecting all kinds of AWS-based workloads, offering recovery capabilities, improved retention, higher redundancy, and so on.
Handy Backup

Handy Backup is, as the name suggests, quite ‘handy’ when it comes to various backup tasks and operations, including S3 backup. As a respectable AWS backup software, Handy Backup can perform regular backup and recovery operations and it also has several useful advantages – including data encryption, backup scheduling, various backup types, several control options, and so on. Other than that, Handy Backup also supports a nice variety of database types (MySQL, PostgreSQL, Oracle, MS SQL, etc.), can both mirror and replicate data to and from AWS S3 storage and even move data between different cloud storage providers, if necessary.
There is also another solution that is worth going over in the context of AWS S3 backup software, and that is Bacula Enterprise.
Bacula’s AWS S3 backup solution
Bacula delivers natively integrated AWS S3 backup solutions as part of its extensive enterprise cloud-based backup and recovery options. It delivers native integration with public and private clouds via the Amazon S3 interface, with transparent support for S3-IA. AWS S3 backup is available for Linux, Windows and other platforms. However, there is something else your organization should know about Amazon S3 backup with Bacula Enterprise: the ability to have unique control over your cloud backup – and at the same time bring significant cloud cost reduction for AWS backup solutions.
Introduction to AWS S3 Backup with Bacula Enterprise
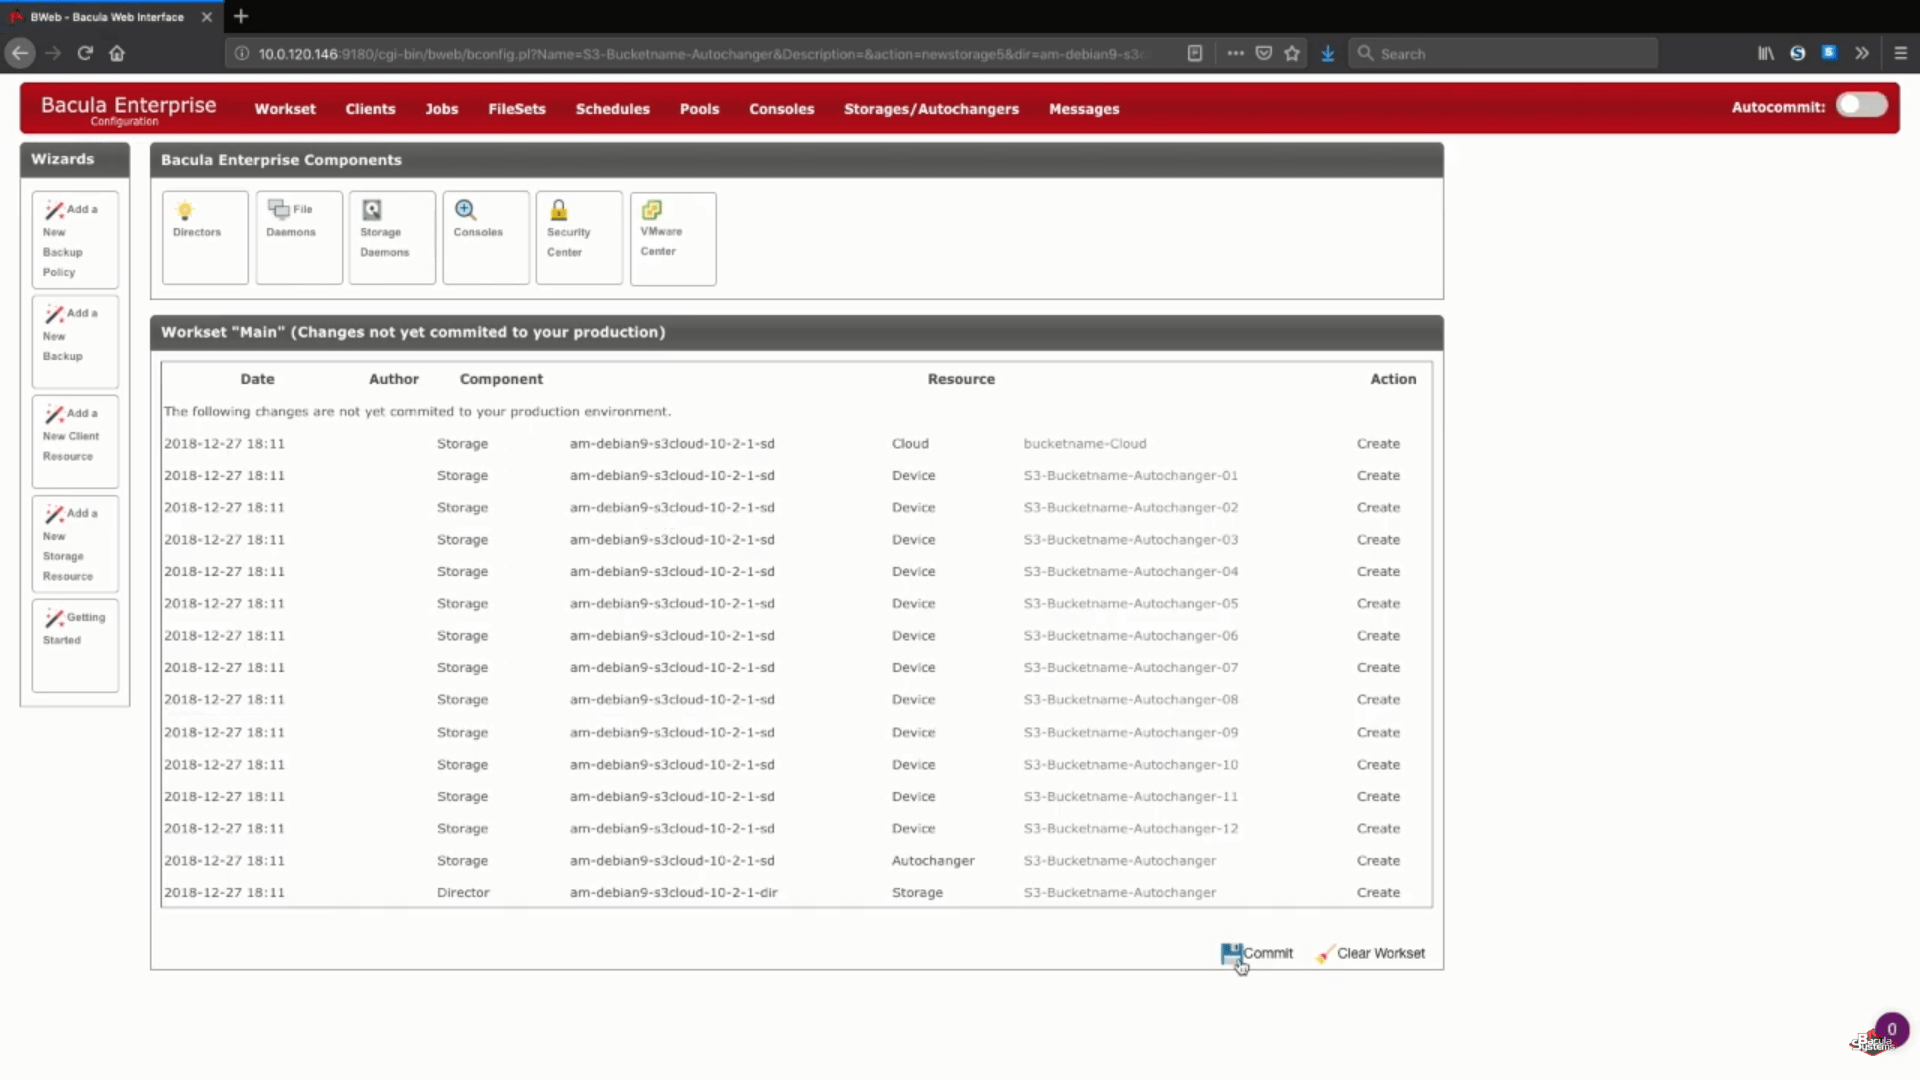
To begin the AWS backup process with Bacula, you need to enter configuration mode first. After that you will be able to see several new options available. You need the one titled “Add a New Storage Resource”.

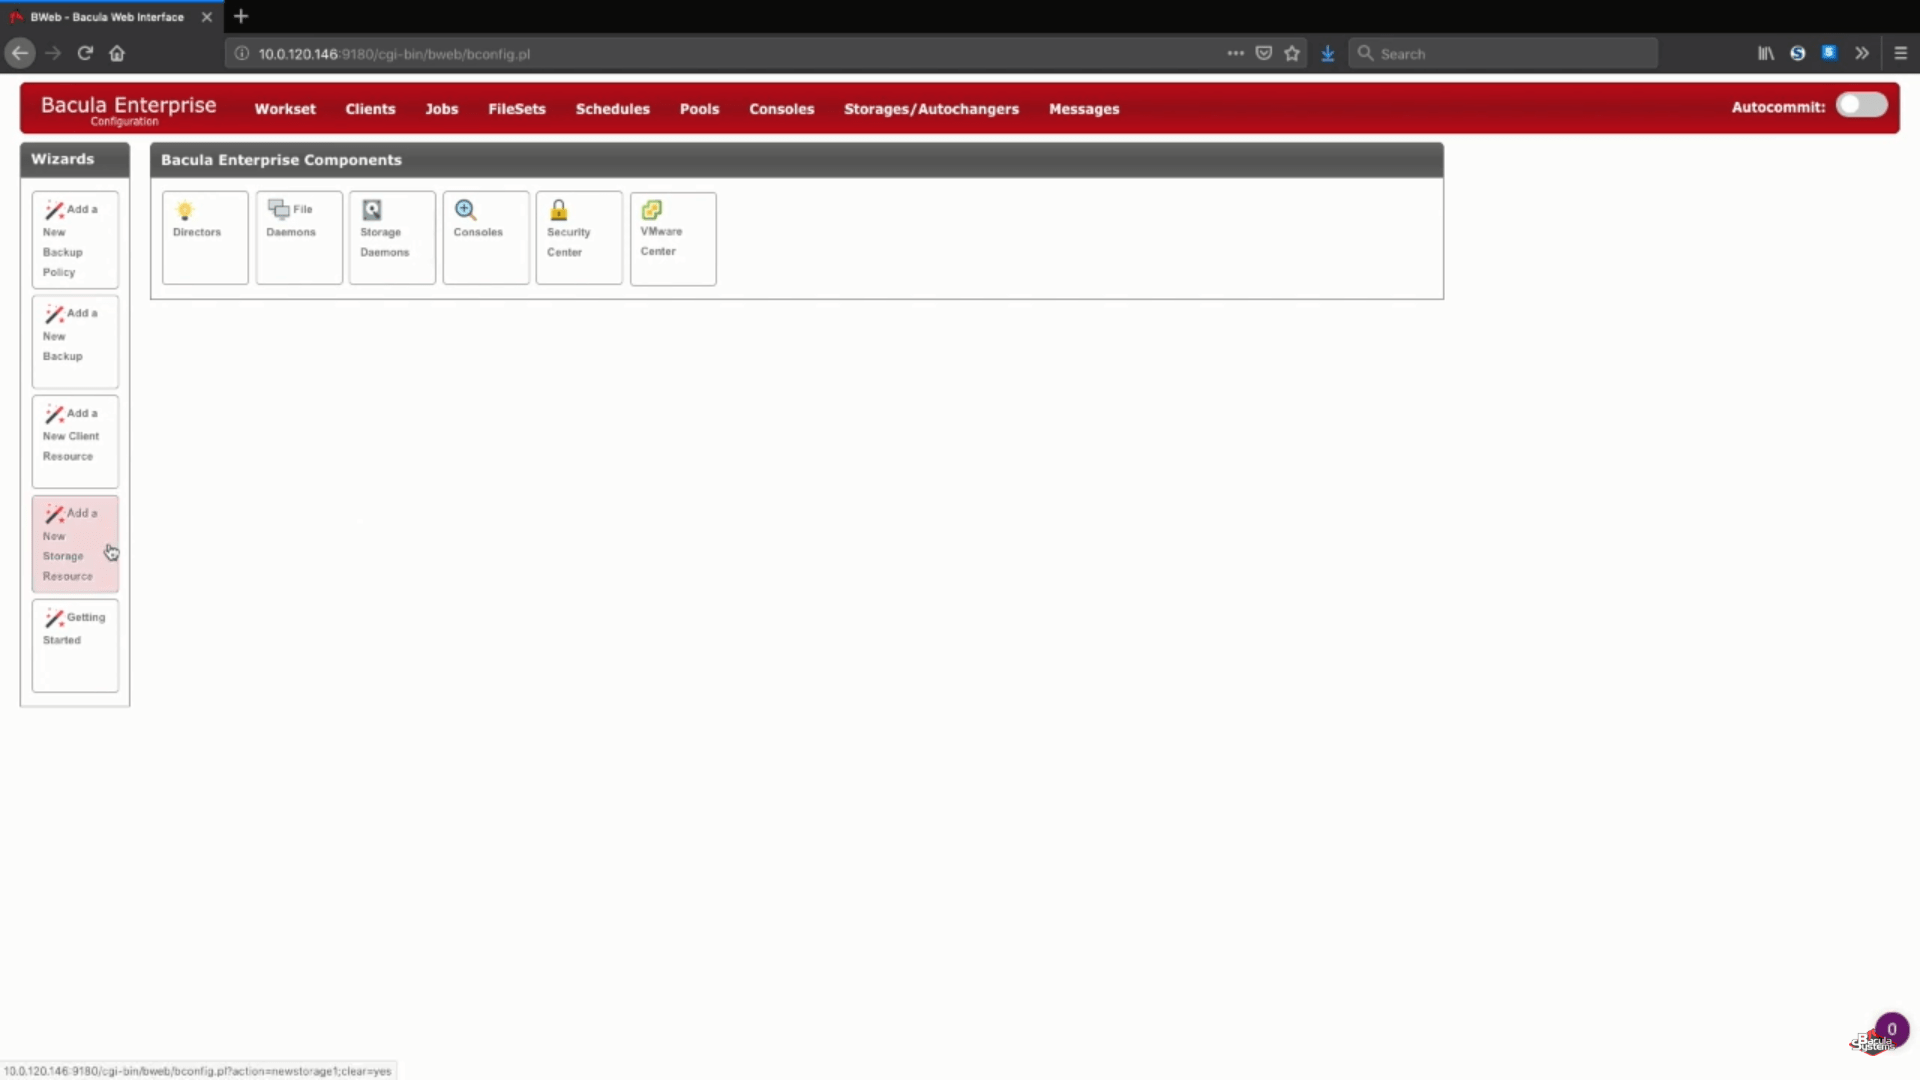
Adding a new S3 storage in Bacula Enterprise
In this specific example we’re adding a new Amazon S3 storage to an existing storage daemon. We’ll also choose the “Cloud Virtual Disk Changer” under the “Device Type” – this device type allows for several simultaneous backups to the same cloud storage.
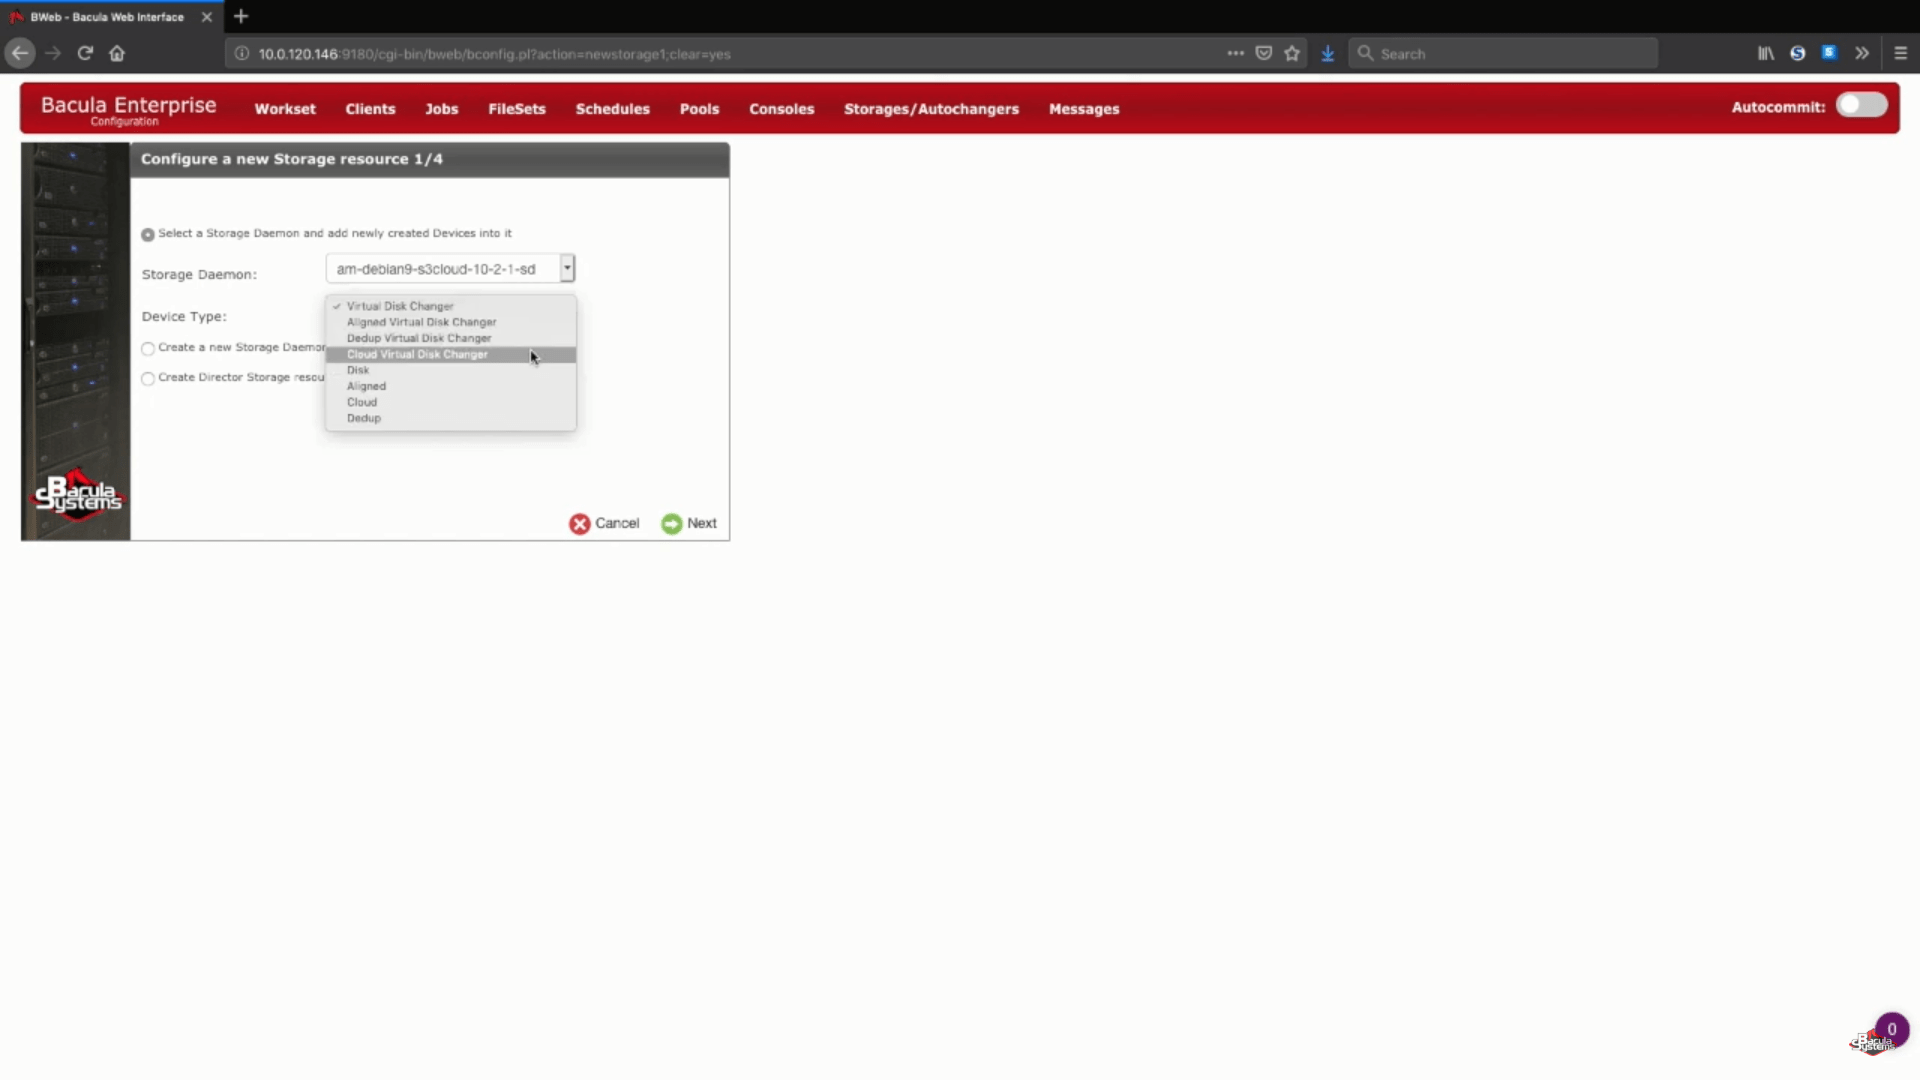
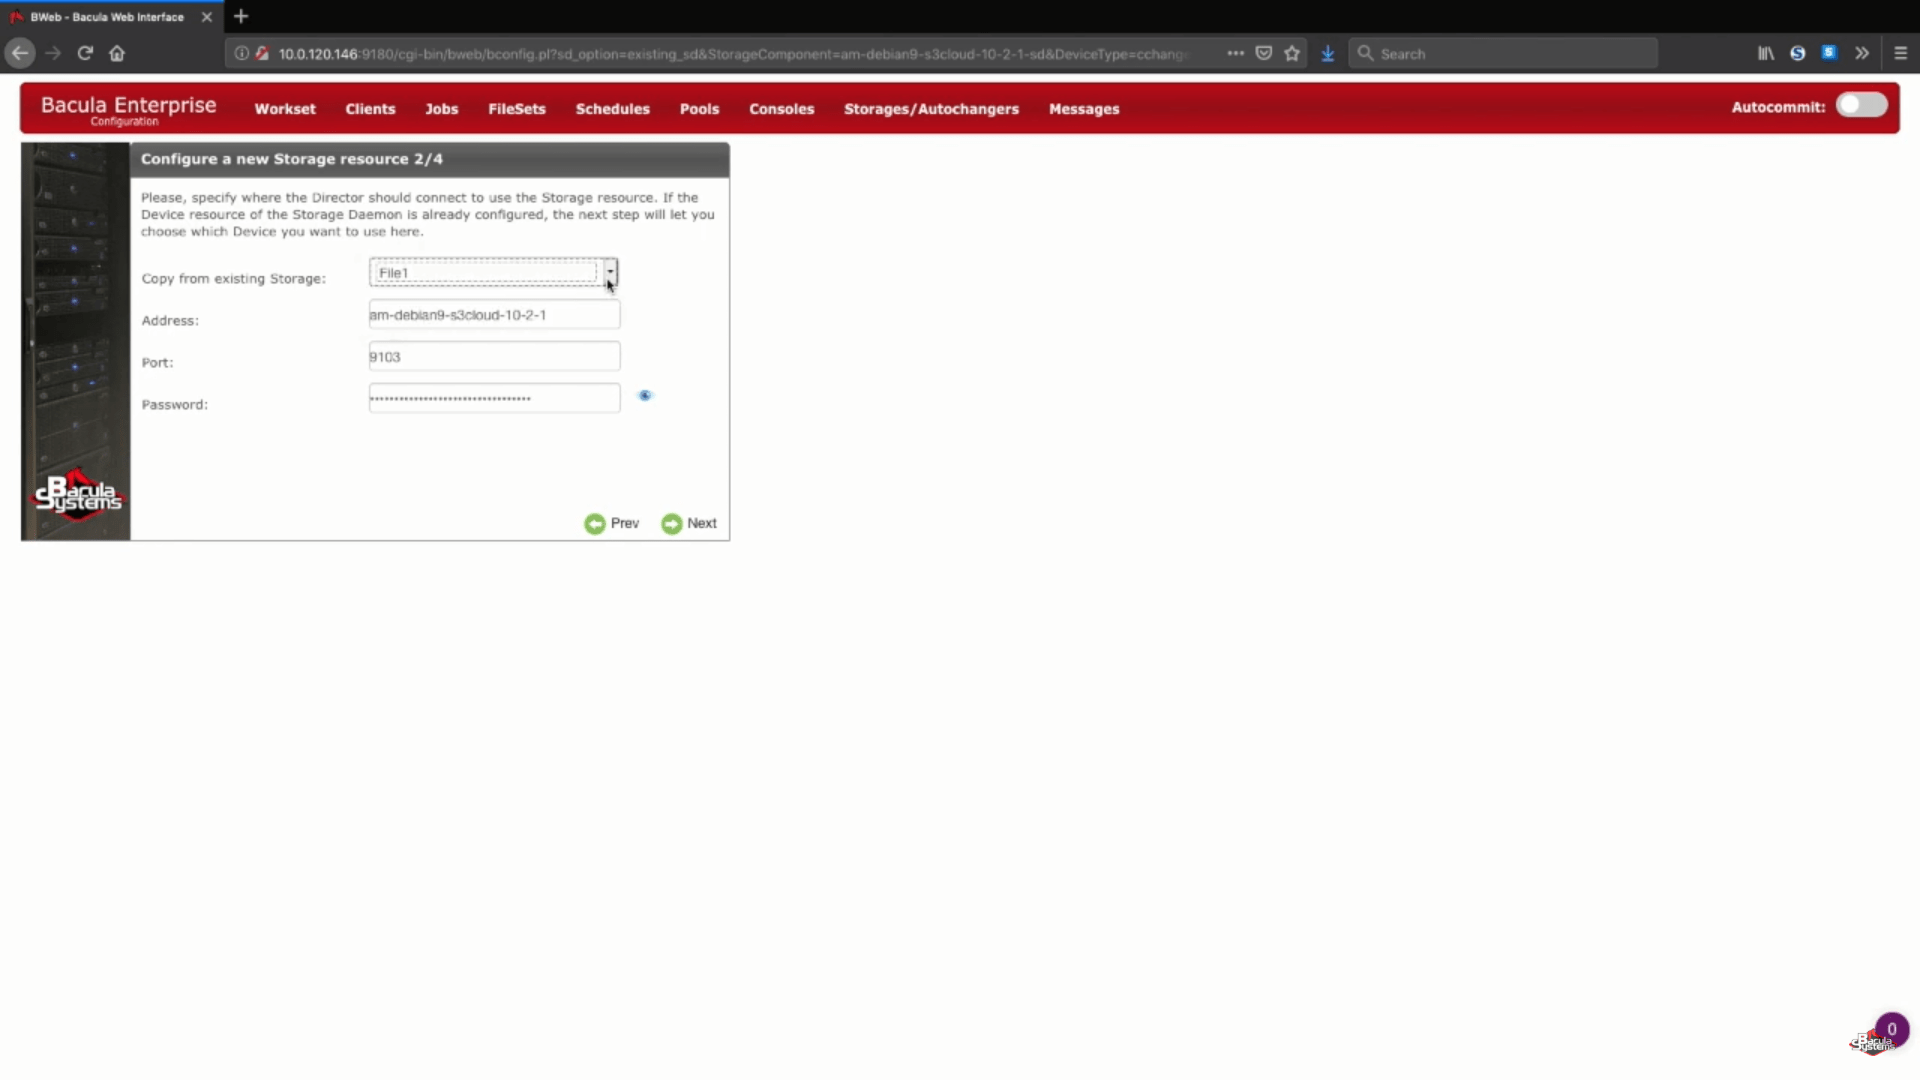
Since our storage daemon already exists – all of the information at step 2 (Configuring a new storage resource) can be taken from the previously created devices.
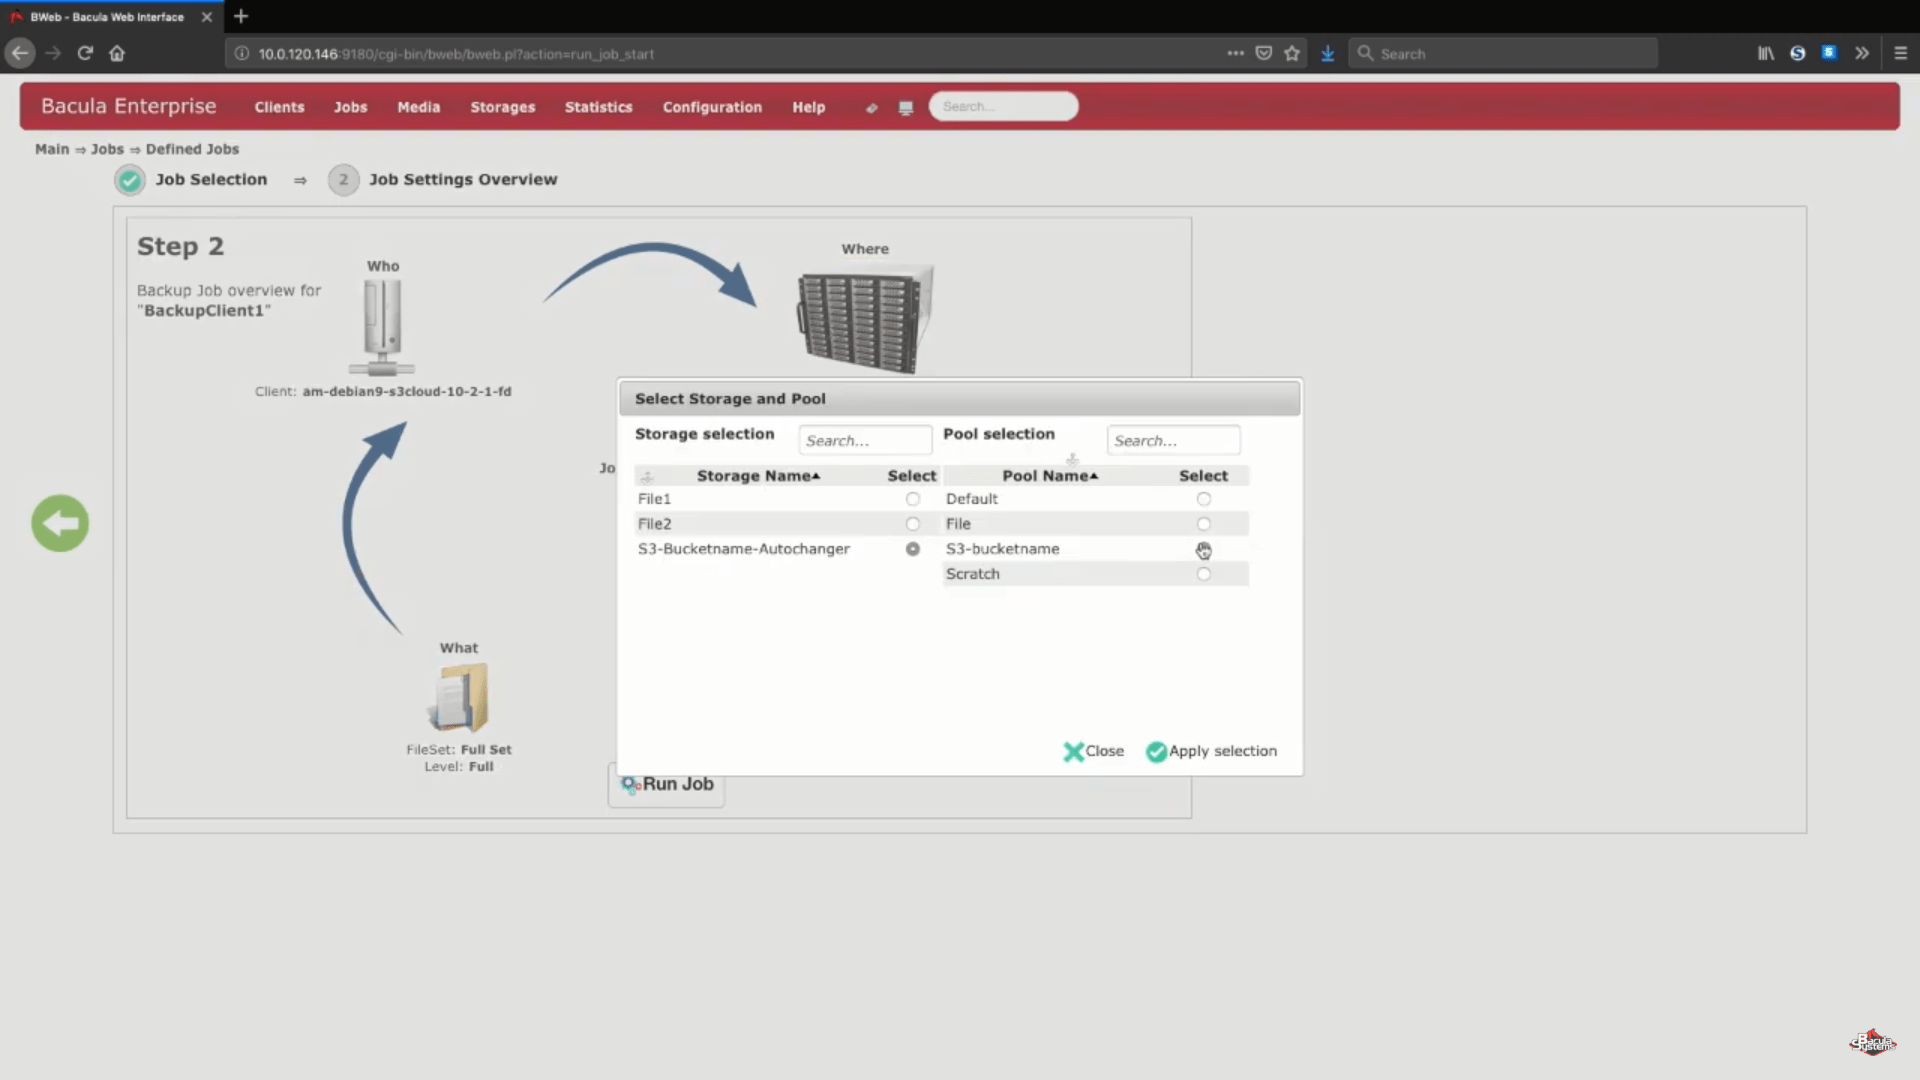
Configuring your AWS S3 storage backup using Bacula Enterprise
The next step of AWS backup process is the cloud storage information configuration. In this example we’ll be storing our backup volumes in the cloud cache, which is usually used as a small temporary area in-between loading a backup to a cloud, but it can still hold a week or more’s worth of the data to allow local backups for that period, and cloud backups if the time period is longer than a week. You can always contact Bacula support experts to know more about cloud cache’s storage size, cache retention policy and cloud upload behaviour.
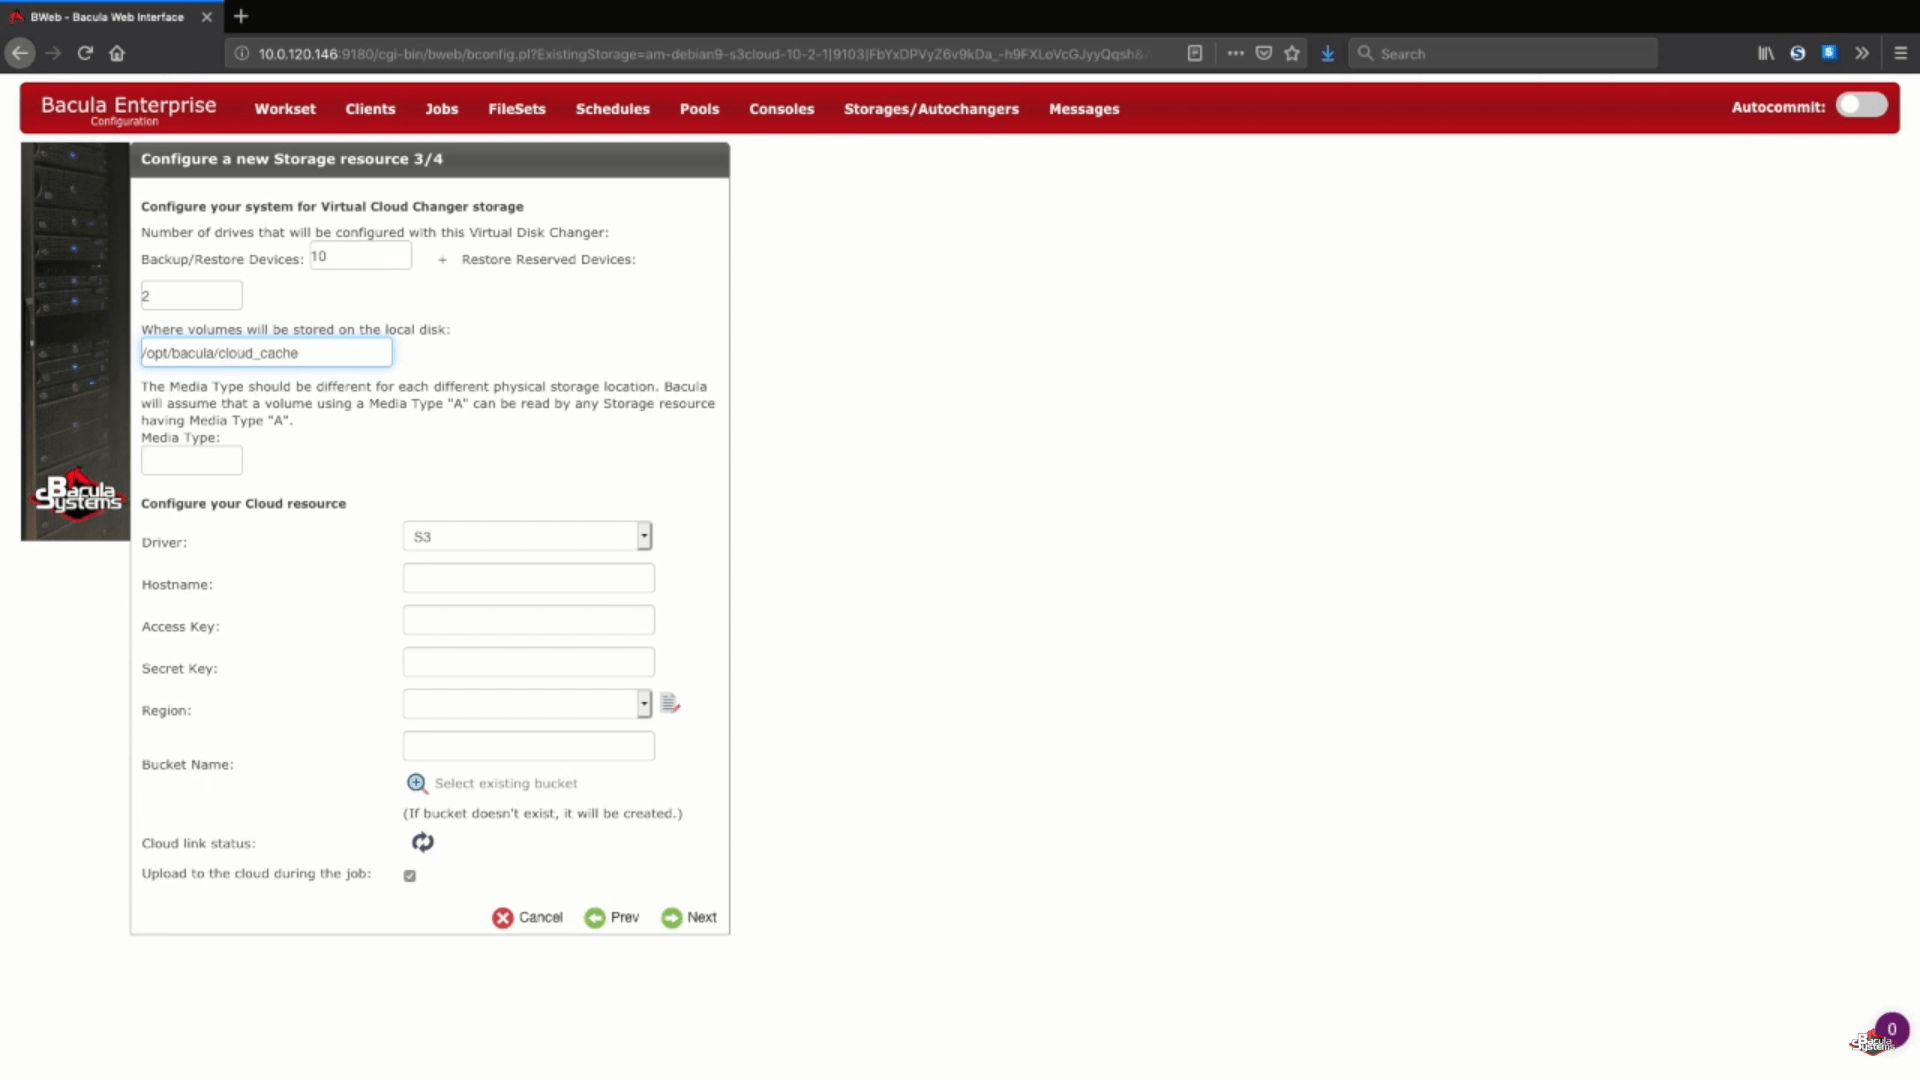
Next we’ll choose a unique media type for our new storage device, to make it easier for Bacula to see this specific storage device’s files.
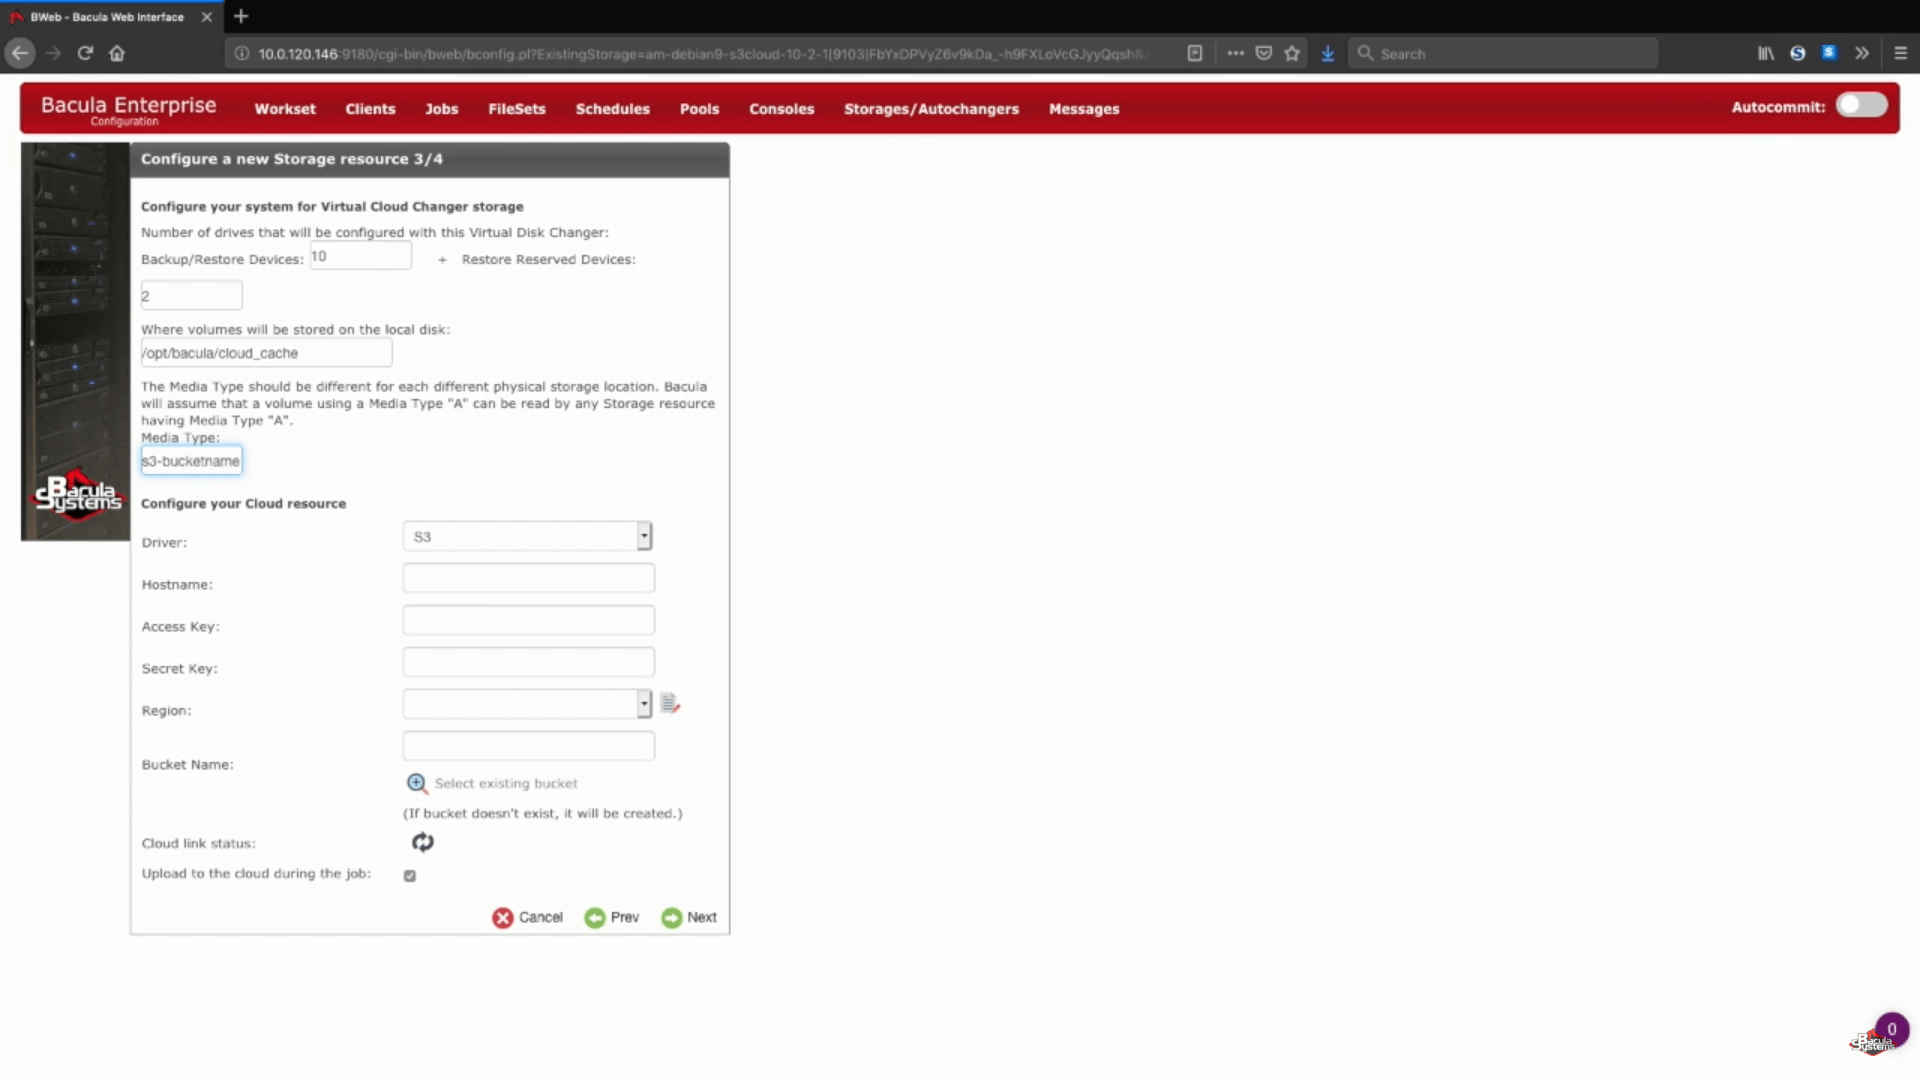
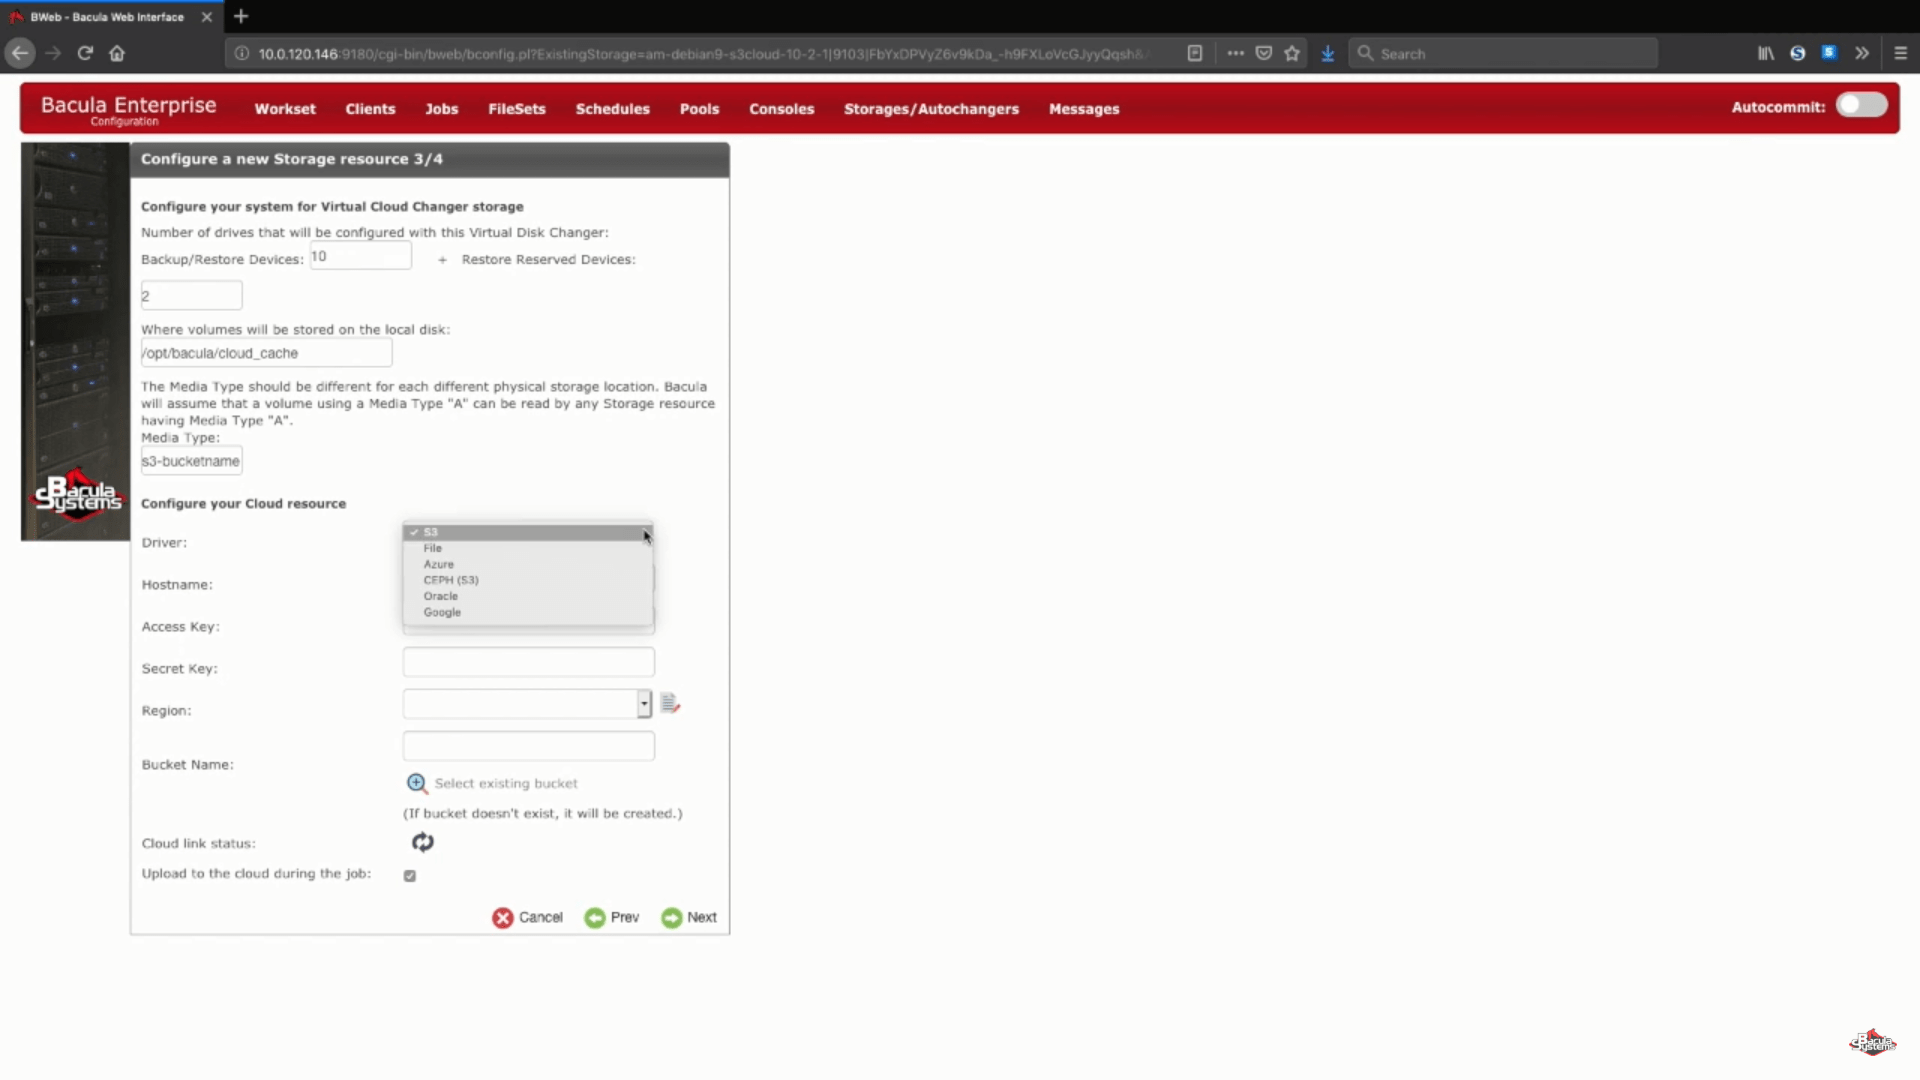
One more part of this step is choosing your AWS S3 cloud driver from a list of supported cloud drivers.
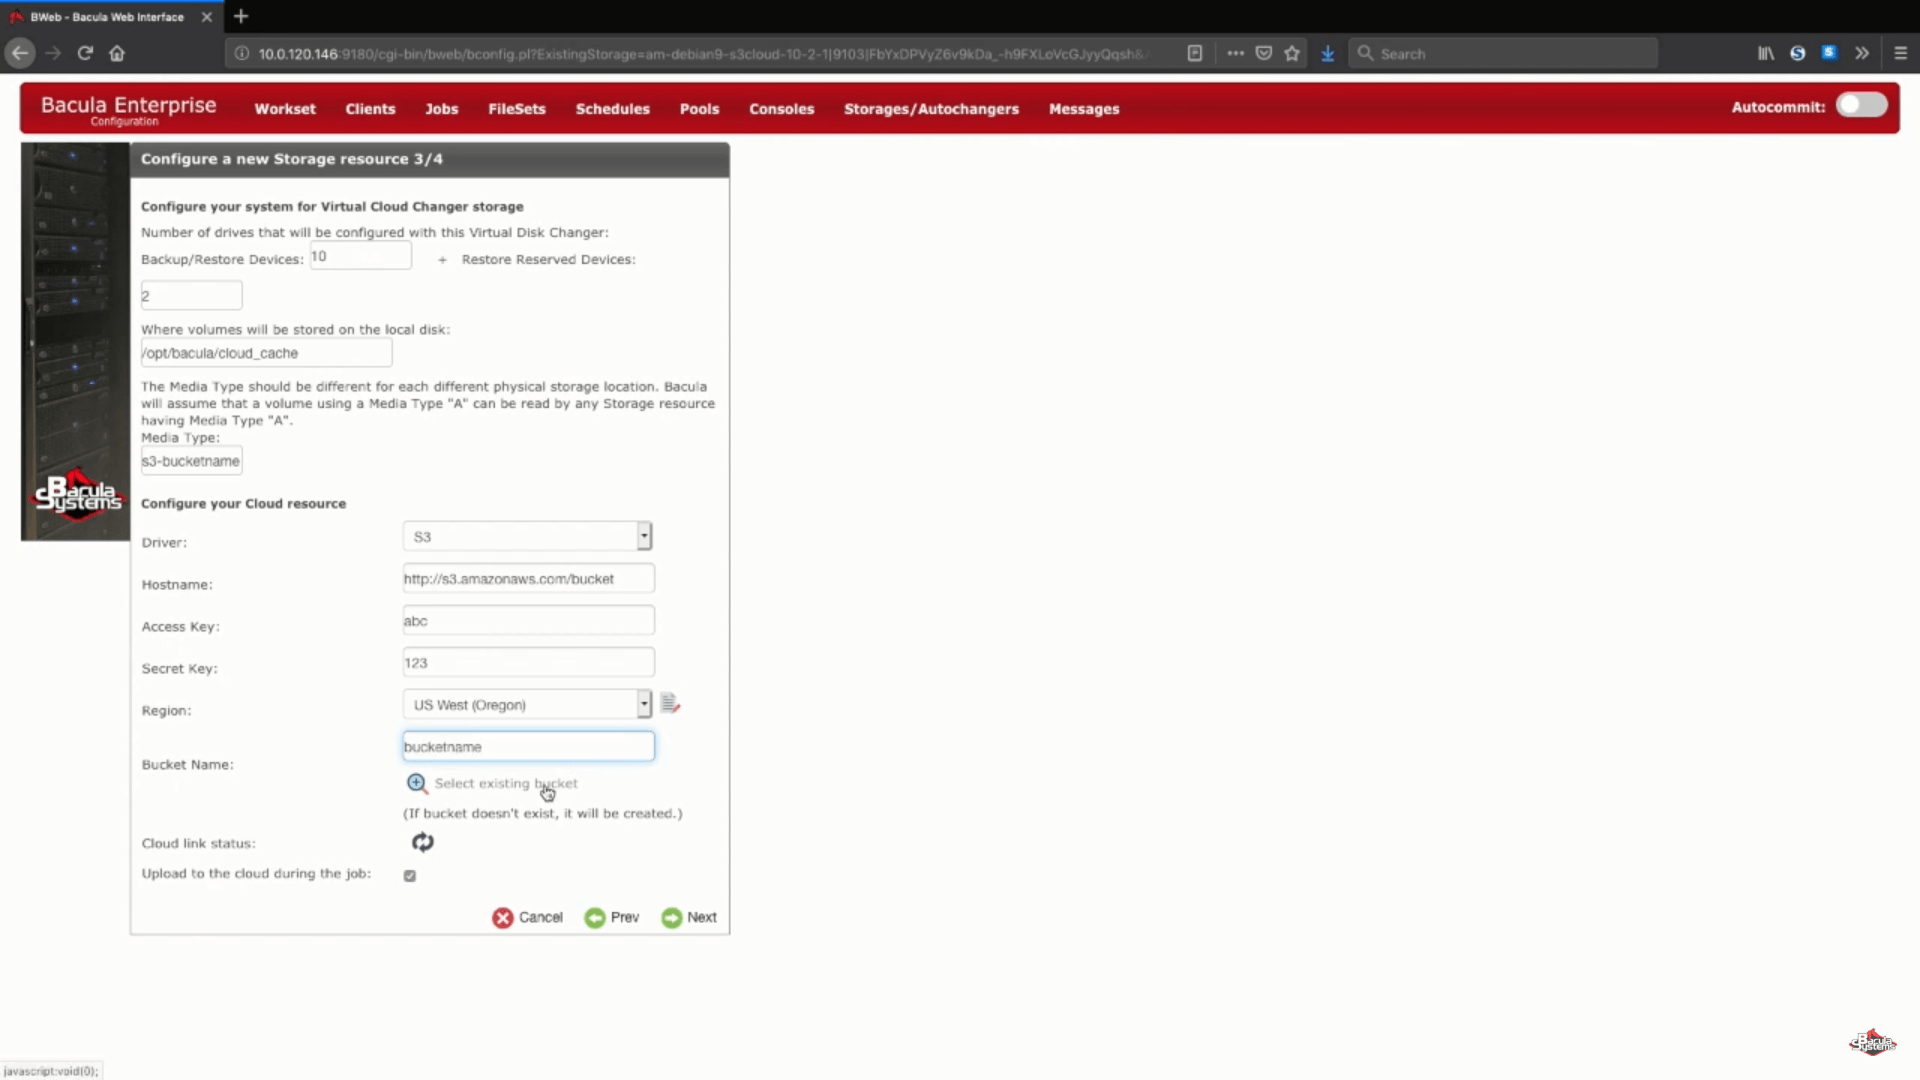
Next, we set up a list of arbitrary information like cloud hostname, account info, region and so on. You’ll also have a choice between choosing an existing bucket by connecting to your existing account or to enter a name in the corresponding line to confirm the creation of a new bucket.
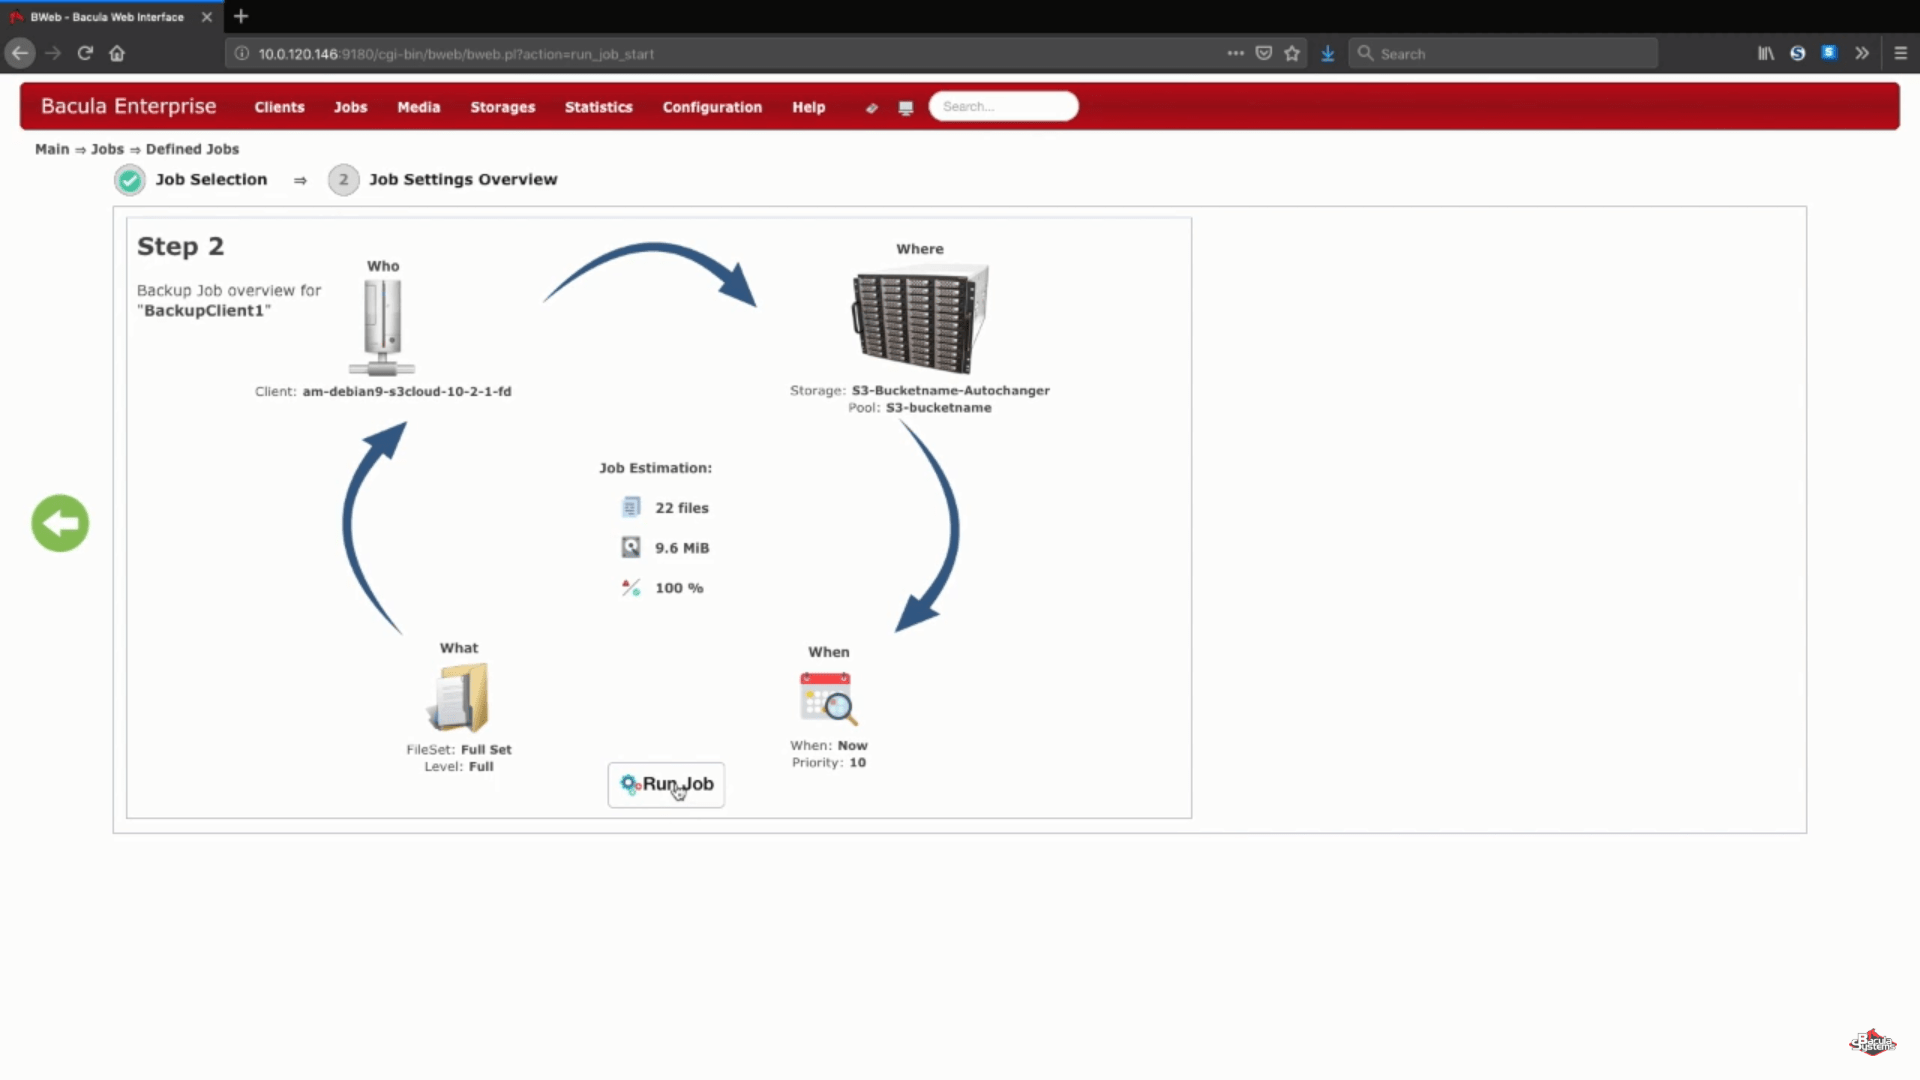
Finishing the S3 storage setup process
There are two possible options left: cloud link status and “upload to the cloud during the job”. Cloud link status button allows you to immediately check your current system’s connection to a cloud of your choosing. “Upload to the cloud during the job” is an option that is chosen as a part of default settings to upload your backed up data to the cloud as soon as it’s ready (even in the process of a backup job), but you can also disable this option if you wish to upload after a job is finished or with some other schedule in mind.
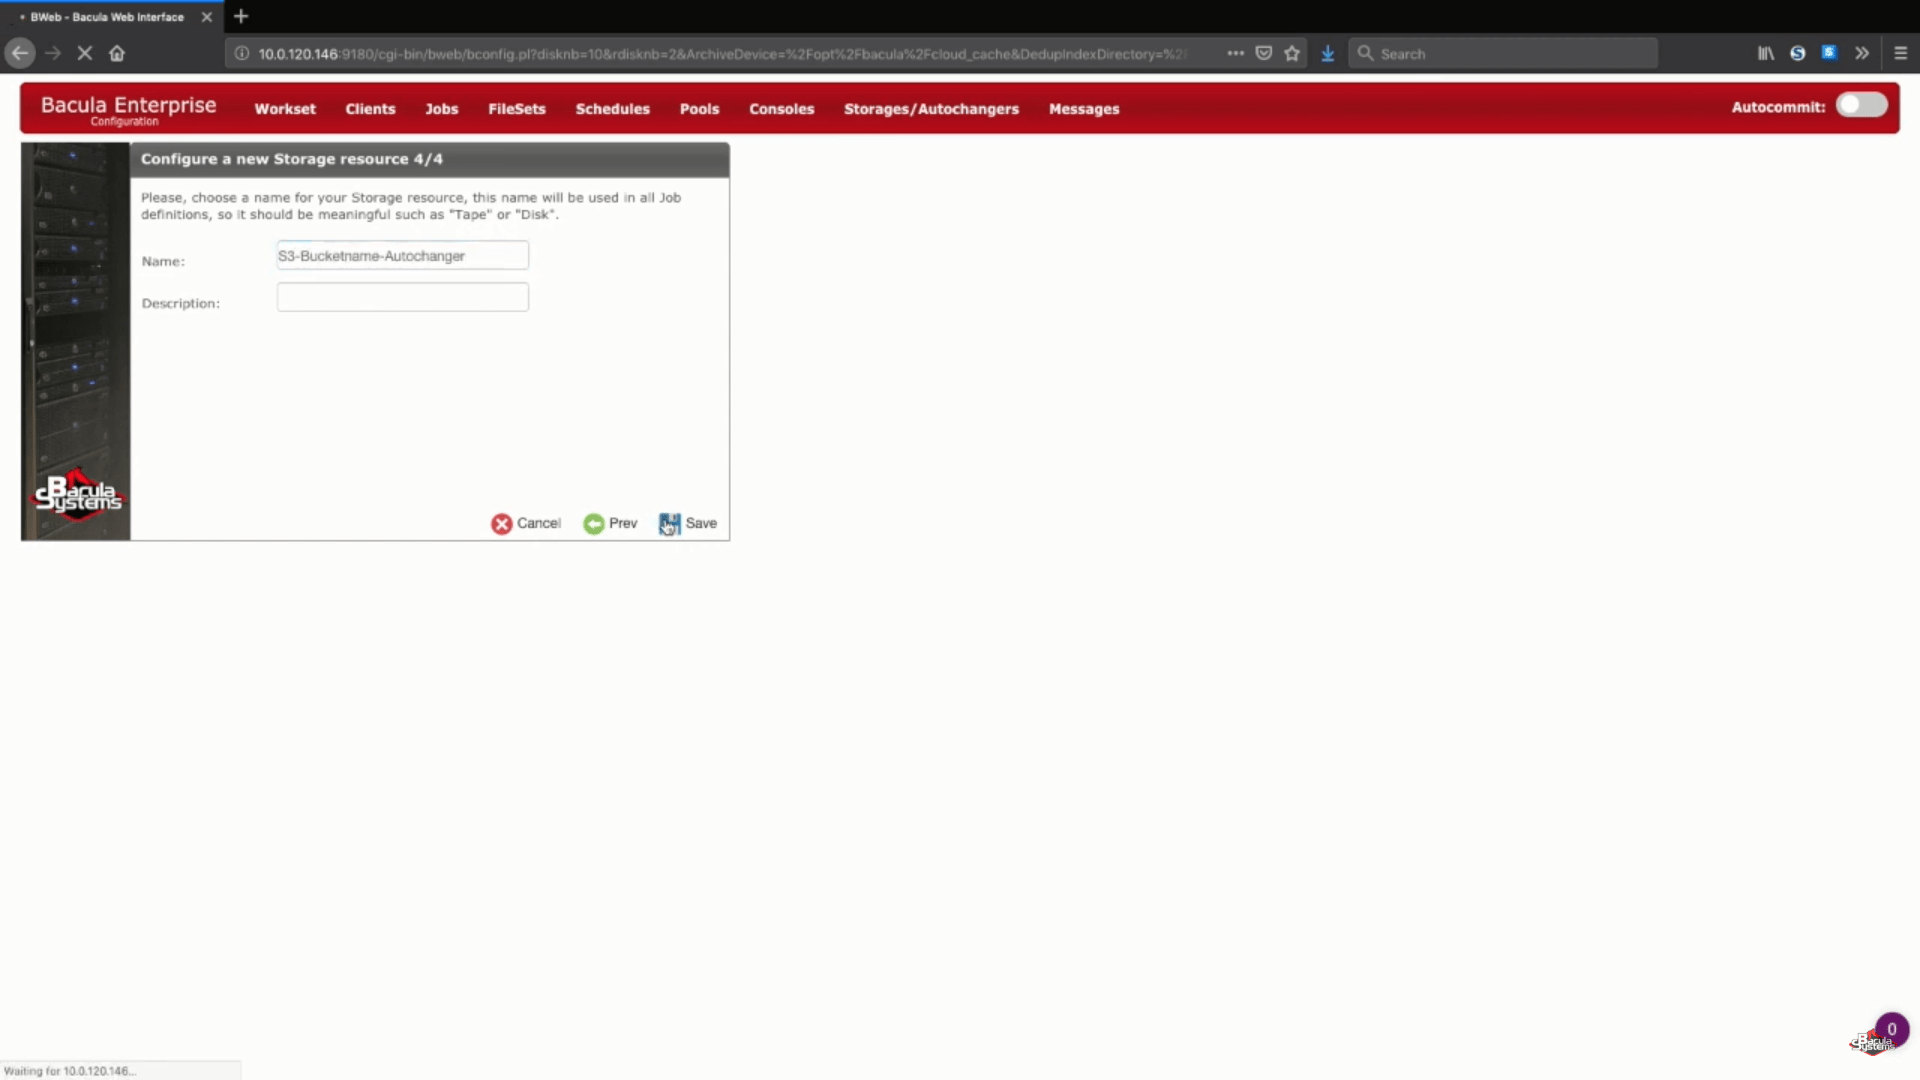
The next step of this wizard is simply typing in your preferred storage name and optional description.
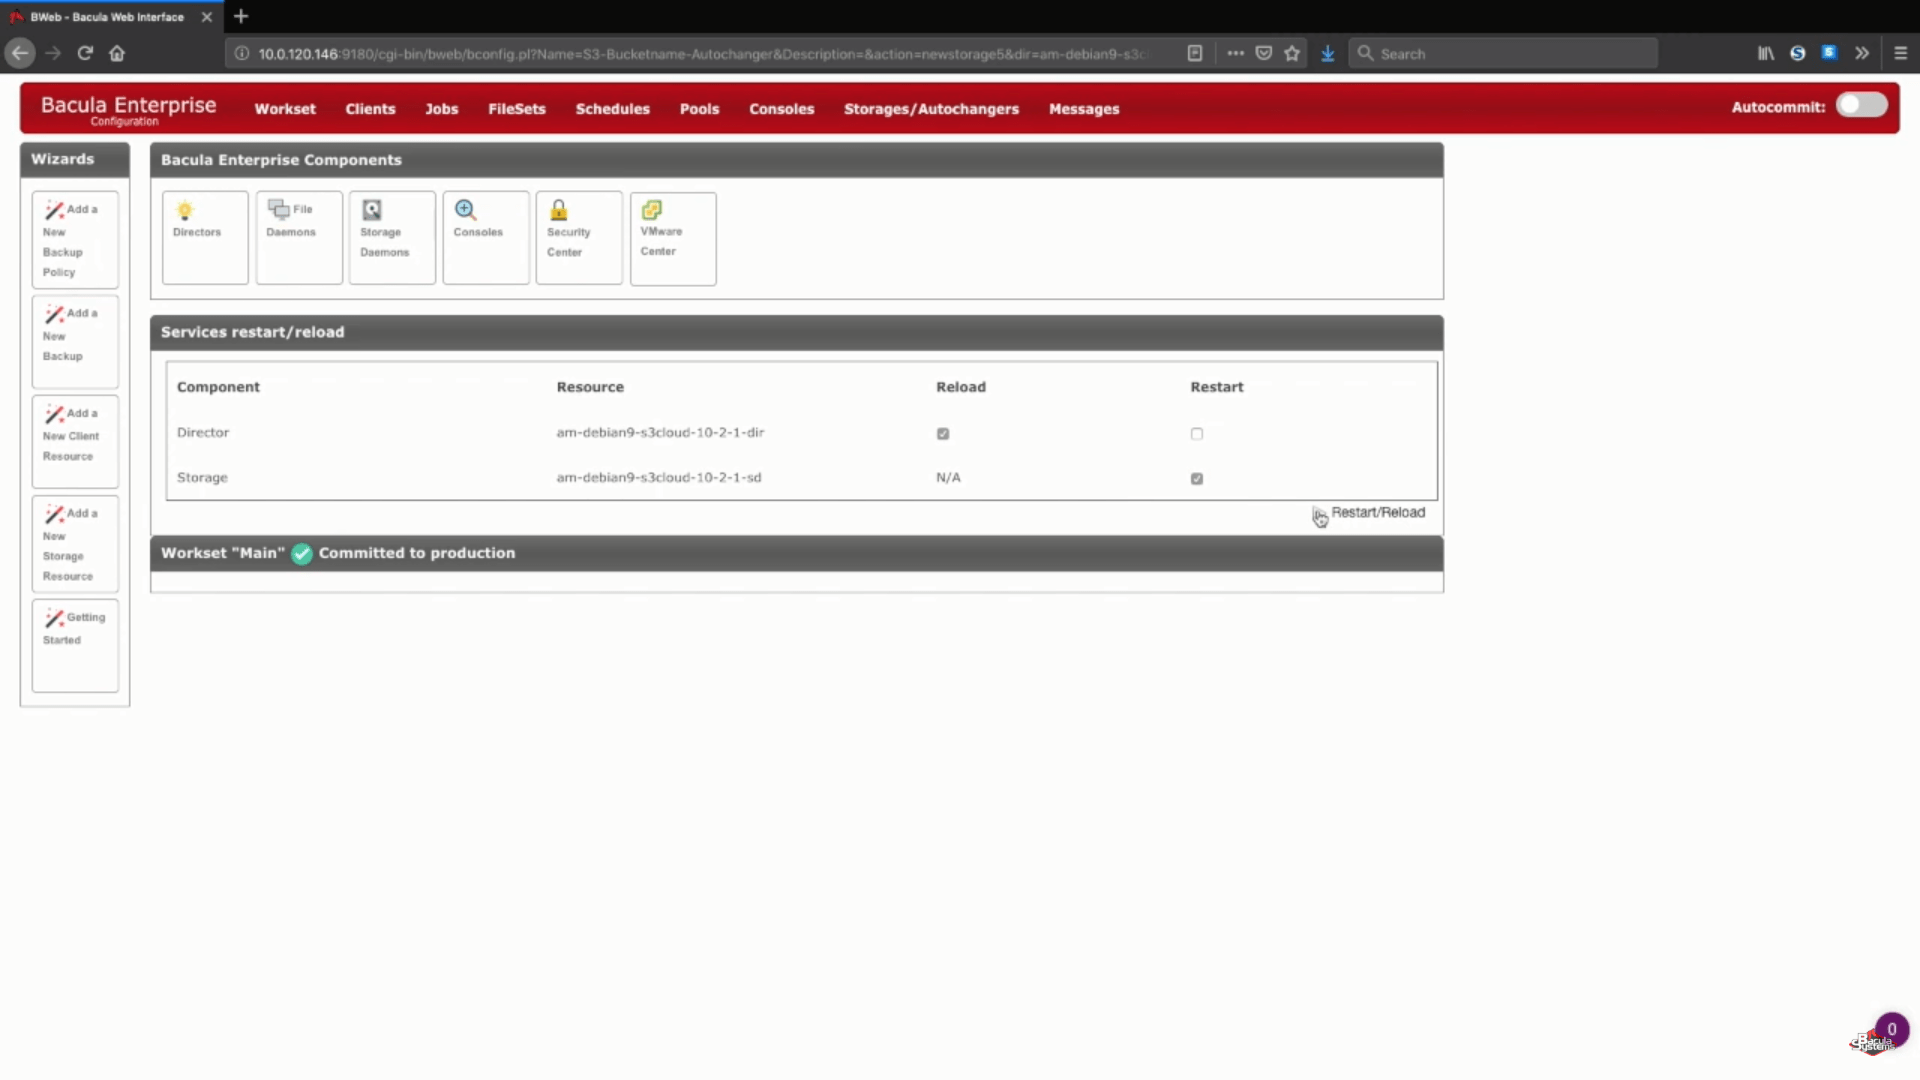
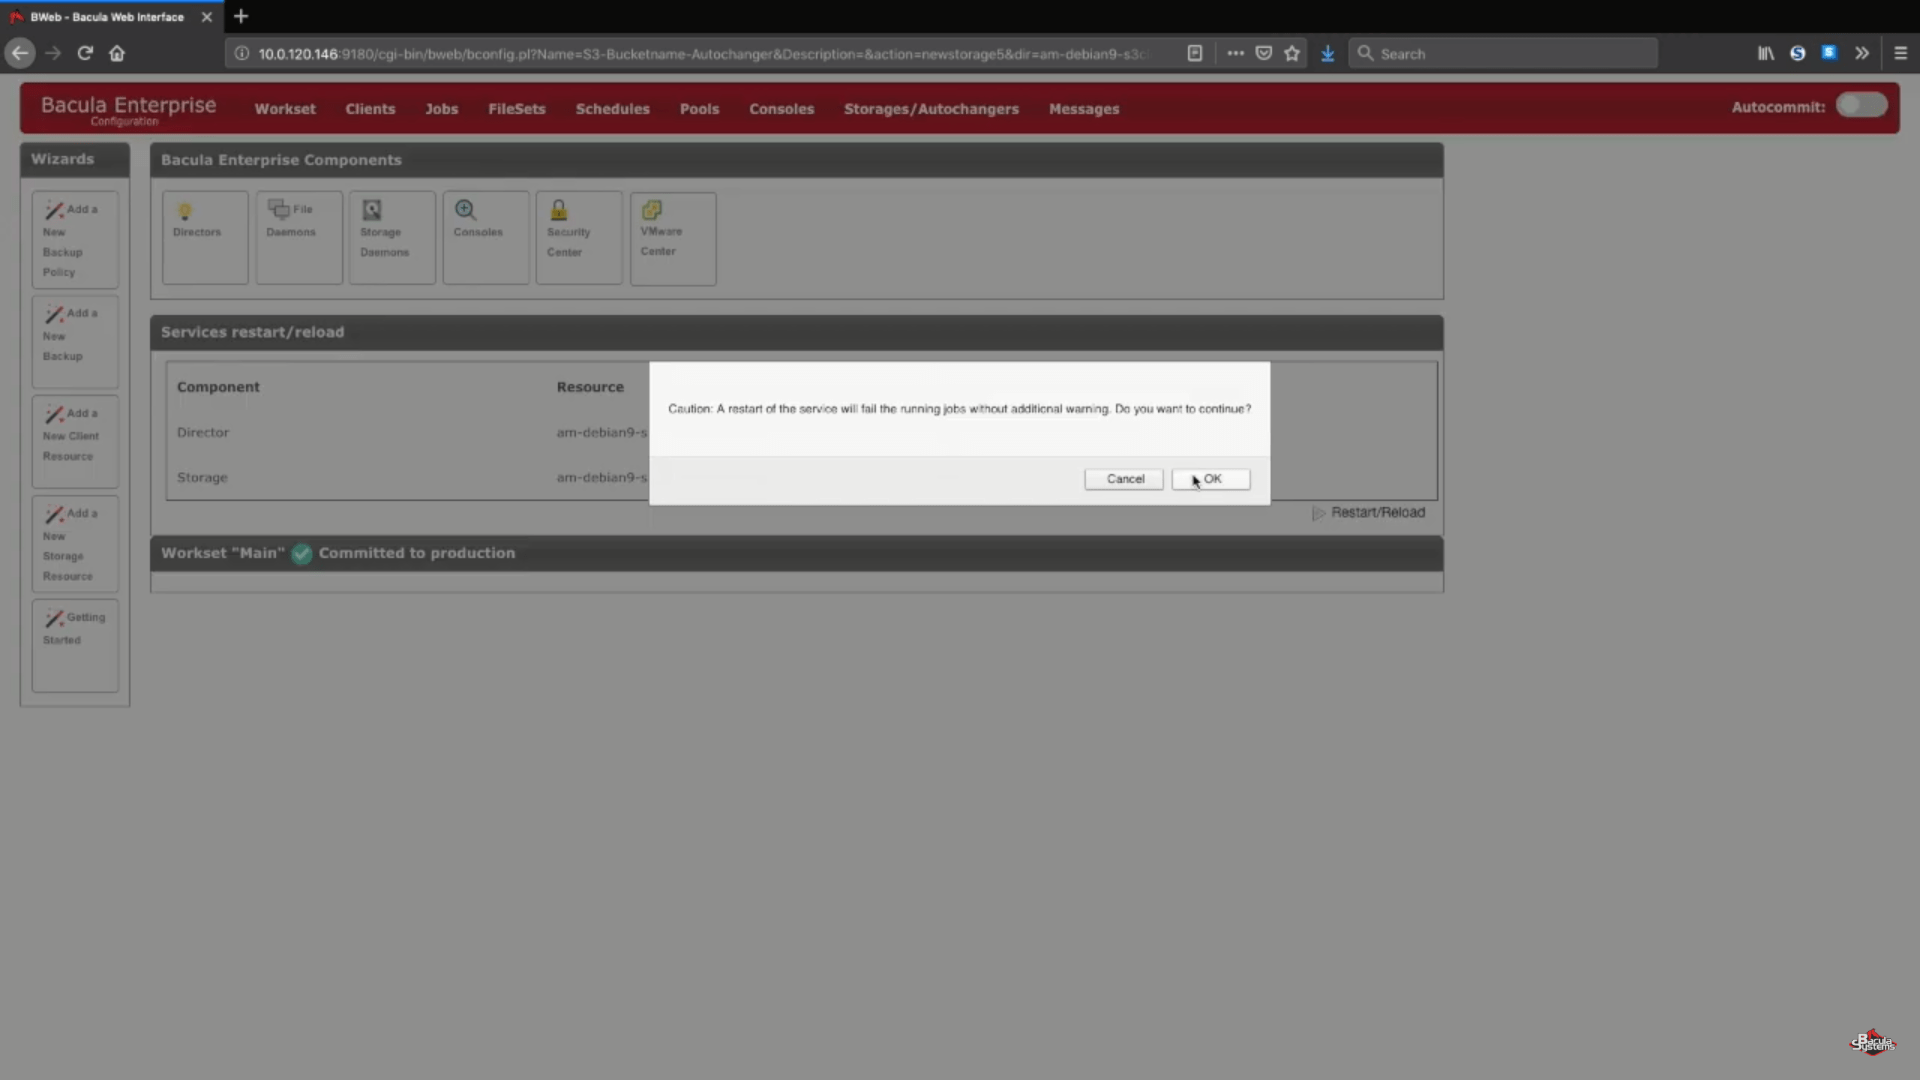
Saving your new S3 backup settings
After this step you can push the “Save” button to allow all of the previous changes to be committed to production. Keep in mind that in order to properly commit everything to production you’ll have to reload your storage daemon, meaning that any job that is running would fail in the process.
A logical step after this would be to set up new backup pools for this specific cloud storage and to properly configure jobs to write data to the new pools. You can address Bacula’s documentation, contact our support or watch our YouTube channel to get help in regards to these steps.
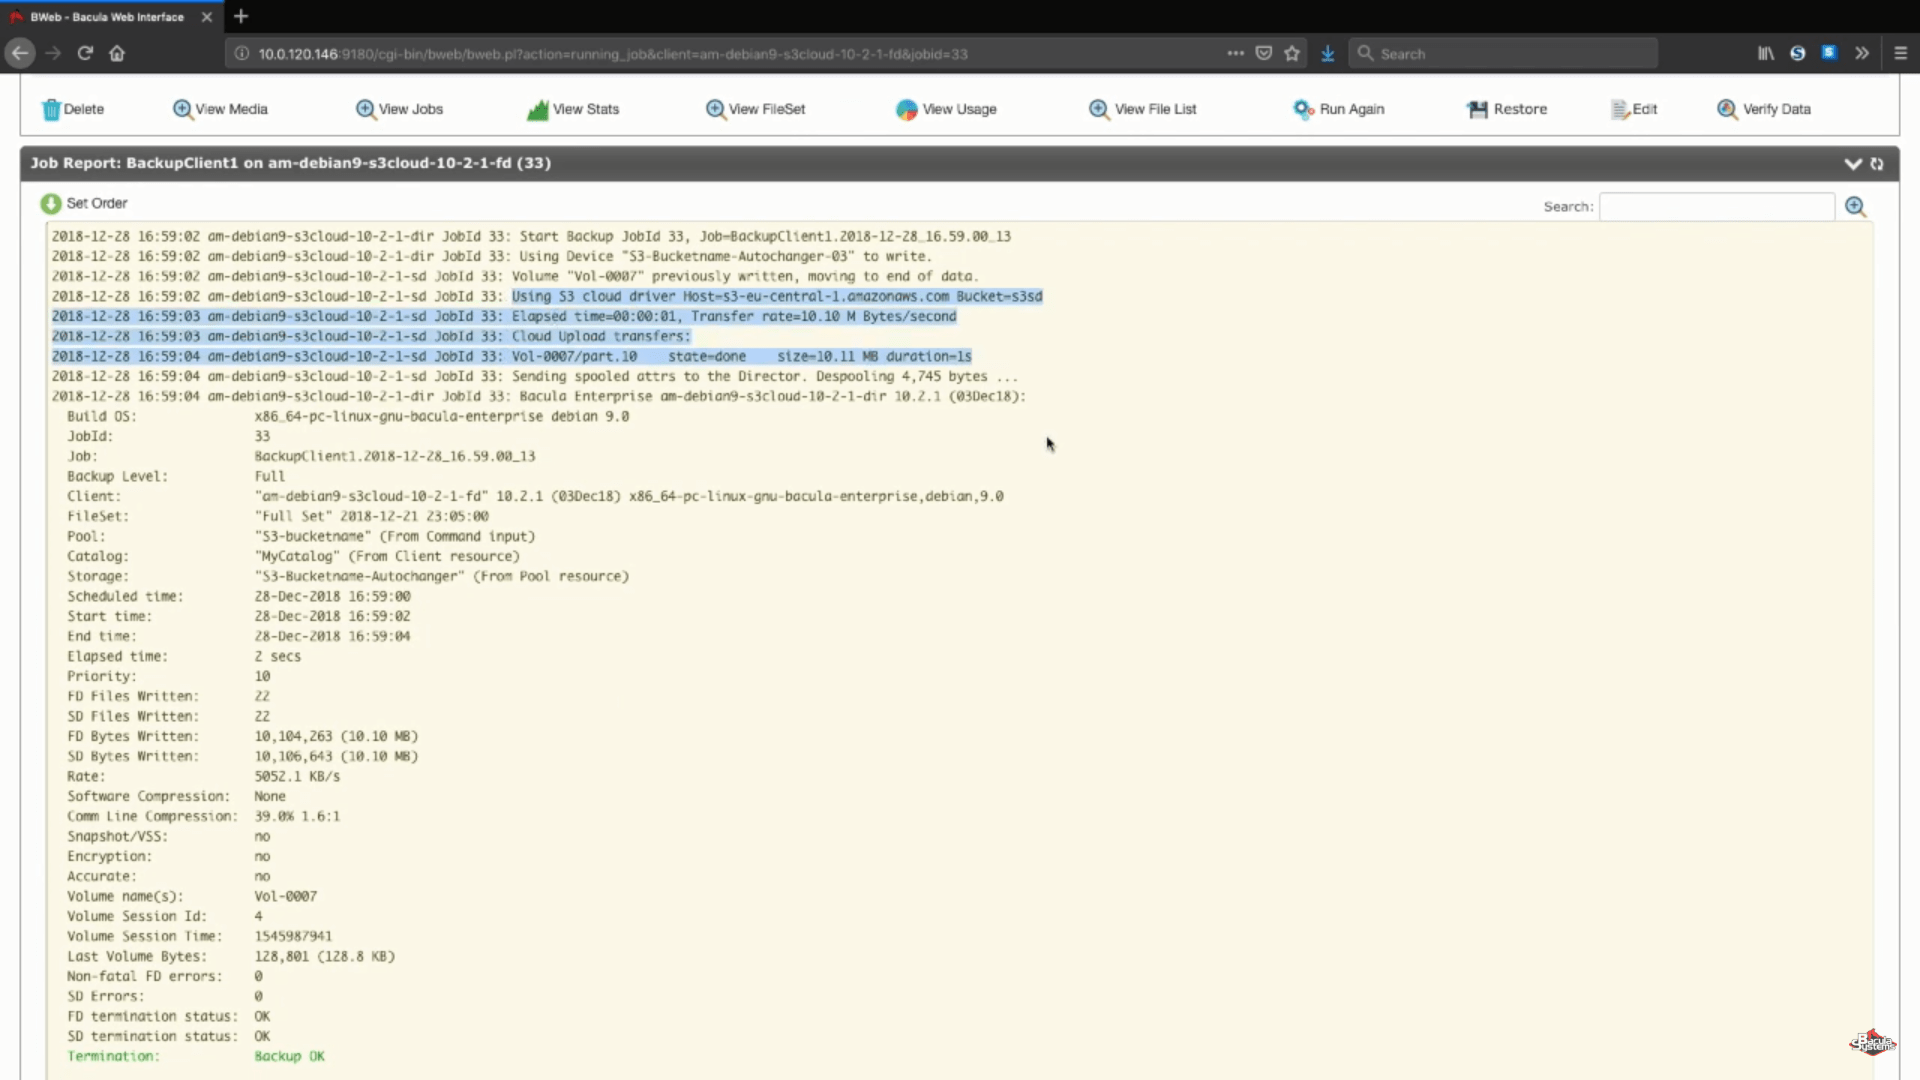
Testing the AWS backup settings
To test that everything we’ve just done works properly, we’ll run a small full Amazon S3 backup job manually directly to the new storage device. Usually this process is automated using a job schedule and/or other configurations.
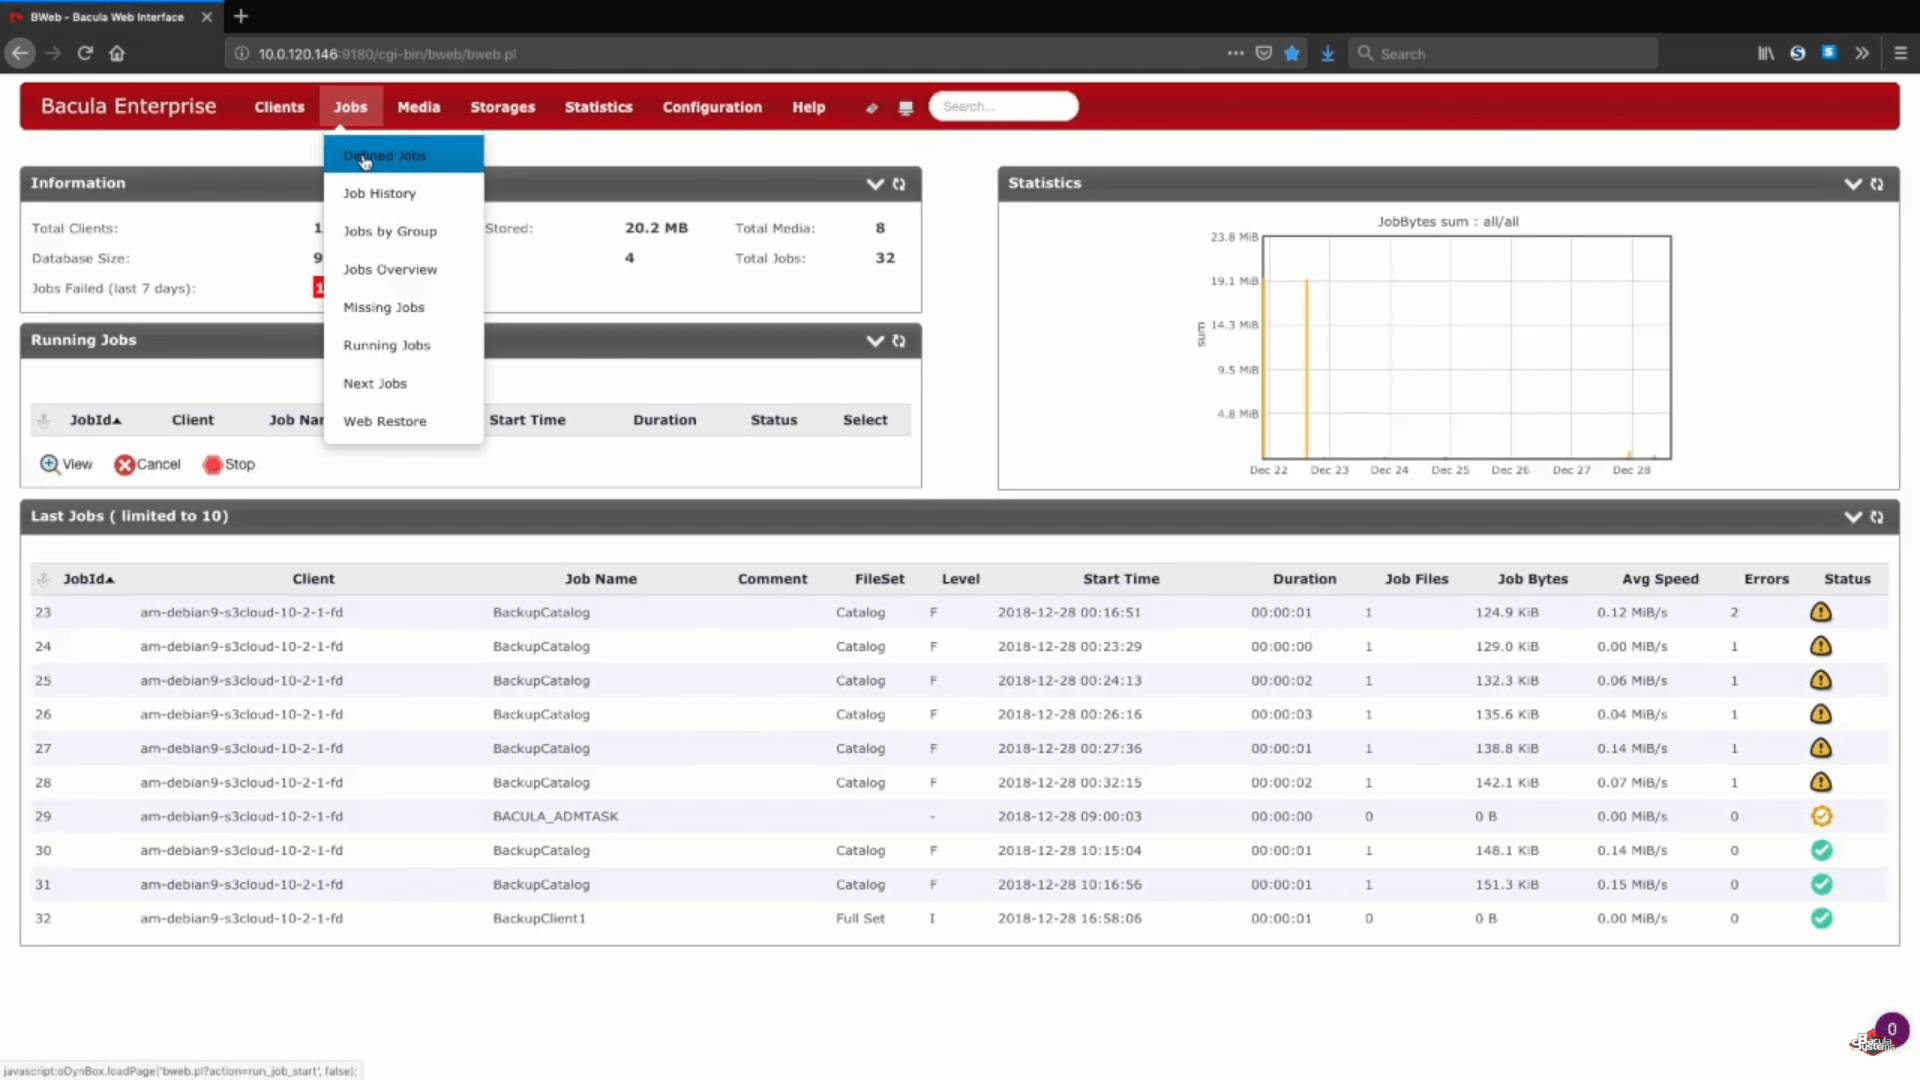
After the job has run we will be able to see the entire process’s logs, and this specific section (on the screenshot below) shows us that everything uploaded correctly.
Conclusion
Bacula Enterprise is a strong choice for reliably managing your AWS S3 and other cloud backups, including creating and configuring newer backup storages and setting up backup jobs to be performed automatically. It also has advanced configuration and customization capabilities combined with ultra-modern and up to date anti ransomware features.


It’s surprising how many other services can be integrated into the basic AWS S3 backup process. This was a very interesting read, thank you.
It’s true, I never thought that something like Amazon Glacier can be used to backup S3 databases, or that we can use versioning for that purpose, either.
I never thought that you can postpone the data upload after the backup is complete, even though i’ve been using Bacula Enterprise’s S3 backup software for quite a while. We learn something new every day, i guess.
I knew that Amazon takes their data’s safety seriously, but this is far more versatility than i’ve anticipated. Learning about Bacula Enterprise’s capabilities in the field of Amazon S3 backup was really interesting, too.