Introduction to Scenario 4
Welcome to Scenario 4 of the Bacula Enterprise Hosted Trial! This scenario takes you on a journey into cloud-based backups, expanding the horizons of your data protection strategy. Leveraging Bacula’s robust and flexible architecture, we will guide you through the seamless process of backing up to the cloud, ensuring your critical data is securely stored and easily retrievable from anywhere.
In this scenario, you will discover how Bacula Enterprise integrates with many cloud storage solutions, starting with a pre-configured S3 object instance. This setup provides a practical demonstration of cloud backup processes, giving you the confidence to scale up to real-world applications using AWS. Embrace the power of cloud technology and experience how Bacula simplifies and enhances your data backup strategy.
Scenario 4: Backing Up to the Cloud
This scenario showcases Bacula Enterprise’s capability to leverage cloud storage for backup operations, highlighting its versatility and compatibility with industry-leading cloud solutions. By backing up data to the cloud, you can benefit from enhanced data durability, accessibility, and disaster recovery capabilities. Remember, a big advantage of Bacula is that can take data from practically anywhere, and back it up – and recover it – to practically anywhere.
Objective
In this scenario, we aim to demonstrate how to configure and execute backups to a cloud environment, we will also invite you to use your own AWS bucket, if you have access to one. You will also learn how to perform data restores, ensuring you have a full grasp of Bacula’s end-to-end and back-to-back cloud backup solution.
Highlights of this Scenario
1. Run a Simple Backup Job:
Use Bacula Enterprise to back up the “Cats and Dogs” dataset or the catalog to the S3 Object store. This step demonstrates the ease of backing up data to a cloud environment.
2. Perform a Data Restore:
As in previous scenarios, execute a data restore operation to ensure the backed-up data is recoverable. This reinforces Bacula’s reliability in data recovery from cloud storage.
3. Configure BWeb for AWS Backup:
If you have an AWS account, learn how to configure BWeb to back up directly to AWS. This section will guide you through the setup, demonstrating how you can utilize Bacula’s cloud backup capabilities with one of the leading cloud providers.
Benefits of Cloud Backups with Bacula
– Scalability: Cloud storage together with Bacula provides virtually unlimited capacity, allowing your backup strategy to grow with your data needs.
– Accessibility: Securely access your backups from anywhere, ensuring your data is always within reach when needed.
– Reliability: Benefit from the high durability and availability offered by cloud providers like AWS, ensuring your backups are safe and recoverable.
– Cost Efficiency: Optimize your storage costs with scalable cloud solutions, paying only for the storage you use. Bacula’s smart endpoint optimization reduces request overheads, thereby reducing the cost to you.
Experience the next level of data protection with Bacula Enterprise by diving into this scenario. Harness the power of the cloud to ensure your critical data is always backed up, secure, and ready to restore at a moment’s notice. Let Bacula Enterprise transform your backup strategy with its seamless hybrid cloud integration capabilities.
Step-by-Step Instructions
These steps are optional and only relevant if you have access to your own AWS S3 storage account. Please skip to step 6 if you want to use the built-in cloud endpoint.
Let’s enhance the explanations and integrate them into the provided template.
1. Access BWeb from the Homepage
.png)
From the Bacula Online Trial homepage, click on the BWeb link to access the Bacula Enterprise interface. This will take you to the main dashboard where you can start configuring your backup destinations.
2. Open the Add Configuration Menu and Select ‘Storage Daemon’
.png)
In the BWeb sidebar menu, click the configuration button and select ‘Storage Daemon’ then navigate to the Clouds submenu. Click the **Add button**. This will open the Add Cloud configuration wizard where you can set up your cloud backup target.
3. Select AWS S3 as the Storage Type
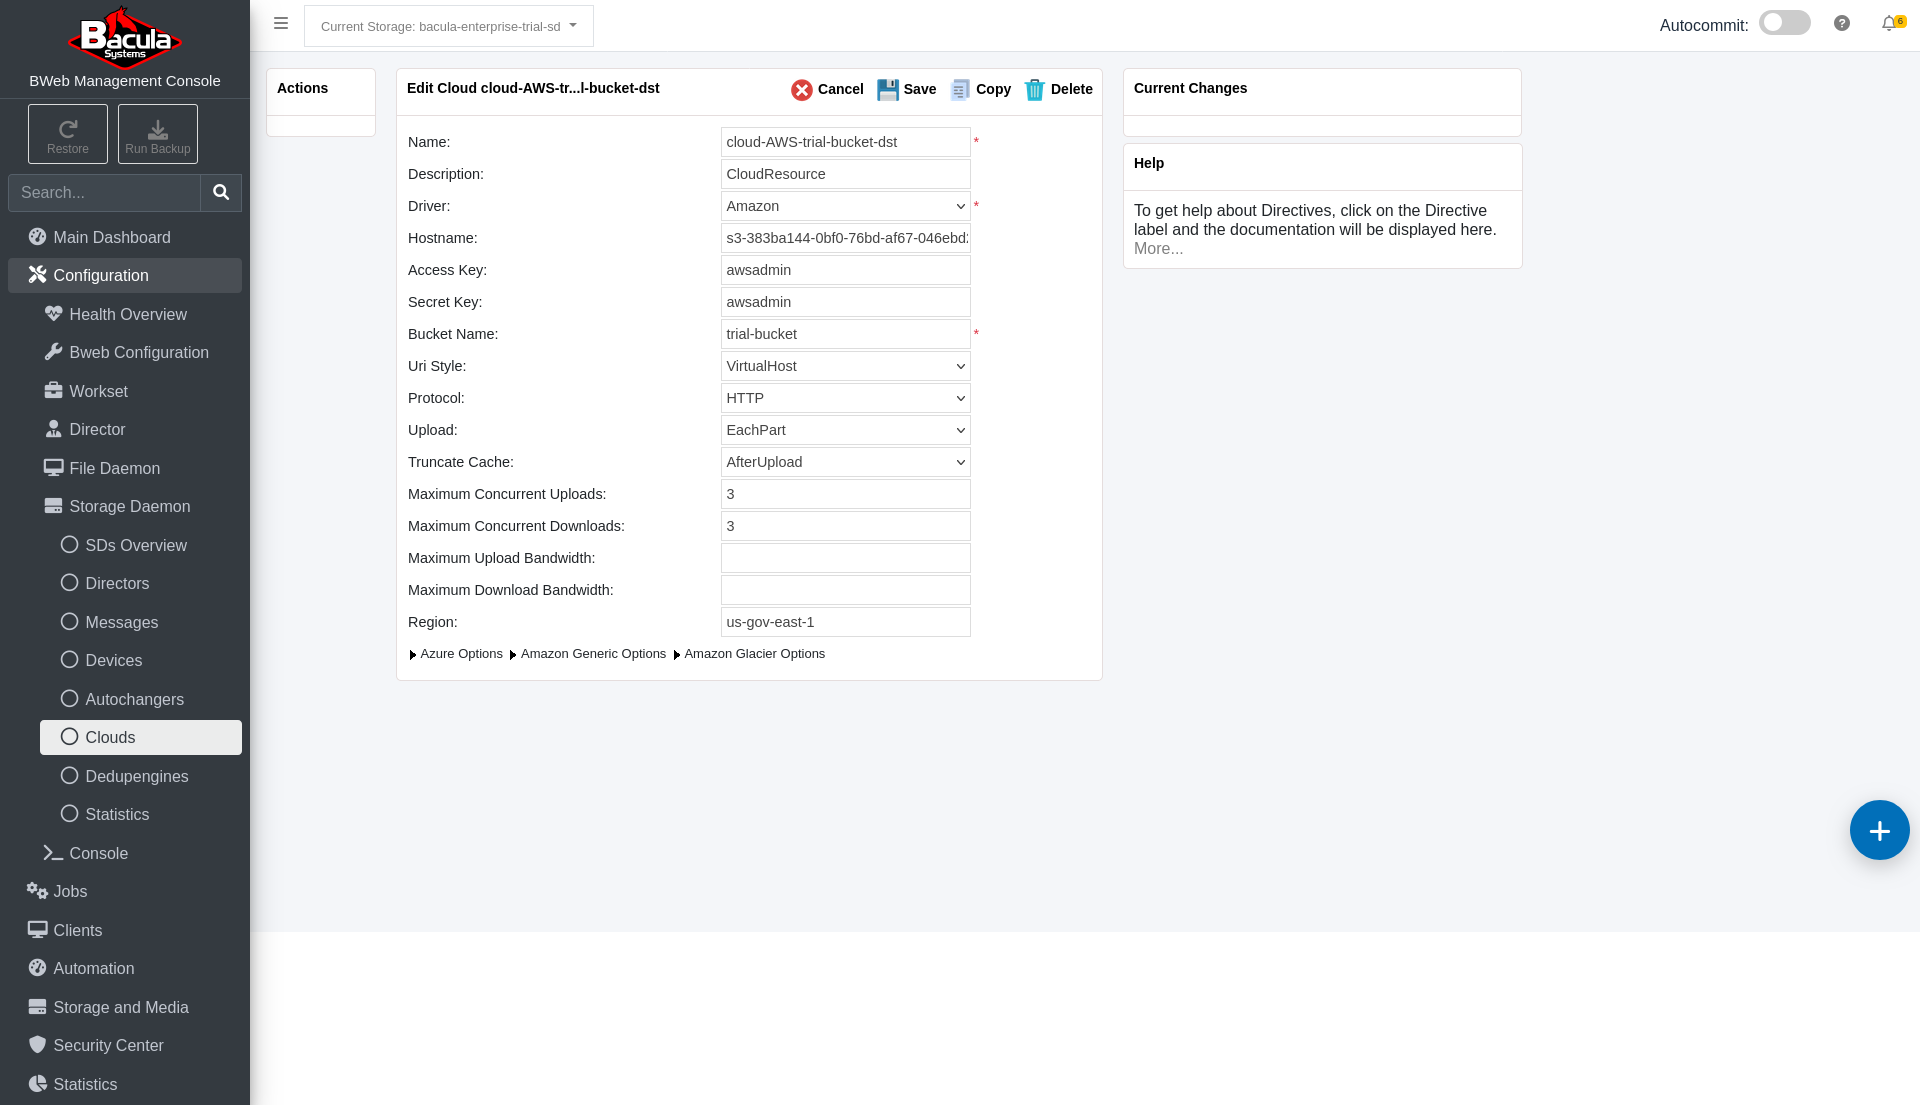
In the destination wizard, select **Amazon** as the driver type. For security reasons this Trial only allows connections to Amazon AWS.
4. Enter AWS Credentials
Fill in the details for your AWS account. Ensure that the credentials have sufficient privileges to read and write to the buckets. The fields include:
– **Name**: The name Bacula will use for this destination.
– **Hostname**: The endpoint URL for your AWS account’s storage.
– **Access Key**: Your AWS access key ID.
– **Secret Key**: Your AWS secret access key.
– **Bucket Name**: Your bucket’s name.
– **Upload**: Reccomend ‘eachpart’.
– **Concurrent Upload/Download**: Reccomend at least 2.
– **Region**: The AWS region where your bucket is located (e.g., `us-east-1`).
5. Verify and Complete the Configuration
Review all your settings to ensure they are correct. Once verified, click **Add** to complete the configuration. Your new cloud destination will now be available for use in backup jobs.
Skip here to use the built in S3 cloud endpoint.
6. Open the Run Backup Wizard
.png)
From the BWeb dashboard, click the **Run Backup button** in the menu.
7. Select the Job Name
.png)
Here we will use ‘Linux all Files to Disk’. select your preferred cloud endpoint as the destination. Click **Next arrow** after making your choice.
8. Choose the Client (Who)
.png)
Next, you need to select the client that you want to back up. Choose either the RedHat, Director server, or Debian client from the list. For this example, select the client `rhel-xxx`. Click **Apply Selection** to proceed.
9. Select the Destination (Where)
.png)
Now, choose the destination storage you want to use for this backup job. Select **cloud-AWS-trial-bucket-dst**. You should also use a relevant pool such as ‘Disk_Full_30days’. Click **Apply Selection** to confirm your choice.
10. Select the Fileset (What)
Now, choose the Fileset you want to use for this backup job. Select **Linux-All Files** for example. You mayb use whatever backup level you wish, Bacula will automatically take a full backup iof required.
11. Verify Settings
.png)
On the configuration summary page, verify all settings for the new source. Ensure that the client, fileset, destination, and retention period are correct. This step is crucial to confirm that all configurations are set as intended before proceeding by clicking ‘Run Job’.
12. View Job Progress
Once the job starts, you can view its progress on the main dashboard under the **Running Jobs** section. Click on **More details** to follow the job’s progress in detail.
13. Verify Cloud Driver Usage in Logs
In the job logs, you will see the `Using driver /opt/bacula/plugins/aws_cloud_driver Bucket=trial-bucket` message indicating the cloud driver is in use. When the backup is complete, you will also see part uploads in the logs `Cloud Upload transfers:`.
14. Initiate Restore Process
.png)
To restore the backed-up files from the cloud, click the “Restore” button as before.
15. Select client RHEL and latest backup job
.png)
In the restore parameters window, select the client (RHEL) and the latest backup job in the list.
16. Select Restore Files
.png)
Use the backup content and restore selection drag and drop mechanism to select the cat and dog datasets as before.
17. Verify Restore Location
.png)
Select the `/` restore location and Replace ‘Always’ in case you need to overwrite existing data. To continue click ‘Run Restore’
18. Restore Completed Successfully
Once the restore job is completed, verify that the files have been restored successfully.
Congratulations on restoring from the cloud and completing the scenario!