Contents
- What is bare metal backup?
- The importance of bare metal backup
- How does bare metal backup work?
- What is a bare metal recovery (or bare metal restore)?
- The advantages of bare metal backup and recovery
- BMR considerations in the context of cloud environments
- The disadvantages of bare metal backup and recovery
- Potential issues and workarounds with hardware compatibility
- Bare metal recovery use cases
- Backup and recovery plan creation
- What is included in a standard bare metal backup?
- Bare Metal Backup and Recovery software feature comparison
- Security considerations for bare metal backup and recovery
- Regulatory compliance with bare metal backup and recovery
- Bare Metal Backup case studies from Bacula
- NASA Langley and Bacula Enterprise
- BGW Group and Bacula Enterprise
- How to execute Windows bare metal recovery with Bacula?
- Initial setup and backup image creation
- Restoring a bare metal backup from the recovery media
- How to execute Linux bare metal recovery with Bacula?
- Conclusion
Bare metal backup and recovery is typically one of the most critical elements of an enterprise’s backup and recovery strategy (often referred to as “disaster recovery strategy” or “DR strategy”). There are a lot of different solutions available, each with its own individual advantages.
These DR strategies are a modern necessity in most business fields, considering that downtime in many organizations can be extremely expensive and damaging. In fact, the average downtime cost was about $9,000 per hour or approximately $1,000,000 for every two hours in 2023 (according to phoenixNAP). The high cost of downtime is one of the primary reasons why most companies and organizations choose to invest in complex and multi-faceted backup and disaster recovery strategies.
Bare metal backup and recovery capabilities are inseparable from any complete backup and disaster recovery strategies, providing the ability to restore the entire system from scratch in even the most dire situations, and dramatically reducing the potential amount of downtime the company takes before returning to normal operations.
Bare metal recovery solutions keep developing, with increasing attention being attributed to the cloud integration capabilities of these systems. The global bare metal cloud market managed to grow from $7.14 billion to $8.96 billion in the span of one year (2022 to 2023), and its current annual growth rate is roughly 25%, with a prediction of $22.13 billion volume by 2027. (according to Reportlinker.com)
What is bare metal backup?
Bare metal backup is a process of backing up your entire system’s data, and it’s not just user data and settings – the entire system, including drivers, programs, information structure, and even the OS itself.
The term itself comes from a straightforward logic. A machine without OS or any other data can be referred to as “metal” – a hardware combination that the server or computer consists of. As such, restoring a backup image to one such hardware unit is “bare metal restore”, and creating a backup image for that same process is “bare metal backup”.
The importance of bare metal backup
There are many advantages of a bare metal backup – which is why currently more traditional file backup solutions are being slowly replaced with newer types of solutions, like bare metal backup. This method is becoming increasingly popular as time passes since a bare metal backup copies all of the data – customer files, settings, and even the OS itself.
An organization’s recovery time objective is usually one of the most important factors when it comes to discovering the value of bare metal recovery. Being able to return the entire IT infrastructure to a working state after a data breach of sorts is a given, but some companies are going to suffer massive losses if their services are offline for as little as an hour.
There are instances where using regular file-based backup is easier and more convenient. However, there are also situations where the data on a machine or server is irreparable or entirely deleted (the most prominent example of this being the result of a natural disaster, such as flooding or burning). Solving these kinds of issues with bare metal backups is a lot easier than going through the entire process of setting up an OS, fine-tuning it for a specific purpose, and only then restoring the backup files.
The entire industry of bare metal recovery technology, or BMR, has undergone multiple changes over the last few years. The increased focus on encryption and ransomware protection is obvious, considering the high number of data breaches happening globally on a daily basis. The widespread adoption of AI-powered features has led to increasingly better anomaly detection and other advantages in security, compliance and usability. The increased popularity and adoption of Multi-Factor Authentication was also seen as a positive sign for the overall security of the process.
Compliance-related matters keep growing in size and importance. Many different regulations (some are industry specific, others are far broader), such as GDPR, demand geo-fencing to be applied to backup data in order to meet compliance, and most organizations are now the target of at least one compliance regulation or rule set. The importance of reporting and audit trails is at its peak for both compliance and operational efficiency reasons, and the potential availability of granular data search and retention simplifies the search for specific information elements in large data volumes.
The aforementioned AI integration is also becoming more popular in terms of various suggestions, be it resource allocation, backup schedule optimization, or potential system failure forecast. Automation is now bigger than ever, with the capability to pre-plan and pre-configure entire sequences of operations to be performed in specific circumstances that happen often enough to be predictable.
The value of cloud-centric capabilities in the context of BMR has also skyrocketed, and this particular topic is going to be discussed in more detail further in the article.
How does bare metal backup work?
In essence, a bare metal backup closely resembles the traditional backup process – it is used to copy information from existing hardware in order to restore it at a later date. The biggest difference here is the fact that the bare metal backup copies all of the background and hidden files, such as configuration and other information, as well. This kind of scrutiny is necessary in order to restore not only the data itself but also its “state” as a working system – to remove the need for additional configuration before it can go back into a working state.
What is a bare metal recovery (or bare metal restore)?
The other half of this solution type is bare metal restore or bare metal recovery. This one implies the process of recovering all of the backed-up data to completely new “bare” hardware, with all the settings, drivers, and other things like OS completely intact.
It follows the exact same logic as bare metal backup, but in ‘reverse’, so to speak – restoring a specific backup to a completely blank server or workstation. It is an advantageous option for larger companies in situations such as ransomware attacks, data breaches, and natural disasters.
The advantages of bare metal backup and recovery
Some of the most significant advantages of this backup and recovery type are:
- Speed. Bare metal recovery can be comparatively fast – since there’s no requirement to restore a particular piece of data, and the process is actually restoring everything, from drivers and registry to desktop icon layout, with no need to install all the drivers and programs from scratch. Bare Metal Restore may be performed on hardware other than the original.
- Convenience. There’s no need to spend time setting up a new computer with all of the software you’ll need; instead, you can just use bare metal recovery and restore everything with a straightforward operation.
- Safety and security. If your system is infected with something (virus, ransomware, etc), using bare metal restore should allow you to get rid of everything that could’ve caused that infection to begin with, including infected files, backdoors, and other potential threats to your system.
BMR considerations in the context of cloud environments
Many organizations have been using the cloud in more and more situations and environments, which has created challenges for existing bare metal recovery topologies. Where traditional bare metal recovery processes only had to restore data to physical hardware, cloud-based BMR had to be able to also restore to virtualized environments as well.
The difference between the two is significant enough to affect the recovery cost, recovery time frames, and even regular work processes. Most cloud-based BMR solutions are faster than their on-premises counterparts, but they do put more load on the existing infrastructure, which might affect the overall system performance in some cases.
The introduction of hybrid or multi-cloud environments also complicates the process to a certain degree. There are several new parameters that now have to be considered on top of everything else, such as:
- The cost of data transfer between cloud storage environments
- Management consistency for different infrastructure segments
- Compatibility and interoperability between cloud platforms
- Variations in RTOs and RPOs for different environments
Luckily, there are many cloud-native backup and recovery solutions to choose from, which can provide a number of cloud-specific features (such as cross-account recovery), as well as optimized data transfer processes, deeper integration with cloud storage APIs, and extensive scaling of recovery resources.
Cloud-native BMR is not a complete replacement for on-premise bare metal backup processes since both have their downsides. The cost savings from reduced on-premise hardware requirements are there, but they are more or less counter-balanced by additional cloud storage costs and data transfer costs, neither of which is a factor for on-premise BMR.
The disadvantages of bare metal backup and recovery
Alternatively, there are also several shortcomings that bare metal backups have, including:
- Hardware compatibility. The most significant drawback of this backup and restore solution is the need to have the same hardware configuration on the system from which the backup is taken and the “bare metal” system that’ll be recovered from said backup.
- Backup and restore rigidity. Due to the nature of a bare metal backup, restoring this backup usually offers little to no customization. The system in question is backed up in a specific state, and that entire state is restored as a result. As such, choosing what settings or applications to restore is not possible.
- Sizeable downtime. Most of the bare metal backups are relatively large since they are just a tiny step away from a traditional “full” backup – the most space-inefficient backup type by far. The total recovery time from a bare metal backup may take a long time if a company’s network or infrastructure does not support high bandwidth (primarily if the recovery process is performed from a network backup storage).
Regarding system hardware in the context of bare metal recovery, there are two main groups of hardware parts: boot-critical devices and other devices.
Some parts of the system can be different when performing a bare metal restore, like a sound card, a capture card, or a graphic card since they are not part of the boot process, and the system can load itself without them (even if with some problems). This “group” implies that, if necessary, you can install drivers for such devices after a bare metal restore process is complete and the system is up and running.
Boot-critical devices are an entirely different thing. Hardware parts like CPU, HDD controller, or motherboard need to be the same for both systems in order for the drivers to match and for the system itself to boot correctly. The inability to match those parts would not allow the system to boot.
Potential issues and workarounds with hardware compatibility
As mentioned before, hardware compatibility is the most significant issue for the majority of bare metal recovery operations. The need to have the exact same system configuration in order for the restoration process to work as intended can be surprisingly challenging, considering how many elements of the hardware structure are involved:
- BIOS/UEFI. System restoration processes with a BIOS or a UEFI being different from the original would not always cause issues to the recovery process. However, it can be difficult to find out when the actual reason for the restoration processes failing is if the BIOS or the UEFI version mismatch is to blame.
- Firmware and drivers. While the recommendation to keep upgrading the firmware and drivers for new and existing hardware is important, it is completely possible that one of these updates would interfere with the bare metal recovery process.
- Hardware Abstraction Layer. HAL is another potential issue when it comes to comparing the original hardware with the current one before or during a bare metal recovery process. There are some modern systems that might mitigate this issue by using universal drivers, but this is not a complete solution to the problem whatsoever.
- Peripheral Compatibility. Internal hardware compatibility is important, but so is the compatibility of various peripheral devices – sound cards, GPUs, etc. Making sure that all of these devices can function after the bare metal recovery process is really important.
Luckily, it is possible to try to address most of these issues beforehand to make the bare metal recovery process as smooth as possible when needed. The most common recommendations for improving the hardware compatibility for bare metal recovery are:
- Performing restoration process tests using different hardware combinations is the obvious recommendation; it should help find most of the potential compatibility issues the system might encounter.
- If the necessary drivers have not been installed beforehand, all of them should be always readily available whenever they are needed during or after the bare metal restoration process.
- Both vendor support and hardware documentation should also be at hand for situations where there might be a need for configuration recommendations or hardware compatibility issue resolution.
- If possible, it is recommended to perform recovery operations using backup tools with an extensive list of compatible hardware, since some modern solutions are fully capable of adjusting themselves in accordance with specific nuances of the hardware combination.
Bare metal recovery use cases
There is a surprisingly large variety of different scenarios and use cases that bare metal recovery is used in, such as:
- The transition from one server type to another (from virtual to physical servers and vice versa)
Physical and virtual server types have their own advantages and shortcomings, with most companies preferring one over the other based on some sort of organization-specific preferences. It is not necessary to stay with a single server type, though, since migration is always a possibility.
Bare metal recovery is technically one of the best ways to handle such migration since it can restore the entire operating system with all user data to a new server regardless of its type.
A company with physical servers might shift towards virtual ones to benefit from lower hardware costs and improved scalability. Alternatively, a company with virtual servers might choose to transition to physical ones or start using a hybrid environment of sorts if they want to reduce their dependency on remote environments and improve the physical security of information.
- A case of operating system corruption created by the influence of an infected application
Most variations of system corruption are often compared with a contagious disease of sorts, creating more and more issues for the entire environment as time goes on, introducing crashes, data loss, and even security breaches.
Bare metal recovery can be used to resolve this issue in its entirety by wiping out the existing storage completely and then restoring a bare metal copy that was made before the system got infected. It is an exceedingly useful solution for situations where traditional methods of data recovery no longer work or are also infected.
- The aftermath of a ransomware attack
The primary point of ransomware attacks is to hold the information “hostage” by encrypting it and not releasing the decryption key until a ransom is paid. Unfortunately, there are also many cases where paying the ransom is not guaranteed to recover all of the data, either.
Bare metal recovery, if not tampered with, is an excellent solution to this issue since it can completely bypass any of the encrypted segments by restoring the entire system from the ground up in its non-encrypted state. If the restoration was successful, then there is no need to pay any ransom in the first place.
- The server hardware upgrade/replacement
All hardware has its own runtime, and there are also many situations where it is necessary to replace specific elements of an infrastructure prematurely. The existence of BMR makes it significantly easier to restore the entire system state onto a new hardware combination.
In most cases, only minor parameters have to be changed afterward to accommodate the new hardware elements. Other than that, BMR can provide an extremely convenient way of upgrading or replacing hardware elements with minimal downtime and maximum convenience.
- An incorrect software upgrade that resulted in data corruption/deletion
Software upgrades are relatively straightforward and fault-proof in most cases. And yet, there are still some situations and circumstances where a single faulty software upgrade can lead to data corruption, system instability, and plenty of other issues.
Following a similar logic to all the previous examples, BMR would be an excellent fit for such situations, making it possible to restore the operational state of the entire system with minimal downtime. The convenience of BMR in such situations reaches its peak when the software upgrade manages to affect the traditional rollback methods, making BMR something of a last-resort option.
- A stolen or misplaced personal PC (laptop)
Theft or misplacement of personal computers is just as big of an issue as losing access to your workstation these days, considering how common remote work has become over the last few years.
Bare metal backups of such systems can turn the irreversible loss of valuable information into a somewhat minor setback since the data can still be restored to another device with minimal losses.
- A system crash or an HDD failure
Hardware crashes were somewhat common in the HDD days, perhaps less so these days, but still a real possibility today, and therefore a significant concern. The situation where an entire system crashes because of a faulty hard drive can be easily redeemed with a bare metal restore process, making it possible to restore the operating system and all of its contents onto a new drive as if nothing happened.
Bare Metal Recovery can also be used to create the same configuration on multiple different hardware appliances using so-called “master images” as the baseline.
The importance of bare metal recovery in the context of disaster recovery is exceptionally high. Bare metal recovery is a necessary part of most disaster recovery strategies since most restoration processes for image-based backups are performed using bare metal recovery as a baseline.
Backup and recovery plan creation
Generally speaking, a backup and recovery plan should always be created as a part of the disaster recovery plan – a
large and detailed document that elaborates on how you plan on keeping the system downtime at its lowest in case any
kind of disaster occurs.
Detailed disaster recovery (as well as bare metal recovery, by association) is now considered a part of the well-known
3-2-1 rule. This rule initially provided the basic structure of a backup plan for end users to customize for their own
needs. However, as the technology evolved over the years, more and more strategies and tactics were added to backup plan
recommendations – including bare metal recovery capabilities.
Additionally, the backup type should also be covered as one of the first elements of your backup plan, considering how
the difference between image-based and file-based backups can drastically change the overall approach to disaster
recovery.
Below, we are going to showcase an example of a backup and recovery plan with bare metal recovery as a feature. This
plan is going to serve as a baseline for the majority of standard backup plans and should be treated as a template to
expand upon, not a ready-made plan.
- Introduction
- This backup and recovery plan showcases the procedures necessary to secure valuable information for Company X, with a focus on bare metal recovery as a feature.
- Backup strategy
- The 3-2-1 backup rule is a great baseline for the backup strategy.
- Three copies of information are stored using two different storage types, and one copy is stored off-site.
- The primary data copy is in live production on the company’s servers.
- The second copy is created with daily incremental backups and stored on-site using a NAS device.
- The third copy is created with full backups performed on a weekly basis and stored off-site in a cloud storage environment.
- Scheduling and backup types
- Daily incremental backups for all servers are performed from 10 P.M. to 2 A.M.
- Weekly full backups with bare metal images are created on Saturdays from 11 P.M. to 6 A.M.
- Monthly full backups are created for archival purposes and kept in long-term storage.
- Bare metal recovery
- Bootable recovery media are created for Linux and Windows server types separately.
- Recovery media are stored in secure yet easily accessible locations.
- Recovery media backups are updated after major system changes or on a quarterly basis.
- Verification and testing
- Weekly automated backup integrity checks.
- Monthly restore testing procedures for random databases and individual files.
- Quarterly full bare metal recovery tests with testing hardware.
- RTOs and RPOs
- RTOs for critical systems are 4 hours, RPOs – 1 hour.
- RTOs and RPOs for non-critical systems are 24 hours.
- BMR procedure
- Damage assessment and the selection of an appropriate recovery point.
- Target hardware preparation.
- Boot process using recovery media.
- Appropriate bare metal backup image selection.
- Restoration process initiation.
- System functionality verification (after the restore is complete).
- DNS and network settings updates.
- Post-recovery testing.
- Training and documentation
- Annual training for IT staff on the topic of backup and recovery processes.
- Detailed documentation for each recovery event with a post-mortem situation analysis.
- Regular maintenance for system configurations and network diagrams.
- Security and compliance
- Set up backup encryption processes to cover information both in transit and at rest.
- Conduct regular backup system audits.
- Check for compliance with relevant frameworks and regulations.
- Define and configure a data retention policy.
- Post-recovery procedures
- Monitor systems on a regular basis after a successful recovery.
- Perform a detailed root cause analysis to identify the issue that led to the event, which forced the bare metal procedure to activate.
- Update all documentation after each recovery process to ensure the lack of errors and outdated information.
- Improvement plans
- Conduct thorough backup plan reviews on a yearly basis.
- Keep an eye out for emerging trends in the tech industry.
What is included in a standard bare metal backup?
To expand upon the previously mentioned topic, a bare metal backup must include the following data categories:
- System State.
- A specific category of data that may be necessary for some of the backups to operate correctly; includes the sysvol folder, as well as NTDS, boot files, system registry, and COM+ class registration database.
- System Volume.
- A specific volume that contains the Operating System data.
- UEFI or other partitions.
- These system-related partitions usually contain critical data, including the Windows boot loader.
- Installed applications or services.
- Specific volumes representing currently installed applications and services. The importance of this category grows even more if these services or applications are not on the same drive as the OS.
Bare Metal Backup and Recovery software feature comparison
The backup software market is highly competitive and filled with competent solutions that house hundreds of capabilities. In order to explain why it is necessary to consider not only the bare metal backup capability, but also the total range of features that your business needs, we are going to present a comparison table highlighting the capabilities of five software examples:
- Acronis Cyber Protect
- Veeam Backup & Recovery
- Bacula Enterprise
- Veritas Backup Exec
- StorageCraft ShadowProtect
| Feature | Acronis Cyber Protect | Veeam Backup & Recovery | Bacula Enterprise | Veritas Backup Exec | StorageCraft ShadowProtect |
| AI-based Ransomware Protection | Yes | Yes | No | No | Yes |
| Built-in IT Asset Management | Yes | No | No | No | No |
| Multi-tenant Architecture | Yes | Yes | Yes | No | Yes |
| Agentless Backups for NAS Devices | No | Yes | Yes | No | Yes |
| Automated Backup Verification | No | Yes | Yes | Yes | Yes |
| Backup Sandbox Testing | No | Yes | No | No | Yes |
| Native SAP HANA Backups | No | Yes | Yes | No | Yes |
| Container-native Backups | Yes | Yes | Yes | No | No |
| Backup Immutability | Yes | Yes | Yes | Yes | No |
| Built-in Compliance Reporting | Yes | Yes | Yes | No | No |
The table above only includes features that are guaranteed to be missing from at least one of the contenders for the sake of visualization. The table should be a good visualization of how different solutions often have their own feature sets, and some specific features might not be included in software that a company purchases for its bare metal recovery capabilities.
All solutions on the list support Bare Metal Backup & Recovery operations, as well as cloud integration. Our goal here is to recommend performing a thorough analysis of your own capabilities before settling for specific software to handle all of your backup tasks. That way, you can avoid choosing a solution that is missing support for one or two features your company desperately needs.
Security considerations for bare metal backup and recovery
Backups have been a noteworthy part of the fight against ransomware and other data breach reasons for more than a decade. Now, most of the existing malware types are aware of the system backups and try to seek them out before attempting to do anything with the master copy. The same logic is applied to all the cybercriminals that use impersonation or exploits to obtain access in a closed business environment.
As such, backup security is an important factor for any company, and bare metal backups are also a part of this concern. The most notable security elements that should be applied to most BMR environments are:
- Backup encryption is a reliable way of preventing unauthorized data access with the help of different algorithms for each of the information states (at rest, in transit).
- Access control is a vast and varied field of measures and tools that prevent unauthorized users from accessing sensitive information; it includes MFA, RBAC, detailed logging, constant monitoring, custom alert systems, and many other elements.
- Extensive integration is a necessity in a modern world of interconnected solutions and environments. Security systems are no exceptions to this rule, and BMR should be easily integrated into other elements of the company’s security ecosystem, including Security Information and Event Management tools (SIEM), Identity and Access Management systems (IAM), and so on.
- Ransomware protection represents all the measures necessary to avoid cyber threats – including regular backup scanning, frequent integrity checks, air-gapping, immutability, etc.
- Encryption key management is paramount in an environment with complex encryption rule sets since proper key storage and robust key rotation practices can improve the overall security of the environment without drastically reducing its performance.
- Immutability and air gapping are both growing in popularity as time goes on, considering how both solutions try to resolve most of the security issues at once by flat-out removing editing capabilities from information once it has been created.
It should be noted that air gapping and immutability are not one and the same. The former uses either physical or logical separation for the storage environment, while the latter is generally achieved through software-controlled data processes. The immutability feature ensures that once data is written to the tape, it cannot be altered or deleted for a specified period, providing protection against data tampering or accidental deletions.. They are not mutually exclusive and are often used together for increased security.
The combination of these security measures in BMR processes drastically increases the infrastructure’s overall resistance to cyber threats and data breaches, ensuring the availability and integrity of information at all times.
Regulatory compliance with bare metal backup and recovery
As mentioned before, data integrity and availability play an integral role in regulatory compliance topics, and BMR environments offer a lot of contribution to these topics by providing point-in-time recovery, data consistency, and complete system recovery when necessary.
BMRs can assist with being compliant with multiple compliance frameworks, be it GDPR, HIPAA, SOX, and more. Most of the useful features remain the same across different situations and regulations, but there are also some examples of case-specific capabilities, as well. This includes the complete system recovery that supports the customer’s right to data portability (GDPR), as well as support for the availability of ePHI electronic Protected Health Information (HIPAA), and many other examples.
Additionally, there is even a whole new term that was created to represent the combination of bare metal and disaster recovery strategies with a simple naming scheme – Bare Metal Disaster Recovery. Most disaster recovery processes are performed as the last resort in order to restore the entire business to its working state, including expensive hardware and software.
As such, spending too little on disaster recovery software with bare metal capabilities is not a great idea in most cases, considering how much is at stake with this single process. Add that to the fact that disaster recovery plans are often essential for achieving regulatory compliance – and it becomes easy to see why bare metal recovery and disaster recovery are this close to one another.
The most notable advantages of BMR in this context are:
- Complete system recovery, including settings, configuration files, customizable options, and more.
- Ability to offer regular data validation and recovery process testing to ensure accuracy and validity.
- Recovery time predictability made possible by regular testing for bare metal recovery plans
It is not the full extent of BMR’s involvement in compliance matters, either. For example, the reporting and auditing capabilities of such systems are also involved with the compliance processes, with detailed logs, reports about expected RTOs and RPOs, and detailed documentation for all actions that have to be taken.
Many organizations operate in multiple jurisdictions at the same time, greatly increasing the complexity of compliance as a task. BMR can be of use here, as well, with data sovereignty capabilities, different retention and security rules depending on the location, and a general recovery process consistency that meets all the necessary requirements at once.
Aligning BMR and regulatory requirements together offers both an extensive data protection environment with efficient recovery capabilities and compliance with all the necessary frameworks.
Bare Metal Backup case studies from Bacula
Bacula’s capabilities in terms of bare metal backup and recovery are effective and convenient, being able to cover a wide range of situations and potential use cases. As an example, we can go over two different case studies that used bare metal recovery as one of the primary reasons for choosing Bacula over the rest of the market.
NASA Langley and Bacula Enterprise
NASA Langley Research Center is a research campus with plenty of computing facilities and thousands of employees; the facility in question specializes in spaceflight research and aeronautics. This branch of NASA was using SyncSort Backup Express with an IBM High-Performance Storage System hierarchical storage management system with 250TB of data in it for mission support and scientific computing systems. 2013 was the year when NASA began evaluating potential replacements for BEX, and at that time, Bacula Enterprise turned out to be the only solution that met all of the necessary requirements and feature requests.
Bacula was the only solution at the time capable of working with HPSS out of the box with no vendor development while also providing fast migration to and from tape media. Other capabilities of Bacula that NASA Langley was looking for were FIPS-compliant encryption, no capacity-based licensing model (considering the total size of the database), and the existence of a Bare Metal Recovery plugin that was fast and efficient.
BGW Group and Bacula Enterprise
BGW Group relied primarily on customized scripting as its backup and recovery operations. However, such options were not suitable for the steadily growing environment, which is why the search for a third-party backup solution was initiated.
They started operating with the Bacula Community version at first, with extensive tape support being the primary selling point at the time. Eventually, the infrastructure of a business evolved, with an increased number of virtual machines and other storage environments. At some point, a formal review of backup and recovery requirements was conducted, with a number of features being considered necessary:
- A centralized console with support for different environment types, including VSphere.
- Certain levels of flexibility and complete interoperability with various storage types – disk, tape, and so on.
- Bare metal recovery support for both Linux and Windows.
A pricing model was also a notable issue for the company since most competitors charge not only for core installs and maintenance but also for the amount of data backed up, which would have been an endless pit of money for a growing business such as BGW Group. At the end of the day, all these features contributed immensely to BGW Group’s decision to start using Bacula’s solution, considering its support for bare metal backups, extensive flexibility, centralized web-based console, and a pricing model not tied to the amount of bandwidth processed.
How to execute Windows bare metal recovery with Bacula?
Bacula Enterprise performs bare metal recovery with additional, powerful options. To understand this, first, we would split this into two segments – explaining different processes performed on Windows and Linux machines.
It is worth mentioning that Bacula Enterprise offers many advantages to both Linux and Windows users regarding bare metal recovery operations. Some of the more prominent Windows-centric bare metal recovery advantages of Bacula include:
- GPT table support.
- UEFI and secure boot support.
- Dynamic disk support.
- Manual partitioning support.
- Easy access to logs.
- Extra ISO customization tools.
- Support for three different backup types (full, incremental, differential).
The process of performing bare metal recovery on Windows systems can be roughly split into two large parts – the preparation/installation part and the restoration part. The former goes over the initial configuration of the process, including setting up the WinBMR backup software, creating backups, and so on. The latter starts with rebooting the system with the recovery device attached to it and goes through every step of the Bacula Windows Bare Metal Recovery wizard, from start to finish.
Initial setup and backup image creation
The first step in this entire process is to download specific files that are necessary for Bare Metal Recovery to be performed in the first place. There are three main files that we are looking for:
- bacula-enterprise-winXXWinbmrPlugin-X.X.X.exe – an installation file that contains the Bacula plugin the user would have to install on every single Windows system that needs to be protected using Windows BMR.
- winbmr-rescue-3.X.iso – the ISO disk image that would be used to boot the system for the subsequent recovery process, it can also be customized using the next file.
- winbmr-iso-configurator.exe – the aforementioned configuration executable file that can be used to modify the ISO’s initial settings, such as passwords, names, ports, and so on.
It is worth noting that the configurator file is not the only way to modify the values of the ISO file, because there are also several command-line arguments that could be used to do the same, such as:
winbmr-iso-configurator.exe –no-gui –iso winbmr-rescue-3.0.iso –cli-name=rescue-fd –cli-pass=xxx –cli-port=9102 –cons-pass=xxx –dir-address=10.10.1.2 –dir-name=bacula-dir.lan –dir-port=9101
Regarding the WinBMR plugin, it needs to be installed and launched to be able to create backups to begin with. During the backup process, this particular plugin analyzes both partitions and host disks to locate information that would be necessary for the restoration process. This data is then saved in a directory such as C:/Bacula/winbmr which saves partition data (including the EFI partition), disk layout data, and more.
WinBMR adds all static volumes to the set of files to be backed up during the restoration process, although it is possible to exclude some of the drives from being backed up or restored. Once you’ve created the backup of existing data and saved it to your ISO file, now it is time to begin the recovery process.
Restoring a bare metal backup from the recovery media
The restoration process is mostly performed using either the CD-ROM or the ISO image itself. The bare metal recovery process for physical servers recommends using CD-ROM as the recovery option, and the ISO image is recommended for virtual servers. While there is an option to create a bootable USB drive using the ISO image, it does not change the recovery process itself and thus we are going to proceed with the aforementioned two recommended options.

Most of the restoration process is performed using Bacula’s Bare Metal Recovery wizard which has a helpful GUI to make the entire process easier for people of different skill levels. However, the first part of the bare metal restore process would be to boot the system using the Recovery Media: the ISO file or the CD-ROM. Most systems have the option to choose the primary boot device using their BIOS settings, although the proper key combinations necessary to load into BIOS may differ from one hardware provider to another.
While this approach does require either remote or physical access to the device in question, Bacula recommends it as the correct way to perform bare metal recovery for security reasons. Once you have managed to boot the system using Bacula’s Recovery Media, it starts with a minimal Windows setup that helps you configure your network settings, and then the Bacula Systems splash screen should appear before you.
A large part of the recovery process from now on is going to be performed using a number of different GUI-based choices and preferences in the following order:
- Choosing the preferred keyboard layout, leading to the program in question restarting (to accommodate your keyboard layout preferences from now on).

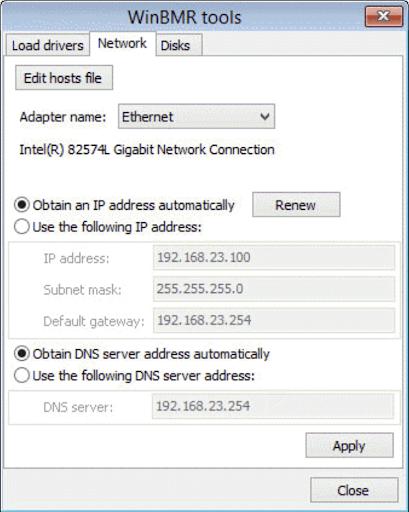
- Setting up a static IP address for this system if the network it works in does not have a DHCP server set up already – this is technically an optional step, but it is highly recommended to perform for everyone to avoid unnecessary problems in the future. The static IP settings menu can be found by clicking File -> Tools -> Network tab.

- The next screen lets you either modify the existing Bacula configuration that was loaded from the Recovery Media or proceed without any modifications to that same configuration. You would see the error message appear at this step if the Director was not able to connect to the recovery file daemon, or if the host was not able to connect to the Director – the error message must show the reason for the error, it can be helpful with figuring out what needs fixing.

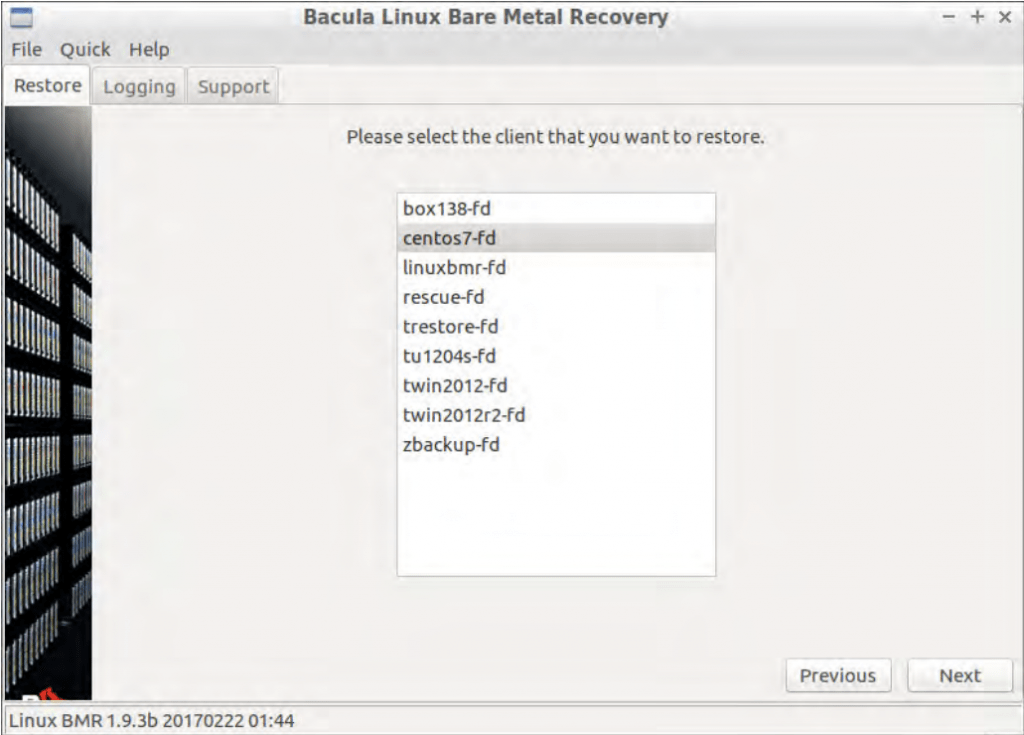
- Once all of the problems have been resolved, you should be able to go to the next screen. At this point, Bacula’s wizard would show all of the clients that it was able to locate so that the user can choose which client needs to be recovered.

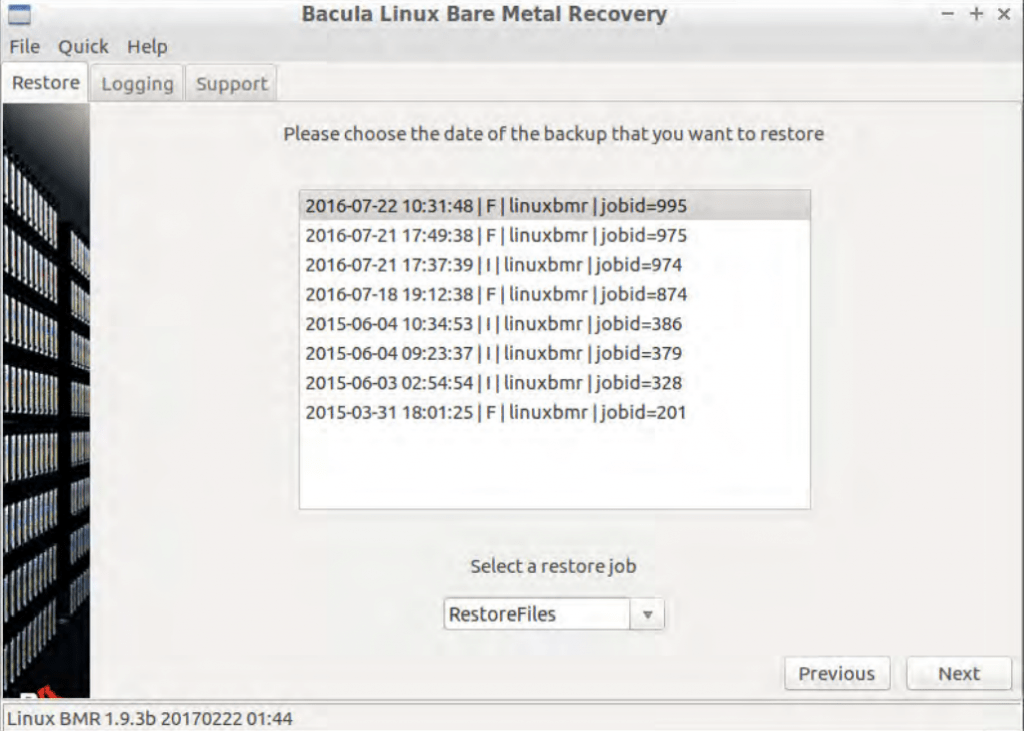
- Once a specific client has been chosen, the next window should show a list of the most recent backups performed for this client – a successful backup operation would have the letter [F] as the primary indication of its success. At this screen the user would have to choose both the backup job that would be used for the restoration process, as well as the restore job template – this setting can be modified, but the standard option should work in most cases with no issues.

The following portion of the bare metal restore procedure may seem excessively complicated, but it is necessary to mention that the standard options for these tasks work in most common cases, meaning that the user in question would not have to have a deep understanding of the topic to be able to restore their system from scratch. Knowing that, it is time to move on with partitioning and choosing what volumes would be restored. - The next screen showcases disks and partitions – including the ones that are currently operational, the ones that were recorded during the backup process, as well as the ability to choose which objects (volumes that have a letter assigned to them) to include in the recovery process or exclude them from that process. The main goal of this particular screen is to match the number of disks and the size of both the source host and the backup data. It is also possible to exclude some of the disks from this process (and it would also make every volume that is associated with it glow red to the right of these lists) or even restore data from one volume to another location, but these processes can only be performed by experts that know what they are doing.

- Another screen called “Manual Partitioning” only appears when the option with the same name is chosen at the previous screen – it allows users to be much more flexible with partitioning by saving all of their previous decisions to diskpart.txt with the ability to edit it if necessary. Assigning drive letters and creating/formatting volumes is a must for the user to pass this particular screen and proceed with the bare metal restore process.

- Volume matching is another sophisticated part of this process on another Bacula Bare Metal Recovery wizard’s screen. It allows users to tell the setup wizard the exact restoration location for every single volume pulled from the backup location. The software is capable of matching volumes with identical drive letters, which is why modifying this is only recommended when the user is not happy with the default settings.

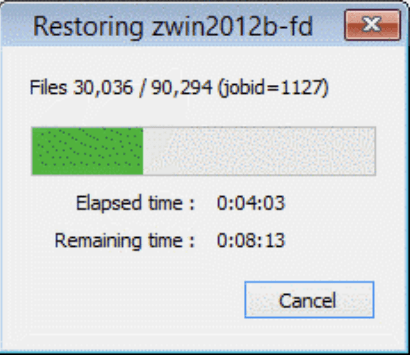
- At last, the next screen would be the one where the user would be able to see the progress of the restoration process – with both the remaining time and the elapsed time being shown, as well as the general status information about the process.

- The last screen in the bare metal recovery process by Bacula showcases a detailed log of the recovery process, including detailed timestamps and possible error messages during and after the recovery was completed.

How to execute Linux bare metal recovery with Bacula?
While Bacula does have a number of advantages that are only applicable to Windows users, there is also a group of benefits that are applicable to both Windows and Linux devices, including:
- Bootable ISO creation.
- Cloning capabilities.
- Restoration to an entirely different type of storage (physical-to-virtual and vice versa).
- User-friendly GUI.
- Exceptional recovery performance.
The actual restoration process in terms of bare metal recovery for Linux has a lot of similarities to the way it is done in Windows, but the initial setup is several times longer – even though the logic behind it is also similar.
First of all, the Linux bare metal recovery system needs a direct contact with Bacula’s Director during the bare metal recovery process in order to be able to restore all of the data properly. As such, a Console resource needs to be set up beforehand via configuring the Director – using a procedure such as the one shown below.
Console {
Password = bacularescue
CommandACL = *all*
ClientACL = *all*
CatalogACL = *all*
JobACL = *all*
StorageACL = *all*
ScheduleACL = *all*
PoolACL = *all*
FileSetACL = *all*
WhereACL = *all*
# The next two ACLs are required when using
# Bacula Enterprise 8.8.0 and above
UserIdACL = *all*
DirectoryACL = *all*
# This last ACL is available when using
# Bacula Enterprise 8.8.0 and above but is not required
RestoreClientACL = *all*
}
Another resource that the system needs in order to perform bare metal recovery operations is Rescue Client – the example of its configuration is also shown below.
Client {
Address = 0.0.0.0 # Will be set automatically by LinuxBMR
Password = bacularescue # USE YOUR OWN PASSWORD
Catalog = MyCatalog
}
The last resource that would be necessary for proper restore operation is a Job resource with the same name that does not have any specific RunScript directives. All three of these jobs are required for any data to be backed up for further restoration.
The next general step would also be relatively familiar – it is the process of downloading and customizing a recovery image in the form of an ISO file. It can be located in the Bacula Systems’ customer area and it has the following name:
- LinuxBMR-rescue-amd64-2.0.0.iso
This image can be either burned to a CD/DVD or written to a bootable USB device, depending on the client’s personal preference.
Booting using the recovery image is the first step in an actual bare metal recovery process, and it may differ depending on whether you need to access BIOS to change the priority of boot devices or you can open that menu without going into BIOS, depending on the hardware manufacturer.
The first visual representation of the recovery process that a client would be able to see is the Isolinux language selection screen which should look similar to the example below. It can be navigated using standard arrow keys, and the “selection” key is Enter by default.
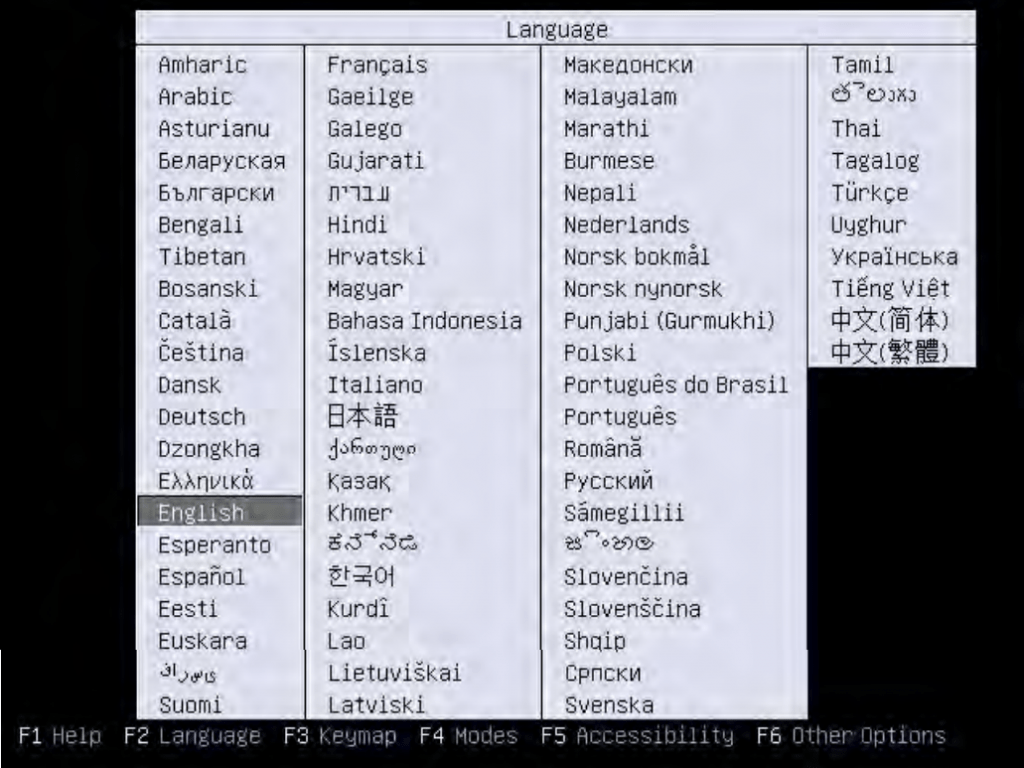
It is worth noting that this screen only lets you choose the language for your Linux Desktop environment, and the only language Bacula’s Bare Metal Recovery tool works in is English. After you have chosen the language from the list above, you would be transferred to the bare metal recovery boot screen, as shown below.
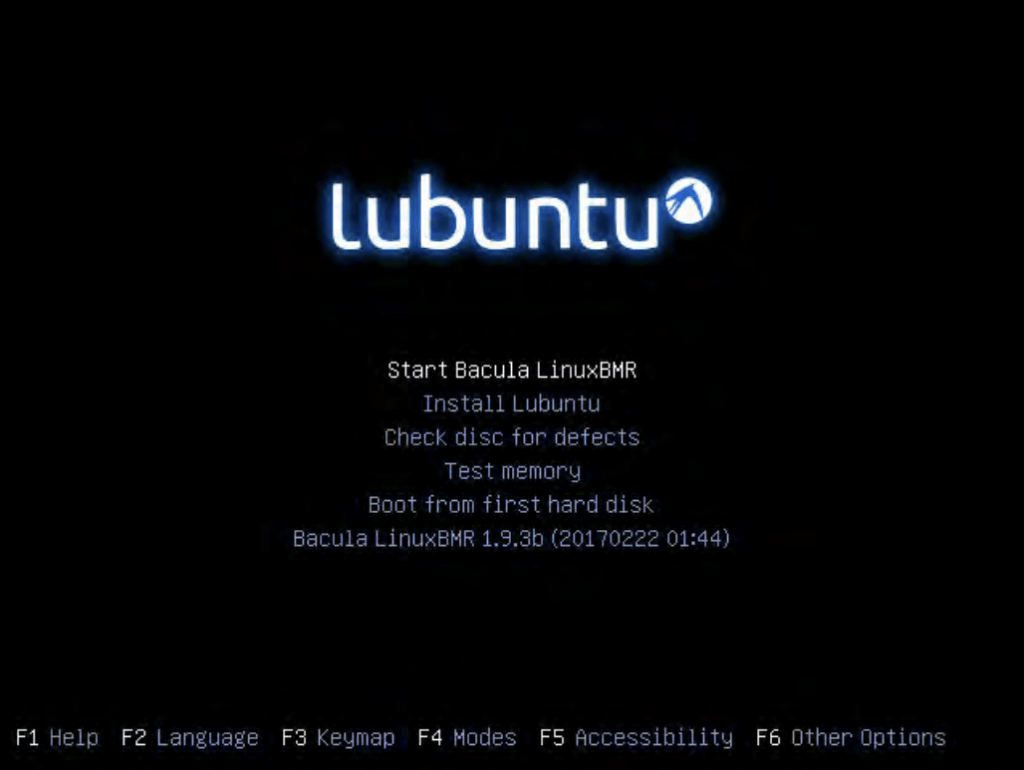
However, there is another task that needs to be done here, and that is choosing the correct keymapping layout. It can be done by pressing F3 on that same page and choosing the layout that the client prefers with “Enter”.
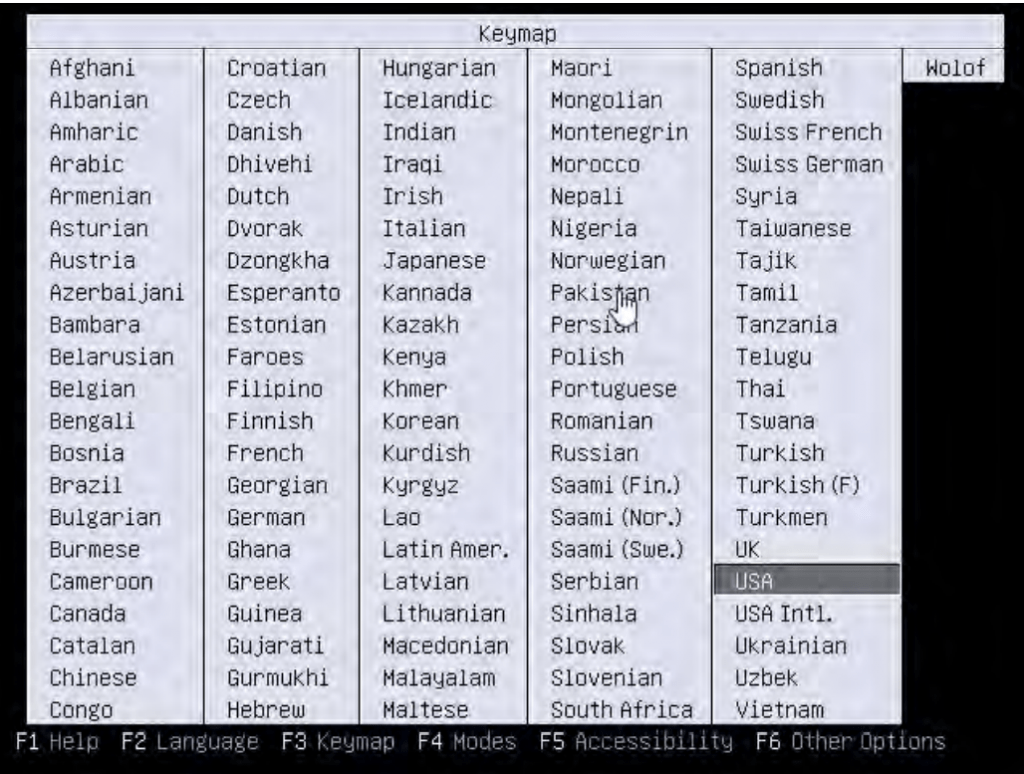
Once the keymap settings have been defined, the bare metal recovery boot screen is going to appear again, and choosing the “Start Bacula LinuxBMR” option would initiate the graphic desktop environment to proceed with the bare metal recovery task. Once the graphical interface is fully loaded, it is recommended to verify if the network settings of the environment are correct, since it is possible that everything was reset after loading this new environment. To open the Network Settings window, the user would have to click on the Network icon within the Linux environment located to the left of the clock at the bottom of the screen and then choose “Connection Information”.
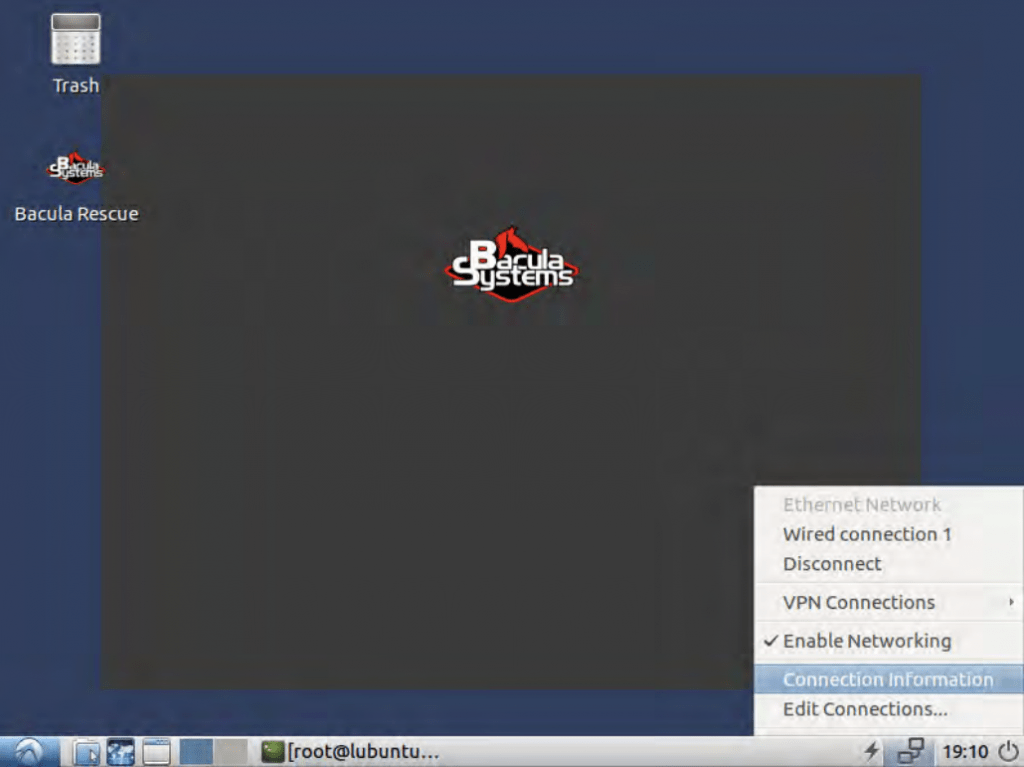
The “Bacula Rescue” icon is the starting point for the bare metal recovery process once the proper network configuration is ensured. From now on, quite a lot of the menus are going to be somewhat similar to examples from the Windows bare metal recovery guide, starting with the “Welcome” screen, as shown below.
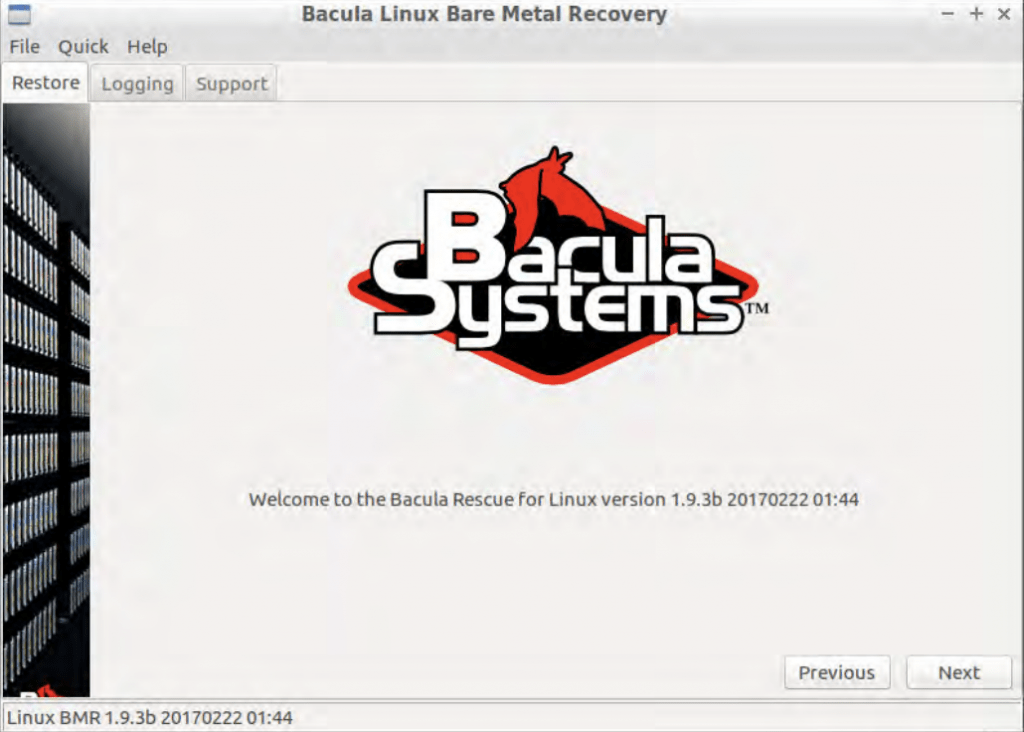
The rest of the bare metal recovery wizard screens are going to be shown in a numerical order for easier reading comprehension.
- The first page that a client sees after going past the “Welcome” screen is the initial setup page that includes client’s name-password combination, director’s name-address combination, and more. All of these parameters are loaded directly from the ISO file and could have been modified beforehand (using the Client resource that was created as the first step of this process) – and it is also possible to modify them at this exact screen.

- At this step, the system checks if the client daemon is running and if it is accessible from the Director – if even a single error pops up, then the process would not be able to continue. A client getting past this screen means that all of these parameters were configured correctly. The following screen shows a list of clients that the Director can detect, and the client would have to choose one to proceed.

- The next screen showcases different backups that were created under the chosen client – and the client would have to choose a BMR-enabled backup to proceed. The status of the backup is shown by a capital letter after the date of the backup (with F meaning a completed backup), and a linuxbmr field would show if the backup in question can be used for bare metal recovery or not. If the chosen client does not have any backups created, the error message would show up and the client would then be sent back to the “client” screen without being able to proceed.

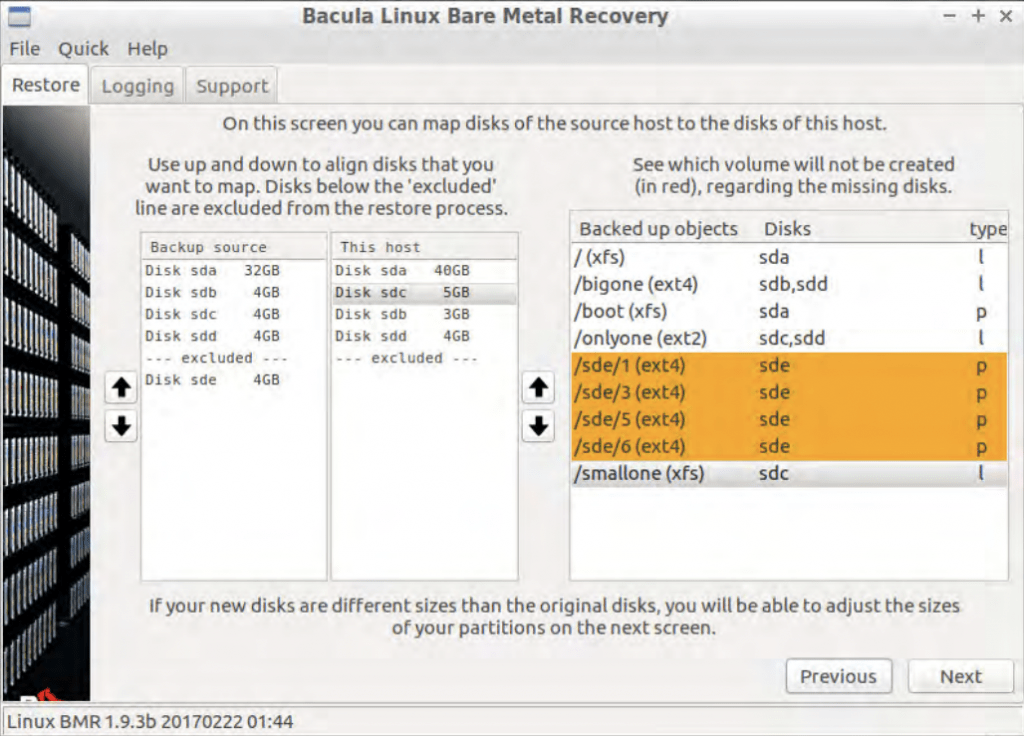
- The more difficult part of the setup begins right here. Once a suitable BMR-ready backup is chosen, the tool loads the disk layout information from the source host to reproduce that layout on the target host, followed by restoring the data from the backup to the target host and configuring the bootloader as a final step of the process. Disk mapping is the first part of this process – it is a part of the process in which a user has to make sure that every disk of the source host is allocated to a disk of the target host. A relatively simple interface allows for different disk allocation rules, and there is also an option to straight-up remove one or several volumes from the process, meaning that they are not going to be restored during the bare metal recovery process.

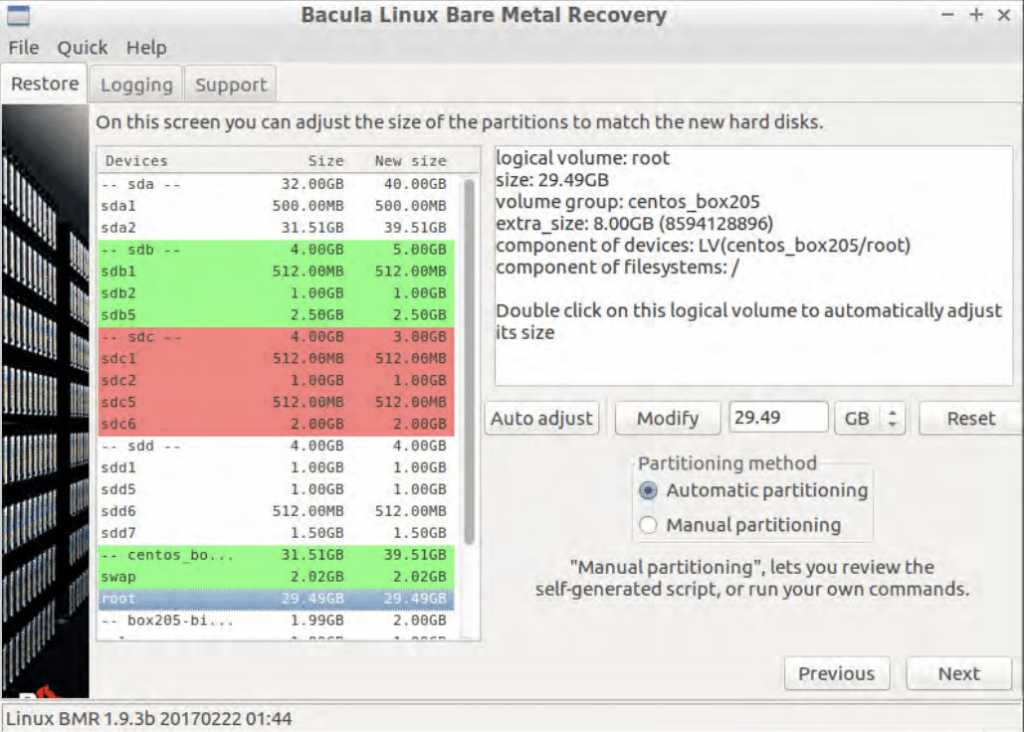
- Once disk partitions have been set up, another Bacula screen allows for these partitions to be modified and adjusted per-partition basis. Adding more partitions or removing them is not possible at this stage, the only option is to adjust them. Green-colored partitions have extra space left, while red partitions are overfilled and would have to be shrunk in size for the bare metal recovery process to proceed.

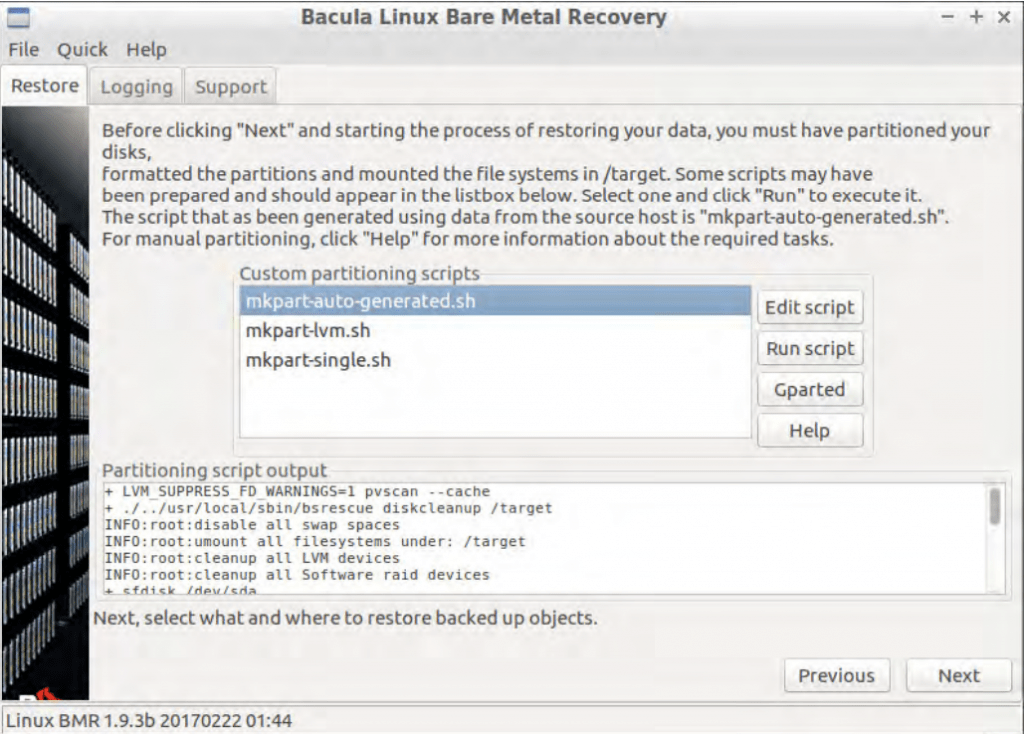
- There are two partitioning methods available in Bacula Linux Bare Metal Recovery – Automatic and Manual. Automatic partitioning attempts to rearrange existing partitions without any input from the client, and that way it is possible to skip a single step of this instruction. For a more personalized approach, it is possible to choose Manual partitioning, which results in the following screen. An experienced user can use this screen to manually change specific partition rules or restrictions, allowing for more flexibility down the road.

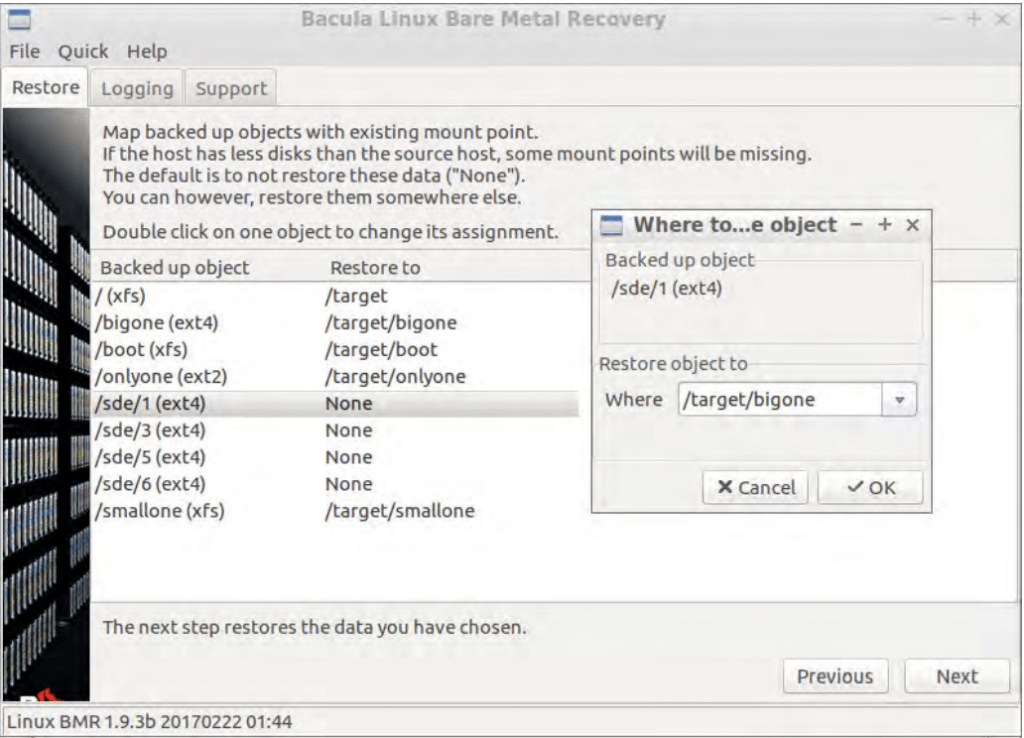
- One last step to go through before initiating the restoration is to match the volumes from inside of the backup with the newly-partitioned volumes on the target host. Double-clicking on every “none” position on the “Restore to” category allows users to specify where this specific object would be restored to.

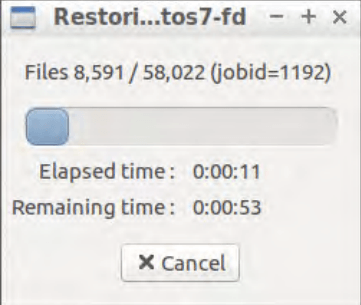
- The next part of the process is the entire restoration procedure, it can be monitored with a status screen as shown in the example below. This window shows the elapsed time, the estimated remaining time, as well as the general percentage status of the recovery process.

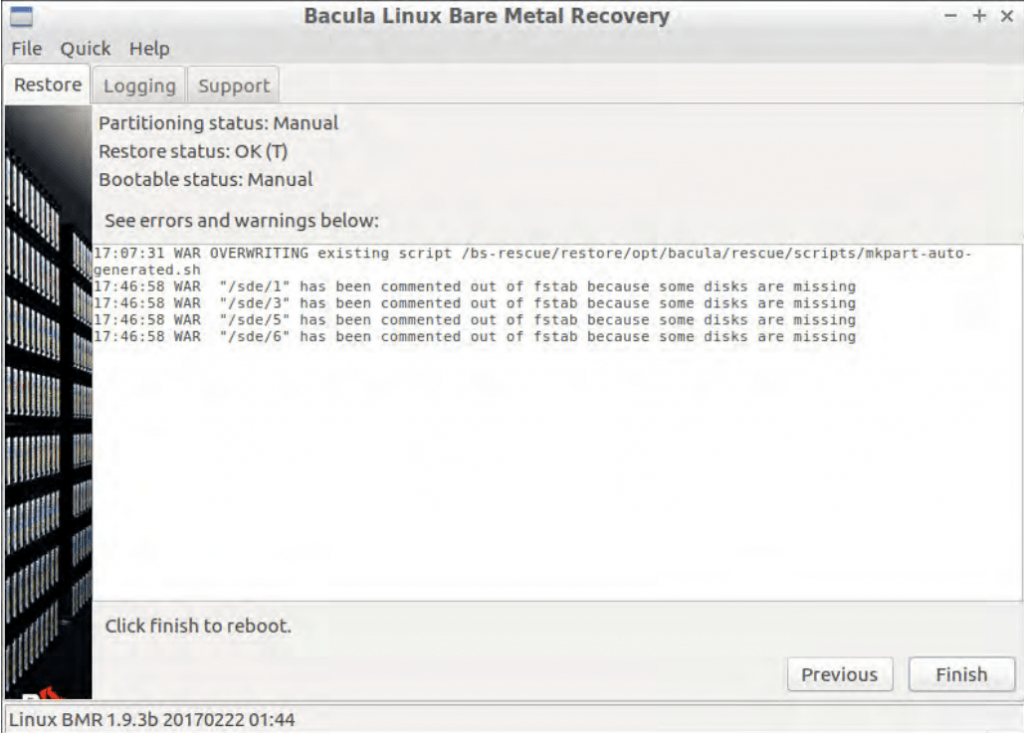
- The recovery process is technically completed now, but there are still a few more operations to go through. First of all, the picture below is the screen that is shown when the main recovery operation has been completed. It showcases a “success” message and a general log of errors and other issues that happened during the restoration phase, if any. The last step of the bare metal recovery process is to perform boot setup – it is done in a similar fashion to how partitioning could be done in the example above. It allows for two different approaches – automatic and manual. The automatic boot setup process allows the plugin to try and set up everything for the client, while the manual offers a high degree of customization to an experienced user to work with.

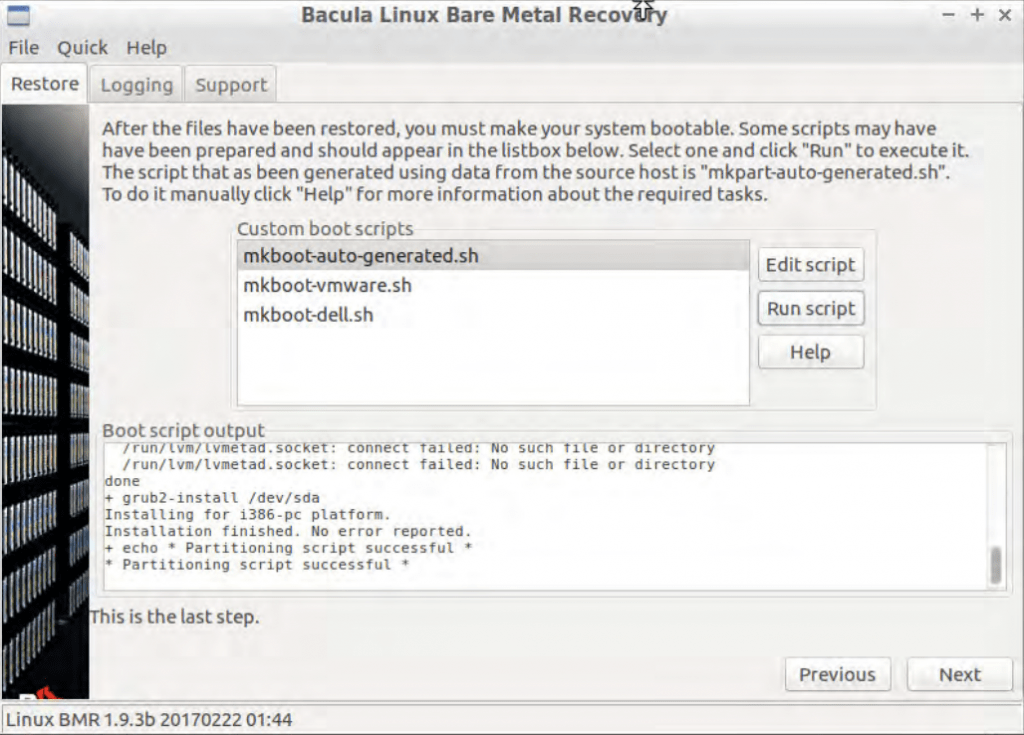
- If the automatic boot setup was chosen, the client then proceeds directly to the next, and final, screen of the Bacula wizard. If the manual boot setup was chosen instead, then the user would see the additional screen similar to how image #7 – with multiple boot scripts that can be customized and/or launched, with another segment of a window being delegated for boot script output results.

- Once the boot setup process has been completed, all users shall see the final screen of the Bacula Linux Bare Metal Recovery wizard, offering a list of errors and warnings that were detected during or after the recovery process. Clicking “Finish” is the final step of this manual.

Conclusion
Bare metal recovery is an essential part of any company’s disaster recovery plan – a set of guidelines and procedures created to mitigate or prevent potential data-related issues such as cyber-attacks, data corruption, data theft, and so on. A disaster recovery plan template is crucial to creating these plans since these plans and strategies tend to be somewhat complicated and may take a long time to create by hand from scratch. Bacula provides a solution that comes with an unusually broad set of features. However, what sets it apart from its peers is its additional scalability and exceptionally high security. This is the reason it is relied on by the most secure-conscious organizations, such as the largest defence organization in the West. More information on why and how to protect backup and recovery from attack is available here.


