Welcome to Scenario 3 of the Bacula Enterprise Hosted Trial! Bacula Enterprise offers users the opportunity to mix and match user interfaces to the users preferences whether this be GUI (scenario 1 and 2), command line with bconsole, scripting, or API. This scenario demonstrates using bconsole. bconsole is a Bacula command line administration tool that performs manual backup jobs.
Following the success of Scenarios 1 and 2, where we explored the fundamentals of backup and restoration using Bacula’s GUI, it’s time to take a deeper dive into Bacula’s powerful command-line interface, BConsole. This scenario is designed to demonstrate the flexibility and robustness of Bacula Enterprise in managing complex data operations through the command line.
In this scenario, you’ll experience the seamless process of backing up and restoring the “Cats and Dogs” datasets using BConsole. This hands-on exercise will show you how to efficiently manage data between different servers, ensuring both servers have complete datasets. You’ll get a feeling for Bacula’s robustness, efficiency and reliability in handling data across multiple environments, providing you with unparalleled control and assurance over your data.
Scenario 3: Backup and Restore “Cats and Dogs” to The Other Server Using BConsole
This scenario highlights Bacula Enterprise’s exceptional capabilities in data management through BConsole. You will learn how to perform backups and restores via command line, emphasizing Bacula’s versatility and power in various operational contexts. By the end of this scenario, you’ll be proficient in using BConsole to ensure your critical data is secure and easily recoverable across multiple servers.
Objective:
In this interactive scenario, our goal is to backup and restore the “Cats and Dogs” files using BConsole. You will transfer these files to the other server, ensuring both servers have both sets of data. This exercise demonstrates Bacula’s robust data recovery capabilities, emphasizing the importance of having a flexible and reliable backup strategy.
Highlights of this Scenario
1. Backup “Cats and Dogs” Using BConsole:
Begin by logging into BConsole. The command-line interface will provide you with a comprehensive set of commands to initiate the backup process. You will backup the “Cats and Dogs” datasets, ensuring they are securely stored and ready for restoration.
2. Initiate the Restore Process Using BConsole:
Execute the restore commands in BConsole to bring the “Cats and Dogs” files back to their original location on the other server. The command-line interface will guide you through selecting the appropriate restore points and destinations.
3. Verify Restoration on the Other Server:
Once the restoration is complete, navigate to the web root of the other server to confirm that the “Cats and Dogs” files have been successfully restored. You should see the files reappearing, demonstrating Bacula’s powerful data recovery capabilities.
Step-by-Step Instructions
1. Access BConsole from Bacula Trial Home
Navigate to the Bacula trial home page and click the BConsole button. Log in using the credentials provided: username `bacula` and password `bacula` (note that the password is not shown when typing).
2. Run a Backup Job by typing run

In BConsole, type `run` to initiate a backup job. This command prepares the console for job selection.
3. Type `5` to select the Linux All Files Fileset
.png)
Type `5` to select the Linux All Files fileset. This fileset includes all necessary files for the backup operation.
4. Modify Job Parameters by typing ‘mod’
.png)
Type `mod` to modify the job parameters. This step allows you to customize the job settings to match the scenario requirements.
5. Change the Client by typing 5
.png)
Type `5` to change the client parameter.
6. Select the Debian Client by typing 2
.png)
Type `2` to select the Debian client. This ensures that the backup job targets the correct server. The final step, repeated below in step 7 for clarity, is to type ‘yes’ to launch the job.
7. Run the Backup Job
Type `yes` to confirm the job parameters and initiate the backup. Periodically check for messages by typing `m` to monitor the job status.
8. Verify Backup Completion
.png)
Once the backup job is running, you can obtain its messages by typing `m`, verify the success message in BConsole (Backup OK). This confirms that the “Cats and Dogs” files have been successfully backed up. You can press m as little or as often as you like, all unread messages will be stored in Bacula’s buffer.
Now, lets restore the data backed up from Debian to RedHat
9. Initiate Restore Command
.png)
Type `restore` to begin the restoration process. This command initiates the restore operation within BConsole.
10. Select Restore Job Type by typing 5
.png)
Type `5` to choose the most recent backup for a specific client. This option selects the latest available backup for the client specified next.
11. Choose Debian Client for Restore by typing 2
.png)
Type `2` to select the Debian client. This step ensures that the restoration will be performed on the Debian server’s previously backed up data.
12. Enter File Selection Mode
.png)
After selecting the Debian client, you enter the file selection mode, similar to a shell environment, where you can navigate directories (`cd`), list files (`ls`), and select specific items for restoration by using mark (`mark`).
13. Mark Directories for Restoration
.png)
Use the `mark` command to specify directories to restore, e.g., type `mark /var` to mark the `/var` directory for restoration.
14. Confirm File Selections by typing done
.png)
Type `done` to exit file selection mode and confirm the files and directories marked for restoration.
15. Modify Restore Parameters by typing mod
.png)
Type `mod` to enter the modification menu for restore parameters, allowing further customization of the restore process.
16. Change Restore Destination by typing 5
.png)
Type `5` to modify the client setting of the restoration. This step is used to change which client the data will be restored to, this ensures the RedHat server will receive the data from the debian backup.
17. Select Red Hat Machine as Destination by typing 3
.png)
Type `3` to confirm the Red Hat machine as the new destination for the restore, ensuring the data is restored to the correct server.
18. Modify Restore Settings as described below the screenshot
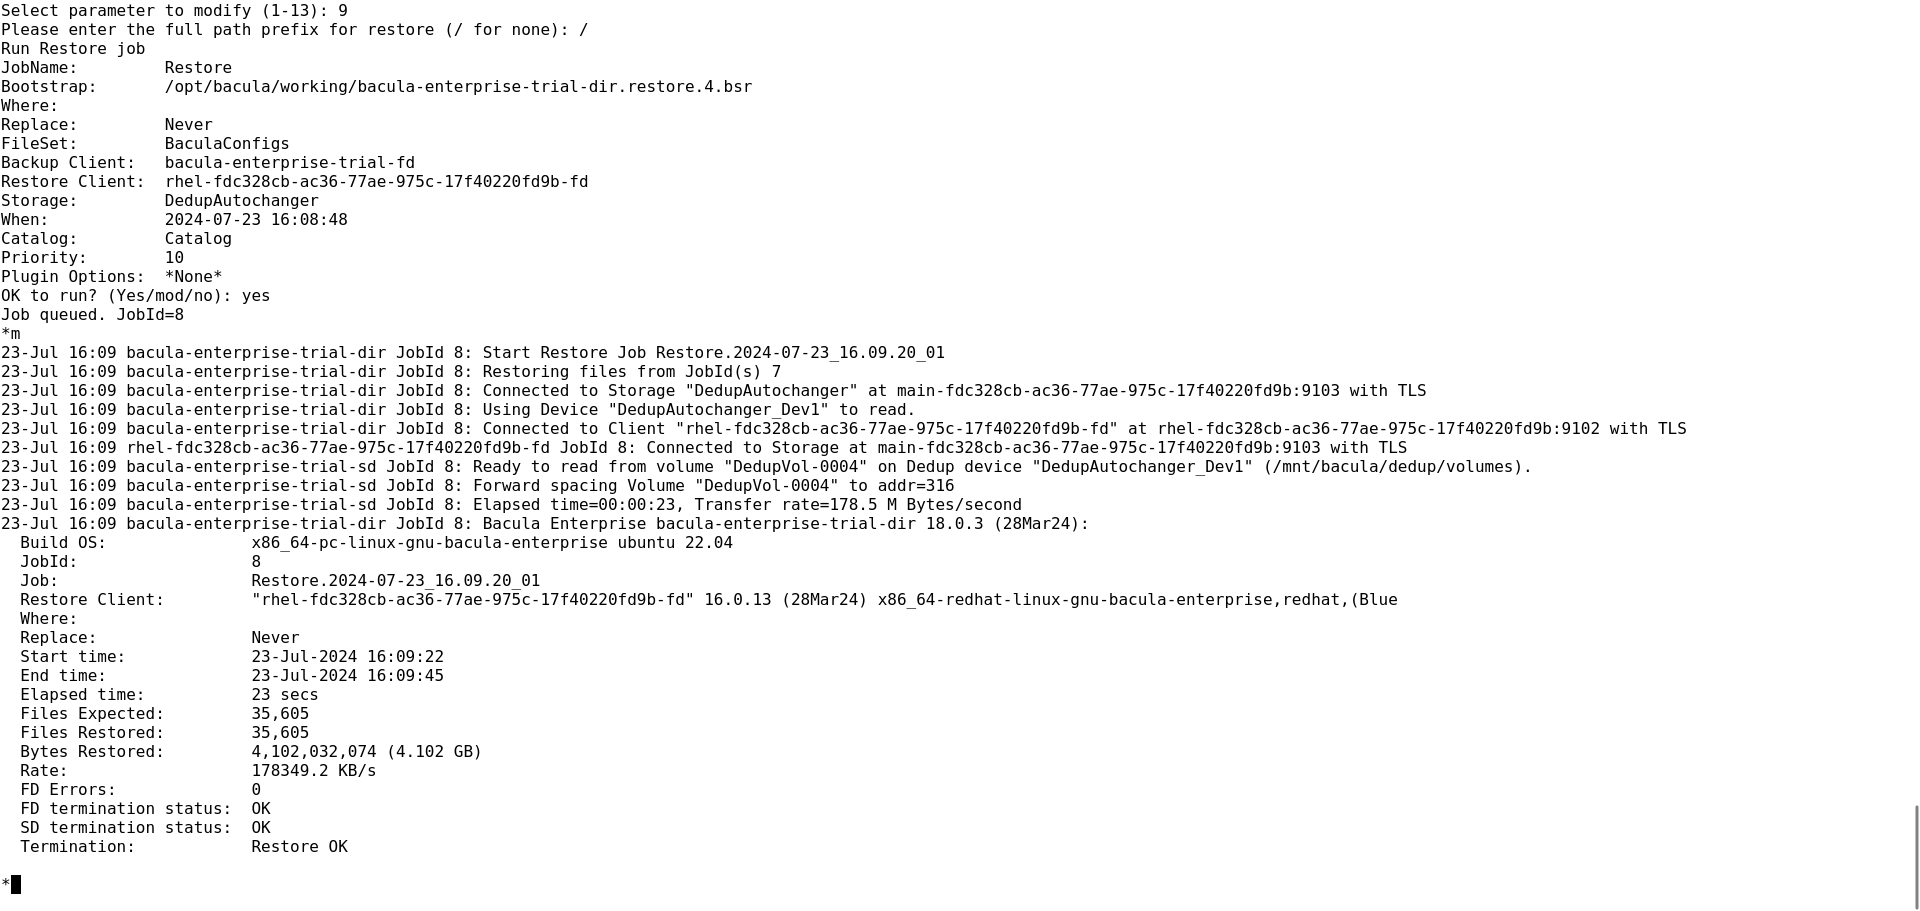
In this step, you’ll be modifying the restore settings to ensure that the data is restored to the original location on the server. Type `mod` to access the modification options. Next, you’ll need to specify which parameter you want to change; in this case, you’ll change the destination directory by typing `9`. When prompted, enter `/` to set the directory to restore to the original location on the server.
19. Confirm and Run Restore
.png)
After setting the restore directory, confirm your changes and prepare to run the restore job. Type `yes` to start the restoration process. This will initiate the job, and Bacula will begin restoring the files to the specified location.
20. Monitor Restore Progress
.png)
Use the `m` command periodically to check the status of the restore job. This command allows you to monitor the ongoing progress and ensure that the job is executing as expected without any errors.
21. Verify Restoration on Web Server
.png)
Once the restore job is completed, verify that the cat and dog data have been successfully restored. Access the RedHat server’s web root through the provided URL and confirm that directories such as `all_cats/` and `all_dogs/` are correctly reinstated, along with any associated functionality such as `delete_cats.php` and `delete_dogs.php`.
Congratulations on completing scenario 3 using Bacula’s powerful BConsole!